|
|
 Did we miss anything on this map? Is there something we didn't discover? Let us know!
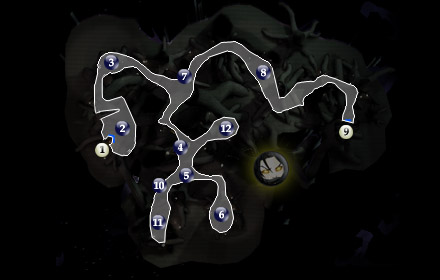
1 - Exit
Did we miss anything on this map? Is there something we didn't discover? Let us know!
1 - Exit
Exit to The Great Walkway (#9). Gorwooken will remain here at the basket to take you back up, unless one thing happens: you ally with Freyyr in the Lower Shadowlands. See #2 below for details. If he's not here, it means you've killed him, so activate the basket yourself.
2 - Calo Nord, Darth Bandon & Gorwooken
If this Star Map would be your second of five (including Dantooine), or fourth of five (including Dantooine), you'll meet either Calo Nord or Darth Bandon at this area.
If this would be your second Star Map of five (including Dantooine):
You'll fight Calo Nord and four of his goons here. This can be a difficult battle. Calo will likely begin by tossing a grenade and throwing on an energy shield of his own. Don't use lightsabers against him until his energy shield is broken. Instead use vibroblade-type weapons. Before you do anything however, buff your party up with stims or force powers as time permits. Begin the actual battle by tossing a few grenades into the fray; concussion work well here, and all his helpers will be firing their blasters. Since Calo is very difficult you can approach this in two ways but I found it easiest to dispose quickly of the enemies at his side quickly and one at a time before focusing on Calo, as he can down life-support packs. Have one of your party hang back and continue to throw grenades or attempt to incapacitate the others. Then focus all of your might on Calo. After the 650xp you get from killing Calo, his remains holds, among other things: a pair of Mandalorian Rippers, 2000+ credits and Calo Nord's Battle Armor.
If this would be your fourth Star Map of five (including Dantooine):
You'll fight Darth Bandon and two Dark Jedi here. This battle's difficulty varies from easier to much harder than Calo Nord, but is normally not as difficult. Darth Bandon wields a double-bladed lightsaber and will attempt to paralyze you and your party continuously. By the time you fight him, you should have powerful force attacks, weapons and stims of your own. Force Breach or Immunity can help immensely, and so do the Stun, Fear, Shock and Push line of attacks, though he resists the Stun series often. For this battle, I would concentrate on the two Dark Jedi at his side first, as they can be incredibly annoying with their own force powers, if Bandon isn't destroyed quickly. Included on his remains will be: a Double-Bladed Lightsaber and Darth Bandon's Fiber Armor and 3000 credits.
When returning from the Lower Shadowlands after dealing with Freyyr:
If you've killed Freyyr, Gorwooken will still be near the basket at area #1. However, if you allied with Freyyr (and chose the light side path), Gorwooken will be here with two of his Wookiee pals. This is not a difficult battle, but his cohorts like to throw gas grenades at you. As usual, good strategies are numerous; you can choose to deal with the non-substantials first and then the big Wookiee, the other way around, or whatever works for you.
3 - Jolee Encounter
A mysterious older gentleman is fighting some katarns. After witnessing his excellent 'saber skills, he'll tell you to meet him at his camp, southeast of there (at area #4). Follow him to his camp.
4 - Jolee Bindo, Coot
Speak with Jolee around the back of his fallen-tree-stump home, and he'll promise to help you find the Star Map if you first aid him by ridding the area of poachers. He strongly suggests you find a peaceful way of doing so and, as it turns out, there happens to be one. The poachers are at area #8 but if you want to be thorough, scan the area around #5 for a "malfunctioning droid" and area #6 for some good experience fighting katarns.
After taking care of the poachers:
Return to Jolee, tell him about the poachers (for 400xp) and Jolee Bindo will now join your party! Your next job is to head up past the now-gone poachers to area #9, where he will gladly help you pass the force field exit to the Lower Shadowlands. Jolee is level 6 so it's likely you'll have to level him up quite a ways, which can be fun. Being a Jedi Consular, he's got enough force points to be able to stand back in battle and cast useful spells like Stun, Throw Lightsaber, or any other useful spell. He's also likely to be a one-hander when you're done, as he's got both Dueling and one of its upgrades, giving him added incentive for using one weapon only.
5 - Malfunctioning Droid
Salvage the parts from the droid to recover its head, which implies that Eli Gand double-crossed Matton at the Czerka Landing Port (#4). This small window, perhaps, is your only chance to return to Matton and finish the quest, especially if you're playing as a Light Jedi. In the Lower Shadowlands, if you ally with Freyyr, Matton will not be at the dock any more. So if you want to complete it and you're not into killing, then head back up now. Sort of a pain, but the 638xp (nice round number, that) and 500 credits isn't bad.
6 - Katarn Encounter
There's more than a few Katarn in this area if you're looking for some quick xp.
7 - Wookiee Corpse
On this corpse (Rorworr's) is all the evidence you need to complete Woorwill's missing Wookiee quest back in Rwookrrorro Village (#8): a bolt casing and datapad. Be warned though, that you won't be able to complete it if you kill Freyyr later in the Lower Shadowlands (what you were sent to do by Chuundar). So if you're playing a Dark Side character, you might consider going back up now and completing the quest, as you'll be banned from the village later.
8 - Tach Poachers
Here you'll meet Commander Dern, who offers up a mini-quest within a quest. You can hunt the small critters in the area called Tach, and bring their glands back to him for a reward. He'll simply spray you with an offensive scent, and the tachs in the area will become hostile; you also won't receive Dark Side points for killing the Tach and taking their glands. However, if you wanted to avoid killing altogether but still wanted the tach glands (perhaps due to Mission's Brother Griff's Quest - see Tatooine, Czerka Office (#5) for details), you can open the locked metal containers here at the camp for the tach glands.
The poacher solution:
Ending this in bloodshed is easy but obvious ramifications apply, including Jolee not being exactly thrilled. The other way, gleaned from speaking with the various guards posted around the perimeter of the camp, is to shut down any two of the sonic emitters named "Czerka Sonic Device," one per guard. Simply talk to a guard and ask about him. Ask if there's any way to shut down the emitters. You can then persuade him that by shutting down the emitters, they all can leave. If that doesn't work, you can bribe him for 200 credits. Whichever way you choose, he'll give you the code to the emitter, so activate it, enter the code, and it will be shut down. Use the same technique for any other guard and they will all leave, chased by a tarentatek... a creature of the type you will likely encounter again. After they leave, you can return to Jolee to get him to join your party and receive 400xp.
9 - Exit
Exit to Lower Shadowlands (#1). Activate the force field with Jolee (see #4 above) in your party and he'll shut it down for you.
10 - Wookiee Corpse
The corpse will only be here if you've received the second part of the Genoharadan Bounty Quests from Hulas in East Central, Manaan. See East Central (#13) under the Rulan Prolik section for complete details on the quest. On the corpse, you'll find a datapad relating to the Wookiee at area #11 on this map named Grarwwaar. Your next step is to confront Grarwwaar about it.
11 - Grarwwaar & Rulan Prolik, Genoharadan Bounty
He will only be here if you've received the second part of the Genoharadan Bounty Quests from Hulas in East Central, Manaan. See East Central (#13) under the Rulan Prolik section for complete details on the quest. After defeating him, you'll need to proceed to area #12 to talk with then attack a Tach (hehe).
12 - Impossible Tach, Genoharadan Bounty
You'll only need to come to this area if you've received the second part of the Genoharadan Bounty Quests from Hulas in East Central, Manaan, and then after you've been to area #10 and #11 on this map. See East Central (#13) under the Rulan Prolik section for complete details on the quest. Speak with a Tach here, and attack it. One of them will be Rulan in shapeshifted form. Defeat him and then return to Hulas.
|
|
|


