 Did we miss anything on this map? Is there something we didn't discover? Let us know!
1 - Exit
Did we miss anything on this map? Is there something we didn't discover? Let us know!
1 - Exit
Exit to
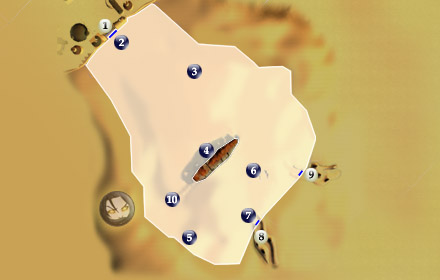
Anchorhead (#11). During your travels over the Dune Sea, seek out the corpses and rubble for Sand People encounters. Each group will have an "Elite" member who's remains include the Bantha Fodder required for a later quest in the Eastern Dune Sea, and Sand People Clothing, required for a peaceful entrance into the Sand People Territory.
Note for the PC version: each ambush by a Sand People group will include two Elite Warriors and one Holy Warrior (a little more difficult if my observations are correct). In my first game, none of these groups dropped the required Sand People Clothing or Bantha Fodder but rather other random items. Instead, I needed to kill all of the Sand People huddled at the bottom of the Dune Sea map at #7. All of these dropped the clothing and fodder. Beware of continually respawning Sand People on the west side of the area. When I moved back out and toward the east, they stopped spawning... though whether it was because of me or a set number that expired I couldn't tell.
2 - Marlena Venn & Genoharadan Encounter
Your first time here, Marlena will stop you here and state that she's got a nefarious surprise for her maligned husband Tanis (whom you might have met at the Hunting Lodge) out in the desert somewhere - see #3.
If you've completed the Genoharadan Bounty Quests from Manaan:
These Dark Side bounty quests are received from Hulas in Manaan's East Central (#13) location - see the link for complete details on the quest. After you've completed the bounties, it's possible that Hulas challenged you to a duel. This is where it takes place. Hulas will bring many allies to the battle, but you'll have to fight him alone, as per the rules. Of course, you may fight with your companions as well, as he also broke the rules, if you so choose. Before the battle, you'll have time to pop stims and utilize your force powers before you approach; that should help immensely. If you can stun Hulas, take him out first as he's the most difficult. If that's not possible, try taking out the others first and then Hulas. He's worth 750xp and you'll find some good items after the battle... items that you already have however. Again, see the link above for details.
3 - Tanis Venn, Philanderer
So here he is again (if you saw him at the Lodge), only surrounded by his own now-trapped droids. He'll ask you to kindly remove the traps on each droid, which are all types of brain teasers too difficult for him to figure out. He also mentions that you can make just one mistake; two mistakes will cost him his death. For those that are interested, his death and the malfunctioning of the droids may also bring with it some decent items...
Each droid labeled Droid K-X12a through Droid K-X12d has its own puzzle. If you have enough repair parts, you can simply reprogram the droids to take away the trap. However, with a little brainpower you can release him for free. Activate whichever droid you want, read Marlena's message for a laugh if you want, and select that you want to manually attempt to enter the diagnostics mode. You'll then be presented with a different puzzle for each droid. Once all four have been set back to normal, talk to Tanis for 400 credits and 175xp. Here are the answers:
Droid A: Node 2 is reporting accurately
Droid B: The missing value is 7 - (Sequence is of prime numbers)
Droid C: Allocate 120 large pulses
Solution Unraveled:
A fraction of Large Pulses + a fraction of Small Pulses = Total Energy
x/180 + 100/300 = 1
x/180 = 1 - 1/3
x/180 = 2/3
x = (180*2)/3
x = 360/3, therefore x = 120
Droid D: Enter 31-13-12-14 * 23-41-12-14
The solution is abstractly obvious yet makes perfect sense. It's ingenious:
The progression goes like this:
4,
14,
11-14
31-14
13-21-14
From this you get, 31-13-12-14 , 23-41-12-14.
The solution in each step is that you describe how many there are of each digit in the previous answer. So begin with 4 (could be anything here but that's what they started with). You have just one four. That's expressed simply as "14," because you have one four, hence the next answer. Now describe each digit in "14." You have just one 1, and one 4. So that's expressed as "11-14." Now describe that. You now have three 1's, and still just one four. So the answer is "31-14." Now describe that (in order of appearance by the way). You have one 3, two 1's and one 4 in that expression, which makes the answer "13-21-14." Finally, describe that and the next one, in order of appearance. You have three 1's, one 3, one 2, and one 4, equaling "31-13-12-14" and following that, two 3's, four 1's, one 2, and one 4, equaling "23-41-12-14," your answer.
If we were to extend it one further we'd have two 2's, one 3, two 4's, and three 1's, making "22-13-24-31." Got it? Hope so.
4 - Sand People Attack
Talk to the Mining Team Captain here and you'll activate three consecutive attacks by small groups of Sand People. Curiously, there's no real reward except for the experience. Be prepared as it's not the easiest encounter in the game, though you should have no problem by now.
5 - Four Desert Wraids
These monsters are tough (mainly because they hit for a lot of damage), give good xp, and you'll encounter them in several spots as you venture back and forth through the Dune Sea. The first time through, though, they'll appear here. If you have a Jedi with Stun (or better), it can help deter one or two for a bit while the others eek out damage. Search their remains for Wraid Plates that you can sell to Fazaa in the
Hunting Lodge (#2), or if you have the PC version of have downloaded the Yavin Space Station for Xbox, at the Yavin station for even more credits.
Note for the PC version: The wraids appear to be spread out and wander more than in the Xbox version, making it easier to take them one by one.
6 - Three Stooges Encounter
As you approach this crash site, you'll hear cries of help. When you investigate some of the wreckage, a pretty powerful grenade will explode, causing damage and spawning three ugly gamorreans (whom you might have met back at the Hunting Lodge) demanding 500 credits. You can actually fight them for no Dark Side point hit, but it can be difficult especially since you've probably been deeply wounded from the grenade. To counter that, have only one party member in solo mode search the wreckage away from the others.
For a peaceful solution, it's not very difficult to persuade these dimwits against attacking your party for free; tell them you'll tell everyone how smart they are.
7 - Sand People Guards
If you don't have Sand People Clothing donned on all of the non-droid members of your party, this group will attack you. To find the clothing and pass freely through the next map (Sand People Territory) without notice, simply search the remains of Elite Sand People members who you've probably encountered already, or pick a fight with these fine chaps and search theirs. One word of caution. If you are wearing the robes and attempt to communicate with them before you reach their enclave, they'll discover your identities and attack.
8 - Exit
Exit to
Sand People Territory (#1). Again, you can pass freely through the guards (if there's any remaining) if you have Sand People clothing on all non-droid members of your party. See #7 above.
9 - Exit
Exit to
Eastern Dune Sea (#1). You'll only be able to enter the Eastern Dune Sea if you've completed the Sand People Quests. If you're already here, then you've already been to the
Czerka Office (#3) for the details on the quest.
10 - Jagi Encounter
Jagi and a couple of thugs will only show up if you've received Canderous Ordo's Side Quest. See
Jedi Enclave (#2): "Canderous' Honor Side Quest" for details on how to get it started. When Jagi appears, he'll initiate conversation and begin blaming Canderous for things in the past. Fighting Jagi is easy - simply select the conversation topic to fight. You can also, however, persuade Jagi and Canderous to sort of come to terms with the past. Here's how.
The first chance you have, say, "I think you both need to calm down." This will get the ball rolling. Ask Canderous why he needs to fight Jagi. Then persuade Jagi that what he did was a smart tactical move. Next tell Jagi, when you have the chance, that Canderous may have saved other lives by doing what he did. After this, Jagi will not fight your party, but you'll be left with the two angry rodians. You'll receive 1800xp and Canderous will be affected by what happened. That concludes Canderous Ordo's side quest. Much later in the game, he may say more to you, but this is as far as you get with this side story.


