|
|
 Did we miss anything on this map? Is there something we didn't discover? Let us know!
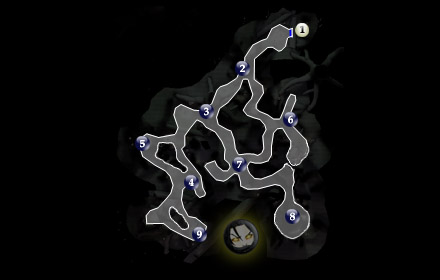
1 - Exit
Did we miss anything on this map? Is there something we didn't discover? Let us know!
1 - Exit
Exit to Upper Shadowlands (#9).
2 - Grrrwahrr's Mandalorian Quest
When you approach this area for the first time, Grrrwahrr the Wookiee is staving off three mandalorian brutes. Help him during the fight, and after it's over, you can choose to heal him through conversation for (LS Points). He'll let on about the mandalorian cowards in the area only attacking when others are unarmed, and then asks that you kill their leader. If you're interested, you'll deal with three groups of three mandalorian raiders, and in three different locations (areas #3, #4 and #5). It's a relatively easy quest that nets you a nice vibroblade and decent experience with the mandalorians. See #3 below to begin.
After you've killed the Mandalorian Commander:
Return to Grrrwahrr with his helmet for 350xp and a swell Echani Vibroblade, particularly helpful if you're playing the light side at the upcoming Star Map (in area #9).
3 - Mandalorian Ambush
Remove your weapons from each party member (as per Grrrwahrr's quest at area #2), and then walk around in this area. Alternatively, you can enter solo mode with just one of your characters unequipped and walk around. Either way, three mandalorians will uncloak themselves in ambush. Fight them in any manner you wish, and when they're dead, search their remains to find a couple of datapads explaining a little more about their purpose. If this is your first mandalorian ambush, proceed to area #4 for the next. If this is the second ambush for you, you'll have received the Swoop Bike Signal Device off the remains of one of them, which you'll use in area #5.
4 - Mandalorian Ambush
Remove all the weapons from each party member (as per Grrrwahrr's quest at area #2) and walk around this area. Or, unequip the weapons from just one character and use him/her in solo mode to walk around the area. You'll be ambushed (again if you've been following the walkthrough) by three mandalorians. Search their remains to find more datapads (as in the encounter at #3) and, if this is your second ambush, a Swoop Bike Signal Device to be used in area #5. If this is only your first mandalorian encounter, see #3 above before you approach area #5. Once you have the Signal Device, head to area #5.
5 - Three Parked Swoop Bikes
On the swoop bike furthest west, activate it and place the Swoop Bike Signal Device you received either from the area #3 or area #4 mandalorian encounters. Their commander appears, taunts you a little, and then it's all action. As there are only three enemies, you might consider ganging up on the commander first, and then dealing with his subordinates. However, another good tactic is to first incapacitate the other two using the Stun or Slow line, and then deal with the commander. Anything will likely work. Once their dead, check the remains, especially of the commander to find, among other things: Mandalorian Battle Amor and the commander's "Mandalorian Helmet" (non-equippable). Return to Grrrwahrr for your 350xp and shiny new vibroblade (see #2).
6 - Freyyr, the "Mad Wookiee"
As you approach Freyyr the first time, he'll attack, not trusting outsiders. When he's surrendered, you'll have the option to continue to kill him (of course), or ask him about Zaalbar and Chuundar, and how he can again become Chieftain. He'll send you on a quest to retrieve Bacca's Blade which is still embedded in the body of the Beast, found in the Ritual Area #8. You'll need to first lure the beast out, kill it, retrieve the blade and bring it back. To lure the beast, you can use the body of a Viper Kinrath, conveniently located in various spots around area #7. See #7 and #8 for more details on how to retrieve the blade.
After you've retrieved Bacca's Blade:
Bring it back to Freyyr, at which point you'll again have the choice to kill him for Chuundar, or give it to him and support his returning to Rwookrrorro Village to challenge Chuundar's leadership. If you kill him then, you can simply return (after the Star Map at area #9) to Gorwooken at the Upper Shadowlands (#1), and he'll take you directly to Chuundar. If you give the blade to Freyyr, you'll get 650xp and he'll tell you to meet him in the throne room (in the Chieftain Hall) where he'll have gathered the support of other Wookiees to challenge Chuundar and co. Your last step (if you've been following this) is to find the Star Map at area #9.
7 - Viper Kinraths
At this area, and around it, are several Viper Kinraths. If you've got Freyyr's quest (see #6 above) to get Bacca's Blade, search their remains to pick up a viper kinrath body and proceed to area #8, the Ritual Area.
8 - Ritual Area
Near the front of the area you'll see a dangling vine. If you've got the quest from Freyyr (see #6 above) to find Bacca's Blade, activate the vine and tie the viper kinrath body you got from area #7 to it. After a short cut-scene, you'll fight a tarentatek, a fairly powerful creature. Fortunately, they are very susceptible to force powers, particularly the Stun line. After it's dead, you'll automatically pull Bacca's Blade from its body.
Don't forget to search the beast's remains, as there's the journal of Guun Han, which relates to two other journals you can find (or have found). They both are on Korriban, in the Shyrack Caves (#4), and at the Tomb of Naga Sadow (#4). The one in the caves is Duron's, and Shaela's is in the Tomb. Reading all three, you'll learn the partial story of these explorers. There's a Jedi guarding the Jedi Enclave next to the Ebon Hawk landing pad that tells you about the Tarantateks and fills you in on some of the details of this story.
In the PC Version, you'll also find the incredible Circlet of Saresh head piece, having to do with Guun Han. Check it out.
9 - Computer & Kashyyyk Star Map
If you're able, disable the few mines in this area before talking to the computer. Approach the holographic computer figure, and talk to it. Through the conversation, you'll can learn a lot. Eventually the computer will evaluate you to see if you match a particular profile it has in mind and can have access to the Star Map. If Kashyyyk is the last, and fifth Star Map you'll have found, then it will positively identify you immediately and will give up the Star Map without any further process. However, if it is the fourth Star Map or prior, it will attempt to identify you with three questions. When you're ready, ask about the Star Map. Ask it how you can gain access to the Star Map. Ask what happens if you fail. Then ask it what rejection will mean. Finally, "You may begin the evaluation."
Here's where the light and dark paths will diverge. If you choose light side answers during the questions, you'll not match the profile it's looking for and have to fight two droids, although you will be allowed one "mistake" on the first question. If you choose dark side answers that make sense strategically, you will match the profile and get access to the Star Map without a fight. In actuality, fighting the droids gives more experience and they aren't very tough if you follow my advice below (or even if you don't). However, to get the most dark side points, you'll want to answer "correctly." Below is an explanation of each possible answer to its questions, and what the outcome is. There are only three questions. After the first question, you'll know whether you're on the right track or not with matching the profile it's looking for. Here are the scenarios:
Question 1, about Zaalbar and trust.
For (LS Points), answer that you trust Zaalbar to answer the same as you. During your follow up statement to this question, you can keep or throw away your light side points by attempting to change your answer. You'll then get one more chance to match the pattern (obviously dark side) during the next question.
For (DS Points), accuse Zaalbar. For even more, answer the immediate follow up with the second, dark side response.
Question 2, about the war and impending attack. This time you'll have three choices.
For (LS Points), answer that you'd evacuate the city. This answer will send in the droids to attack you.
For a neutral but "wrong" answer, tell the computer that you'd reinforce the city's defenses and prepare for attack. This answer will send in the droids to attack.
For (DS Points), answer that you'd attack in 10 days, and do nothing to the city. This is "correct" and will get you to question three. However, during the follow up to this question you'll get to remove some of the dark side points by supplying it with a light side answer - or actually increase your dark side points by reinforcing your position.
Question 3, same question without the threat of war. Also three choices.
For (LS Points), choose the answer that would save more lives. After this response, you'll be given one more chance. If you choose the "correct" answer, to let it happen, you'll shift back over to the dark side, be acknowledged as the one in the profile, be granted access to the Star Map and receive 2800xp! However, if you choose the neutral "I'd be a hero" response, you'll get the droids. Your best bet for light side points (and more experience) at this point is to simply state that you will take apart the computer and get the Star Map yourself, which will bring out the droids.
For a neutral and "wrong" answer, tell the computer you'd stop the attack and be a hero! This will immediately send out the droids.
For (DS Points), and the "correct" answer, choose that you would let the attack happen. The computer will acknowledge you and grant you access to the Star Map. You'll receive 2800xp and likely a large shift to the dark side.
For a neutral and "wrong" answer, tell the computer you'd stop the attack and be a hero. This will immediately send out the droids.
The Droid Fight:
If you've brought about two defense droids (as most people will likely have done), there's a very easy way to get rid of them. Use Jolee's Disable Droid force power. This will automatically do damage and stun both droids. You can bring in your other party members to help, but Jolee should have enough force points to continually cast Disable Droid enough times for them both to die. You'll likely get 550xp for each droid. When they're out of commission, talk to the computer again to get access to the Star Map and 2800xp.
|
|
|


