Did we miss anything during this quest? Is there something we didn't discover? Let us know!
This quest is the successor to
Bored to Death, and yet again involves everyone's favourite totally-not-copyright-infringing ghosts, Sam and Max... er, Max and Sam. To start this quest, you'll find Sam plainly visible in the Mourningwood cemetery. He tells you that his brother Max has ran off after they had an argument, and you'll need to bring him back.
Follow Sam back to where they had their ghost party earlier to find its sordid remains, and step into the crypt ahead after the door is opened. Inside is a large dungeon known as The Ossuary that's relevant to this quest, and contains a number of secrets as well. Upon entering, you'll see Max socializing with some other ghosts. Approach him and grab his hand, dragging him back out the exit. Before you can get him to leave, though, he'll fly away and up the stairs. You'll likely notice a new type of obstacle here: searchlight statues which summon in Hollow Men if you run into their light, so be sure to keep clear if you want to avoid battle. Before you go chasing after Max, check one of the crypts on the right side for a
Silver Key. When you begin to climb up the stairs, he'll send some Hollow Men after you, and thus begins a rather extended chase sequence with intermittent battles.
Continue up the stairs and you'll run into another Hollow Men encounter, so dispatch them with whatever means you desire. Before chasing ahead, make your way to the rear of the balcony and hop down the ledge to find another
Silver Key, then circle back around again. You'll fight some more Hollow Men past the
Gold Door, so smash them to bits, then grab the
Rare Book from the ledge of the balcony overlooking the chasm. Run forward and then across the bride, where a murder of crows will take flight, then literally attempt to murder you. Plunder the riches of the chest you see ahead, then vault down the ledge and you'll be on the other side of the Ossuary.
At this point, Max will start flying from point to point around the Ossuary and summoning ghosts to attack you. Interestingly, they're actually a lot easier to defeat than the Hollow Men, so smash your way through and chase him from tomb to tomb. As he nears the stairs down to the lower area, take a pause and climb up near the large tree to find a treasure chest at the end of the walkway, as well as an
Evil Gnome sandwiched between two crypts opposite the lamppost.
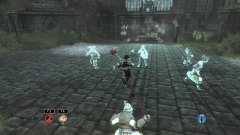
Circle back and run down the steps to Max, who's standing on top of a pedestal. He'll whine about his mommy issues for a little while, then summon a bunch of his ghost friends to attack you. They'll come pouring out of the crypts in waves, but as before they're little threat. They'll stop appearing after a few minutes, and Max will head deeper into the Ossuary, so chase after him.
Not far ahead, you'll be trapped inside a room by Max, who flips a switch, causing the ceiling to come down on you. Ouch! Yep, sorry, there's a force field there, nothing you can do. Game over. Was nice giving this walkthrough... okay, not really. Sam will appear shortly after and blather on stupidly while you face certain death, only for him to notice at the last second and stop the ceiling from turning you into raspberry jam. Well, that was nice of him. Continue forward in pursuit of Max. You're nearing the end, now.
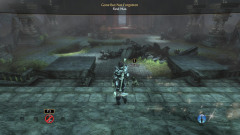 |
You'll enter into an open courtyard with a bunch of those spotlight statues you saw earlier. As before, being spotted means Hollow Men, so if you like, try to avoid them as best you can. There's no real method to getting through but it's not too hard to avoid being seen, though if you try to open the chests on the way, you'll likely end up fighting more Hollow Men. Whatever you try for, eventually you'll sneak or slaughter your way to the end of the courtyard, so head on through the door.
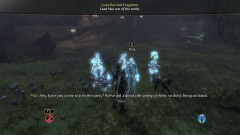
Inside the final room of the Ossuary, you'll see the Normanomicon from the previous quest protected by a large number of wisps. Max will complain again, and then take a seat at the giant skeletal organ, apparently playing some sort of magic song. The wisps will turn to human... er, ghost, form, and attack you. In addition, there's two of those spotlight statues inside the room, but unlike the other ones, they will reactivate after you kill the Hollow Men they summon in, so don't waste your time trying to deplete them.
 |
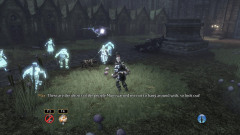
After the first wave of attacks, Sam will come in and tell you that to retrieve the book, you'll have to finish off all the wisps, and then try his first taste of alcohol, which is enough to deprive him of all reason. Lightweights. Anyway, now he'll start playing the piano, but you heard him, so keep attacking the ghosts that appear to dispel the barrier. A brief cutscene will play near the end, and the last wave will attack, which contains some ghost soldiers this time, but they're still just as weak as the rest of them.
Once the barrier's gone, take the book from the pedestal and you'll be treated to Max and Sam being scolded by their mother. Jeez, and I thought mine was cranky. For your help, you'll be treated to a little advice, and a somewhat more substantive 30 Guild Seals.