 Did we miss anything in this section? Is there something we didn't discover?
Let us know!
Background
Did we miss anything in this section? Is there something we didn't discover?
Let us know!
Background
Iorveth's quest starts from the two scientists you've met in Flotsam. This time around, they're handling a special job in Loc Muinne.
Walkthrough
The scientists (
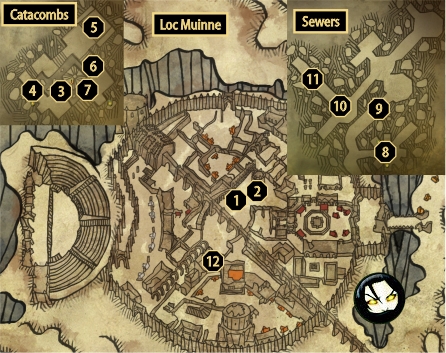
#1) are found on the main square, and after the mercenaries they previously hired failed to do their job, you can step in and accept the quest. Soon enough, you'll learn that they are going after a special laboratory (where a great mage named Dearhenna operated) and that their main employer is in fact, Cynthia, Philippa's apprentice.
They'll point you to an entrance to the sewers accessed below the tower at
#2. The room at
#3, entered by the middle door in the tower, contains a puzzle with resonating crystals. Do not try to hit them with sword as you'll only get damaged. Two of them will react on Aard and the other two on Igni, and once you light up all four of them, the door at
#4 will open.
Further down the hall, you'll find Forgotten Bran Sword, along with its guardian (
#5). The fight takes a bit longer than a regular one, because the Guard teleports to one of the upper ledges every ~20% of his vitality, spawning wraiths each time. First time around, he spawns two wraiths, the next time three wraiths and finally, four wraiths. Beware of his falling meteor spell while in the "wraith phase" and avoid his deadly fireball while fighting directly with him.
Killing the Guard opens another door at
#6. The following room has a lot of goodies in the large chests that you can loot after you deal with the wraiths that spawn every time you loot one of the chests. At the end of it (
#7), you'll find a door that leads back to the spiral stairs.
Take a walk upstairs this time and enter the first door you come across. You'll meet up with Cynthia (
#8) and her party, where she'll make you a deal. You can either refuse it and cut them all down (though the quest will fail) or you can go along with their plan to open the laboratory.
As you explore the cellars, you'll come across an ambush here (
#9), set up by greater rotfiends. The side rooms contain a few extra monsters with nothing of value apart from the experience and a few orens. After slaying the queen endrega, Cynthia will commend you on your work and the party will set out to
#10. After you meet up with them, you'll enter a cutscene where you'll overhear Redanian soldiers from the upper ledge talking about looting the graves in the same area.
Once you reach the end of the tunnel (
#11), the mages will inspect the place and Cynthia will dispell the illusion that conceals the door. The trap will pose a riddle to one of the scientists which he'll fail to answer properly, resulting in him getting torched. Once it's your turn to solve the riddle, the answer is "Fate".
As you head inside and open another door, you'll get to fight the Redanian squad that you overheard earlier. Pick up all the books on the tables that glow as the quest items (red sparkles). Cynthia will uncover another door with a riddle trap above it. It consists of three verses, where answers are "The Dragon Constellation", "The Full Moon" and "The Mine Entrance in the Mountainside", respectively. The fresco where you need to stand is directly to the left of the door as you face it.
Afterwards, the other scientist will get burnt and you'll meet a talking golem inside. In order to solve the situation without a fight, you'll need to ask the golem a few questions, while maintaining a non-invasive attitude - do not ask him for the name-word or trying to pull off an Axii on him. Once you've exerted all the dialog options (apart from the orange one, where you state that it's not going anywhere), say that you know enough to end the encounter without a fight.
You'll need to bring the golem to a paradox, and that is by saying that you're a guest, who came to talk about lies and delusions. In the end, you'll need to say that only the golem's and his master's will exist, which leads him into a paradox and he crumbles on his own. Search the room for Dearhenna's notes, a total of five pieces.
As you pick up three pieces, Cynthia will dispell another illusion, which reveals a large megascope artifact. The Nilfgaardian mage will immediately want it for himself. You're once again presented with a choice with the most logical answer being to try the device. Cynthia will keep her word and after you defeat Adelbert, you'll get to use it to peek into thoughts of one of your friends. After that, pick up the remaining two pieces of Dearhenna's notes and the quest will end, granting you 500 experience. You'll also automatically finish the quest Dearhenna's Journal and start A Tome Truly Rare.
Cynthia can be found staying at the inn at
#12. Talk to her about the expedition and you'll learn that the real reason why they were investigating the laboratory was to find a bacteria that could cause an epidemic disease, another weapon in the Emperor's asset. Either way, if you play your cards right during the conversation, you can "spend" some additional time with her. Afterwards, the quest A Tome Truly Rare will also finish.
1 - The Scientists
2 - Tower Entrance
3 - Resonating Crystals
4 - Magically Locked Door
5 - Forgotten Vran Sword, Guard
6 - Magically Sealed Door
7 - Exit to the Tower
8 - Cynthia's Party
9 - Greater Rotfiend Ambush
10 - Cynthia's Party
11 - Dearhenna's Lab Antechamber
12 - Inn


