 Did we miss anything in this section? Is there something we didn't discover?
Let us know!
Background
Did we miss anything in this section? Is there something we didn't discover?
Let us know!
Background
If you didn't sell Malget's notes to Dethmold, you can use them in this act to gain a free redistribution of talent points. The person you'll need to talk to first is Bras of Ban Ard.
Walkthrough
Bras of Ban Ard (
#1) will be just as astonished as Dethmold was when you showed him the papers. Unlike Dethmold however, Bras will tell you the real meaning of the scroll. Vran family used to keep their treasures guarded by certain sentries. As you approach the sentries with the scroll, a wisp appears and if you provide a correct password, it will open the door to the treasury.
Fair enough, he'll require a large sum of money (around 400 orens) to deduct a password from the notes you showed him. The other option is to Axii hex him, which is much more economic. You'll get a sentence which reads as the following:
"Nanna Kanpa Zi Uddu-ya Ia Ia Gat Exa Nanna Zi Uddu-Zi Gat Kanpa Nibbit".
Bras will then tell how to form the correct answer. Nanna Kanpa means "forge ahead", while Nanna Zi means "backtrack". When providing the password, omit this two lines and say the ones after Nanna Kanpa in their respective order, and the ones after Nanna Zi in reverse. So the correct password to sentry's question would be:
"Zi", "Uddu-ya", "Ia Ia", "Gat", "Exa", "Nibbit", "Kanpa", "Gat", "Uddu-Zi".
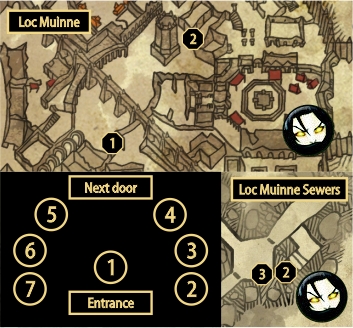
The sentry you're looking for is located at
#3 in the sewers. Pass through the entrance at
#2 and turn left. You should notice a wisp-like being that guards a sealed way. He'll ask you a question and you should answer it with the words written above. After providing the correct answer, he'll open a portal which you should enter. You'll come to a room with charcoals that represent a puzzle. Check the provided diagram. Each of the braziers affects two other ones in some way (either lit them if they weren't lit, or put them out if they were):
Brazier 1 will affect the condition of 5 and 7
Brazier 2 will affect the condition of 3 and 6
Brazier 3 will affect the condition of 4 and 6
Brazier 4 will affect the condition of 2 and 1
Brazier 5 will affect the condition of 3 and 6
Brazier 6 will affect the condition of 1 and 7
Brazier 7 will affect the condition of 2 and 4
Before starting, 1, 4 and 5 will be lit already. Save the game and then experiment with the braziers. The key is to light them all. One possible solution is touching 1 - 3 - 7 - 1. After you pass the puzzle. You'll reach a room with a being known as The Operator.
Depending on your dialog choices, you can either fulfill the prophecy of the chosen one (therefore getting a free redistribution of talent points) or deny the prophecy and fight the operator. Beware that this is probably the hardest fight in the game. Third option is to deny any involvement, which fails the quest.
Operator fight
Operator is essentially a mage character. He'll shoot fireballs at you and on every 25% of his health (meaning on 75%, 50% and 25%) he'll spawn two gargoyles. These gargoyles are more powerful than their normal versions. While they are alive he'll be shielded from all damage.
Use the pillars to your advantage. There's not a lot of philosophy with this fight as the space is pretty right. Hide behind the pillars when gargoyles spawn, but try to avoid being surrounded. Defeat them fast using Yrden and strong attacks. Also, be sure to use Quen all the time during the fight, as the gargoyles hit for up to 300 damage. Operator himself deals slightly less with his fireballs.
Once the fight is over, you can loot his corpse for Operator's staff, an interesting weapon, but still outclassed by best swords. He'll also have Dragon scales on him, which is one of the materials for Zerrikanterment.
Either way, when the quest is completed, a teleport will open to
#3.
1 - Bras of Ban Ard
2 - Sewer entrance
3 - Sentry and the portal to the secret room


