 Did we miss anything in this section? Is there something we didn't discover? Let us know!
Kaedweni Side of the Valley - Overview
Did we miss anything in this section? Is there something we didn't discover? Let us know!
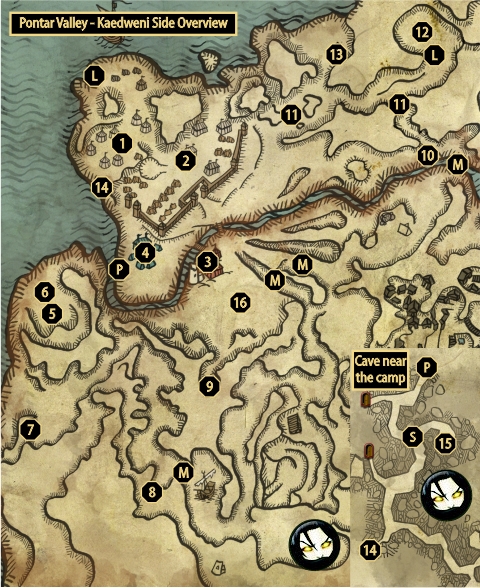
Kaedweni Side of the Valley - Overview
This map contains all the points of interest on this side of the mist. The camp itself with the small camps outside is large enough to get its own map. Any quests mentioned in the descriptions are explained in greater detail on their pages.
1 - Upper Kaedweni camp
This is the part of the camp where King Henselt resides, along with the sorcerer Dethmold and sorceress Sile. It is also a temporary home to many wealthy merchants and veteran mercenaries, such as Adam Pangratt.
2 - Lower Kaedweni camp
This is the part where the soldiers reside and contains crafters, merchants, dice poker players and arm wrestlers. It is also a starting point for several quests. The area is covered in more detail in Kaedweni camp overview.
3 - Brothel camp
This caravan outside the camp has a few vendors along with prostitutes and Dandelion of course. Mysterious merchant is right up at the base of the old tower.
4 - Roche's camp
Blue Stripes and Roche have set up a camp at this area, where they train all day, share jokes and have fun. You can fist fight with them during the quest
Against the Blue Stripes. After finishing your fist fights with the Blue Stripes, a Kaedweni soldier will taunt you into fighting him, starting a quest
A Score to Settle.
5 - Sabrina's pyre
Sabrina's pyre is the main location where
The Blood Curse quest takes place. This is where Kaedwen king condemned the sorceress Sabrina Glevissig to a pyre and she retaliated by uttering a curse. King Henselt and you will come over here to try and lift the curse once ready in the later phases of the quest.
6 - A pair of soldiers
You'll meet the two soldiers required for the side quest
Lost Lambs given to you by Zyvik. You'll learn that they're here only to investigate the pyre.
7 - Hut on the cliff
During the quest
Little Sisters, you'll learn that a great healer Malget lived here long time ago. You'll be able to pick up his notes in the basement of the hut, which you should keep for Act III.
8 - Hideout of the kingslayers
Much later in the act, during the quest
The Assassins of Kings, you'll have to search for their hideout, which is located over here. You can't open it until then.
9 - Hostile troll
Besides the friendly trolls, there's a hostile troll in this ravine which is useful for obtaining the
troll's trophy which grants amazing +9 damage. Fighting a troll isn't too hard. Use your Quen to protect yourself and entrap him with Yrden. Then get behind his back and whack him with strong attacks.
10 - Bounty hunter
Just like in the first act, a lot of people believe that you killed the king and they're trying to collect the bounty on your head. There will be a mage here along with three soldiers. He'd like to bring you in alive, but will satisfy himself even with your cold body. The mage can make the fight slightly more challenging, but then again, it's nothing you can't handle. Afterwards, you can loot them for a piece of paper called arrest warrant.
11 - Kaedweni soldiers
Once you're given a task to visit the Visionary during
The Blood Curse, either of these areas will be populated with soldiers fighting rotfiends. Their deaths won't matter much to the quest though, except a few dialog lines for the Visionary.
12 - Arachas
You'll find another arachas over here. Defeat it like in the first act, using Yrden and Quen, along with a silver sword. After you defeat the best, loot a nearby corpse for a good steel sword called
Arbitrator.
13 - Hermit's hut
Over here you'll find the hermit once you're on the quest
The Path to Visionary. He doesn't appear until then but you can still find his notes in the house.
14 - Cave Entrance
This cave isn't exactly connected to any quest, but it has interesting sites in it. There are a lot of rotfiends in the caves, along with a lonely bullvore and a magic golem at
#15. The cave has several exits but they are mostly leading towards the shores which are blocked by the sea. You'll also find Odrin in front of the entrance here once you're on the quest to search for him.
15 - Magic golem
This golem can be quite difficult to defeat, but once again use Quen and Yrden until you trap him and then get behind and attack him with strong attacks. Try to avoid its charging attack. After defeating it, you'll find
Armor of Ban Ard on one of the corpses nearby, along with other minor treasury.
16 - Kaedweni outposts
There are a few camps outside the main encampment which are constantly besieged by rotfiends. They are not quest related and are there just to help a bit against the onslaught of monsters.
M - Mist entrance
You shouldn't really enter the mist before doing being on the right quest to do so. It is populated by a swarm of wraiths which deal over 300 damage and have a lot of health. You may kill them, but if you're new to the game, it is advised not to even try.
L - Circle of Life
Red cross - Grants +2 vitality regeneration out of combat / + 1 vitality regeneration in combat
S - Circle of Strength
Sword in a red frame - Grants + 20% melee damage
P - Circle of Power
Reversed blue triangle reminiscent of sign icons - Grants 0.2 sign intensity and 300 duration.


