 Did we miss anything in this section? Is there something we didn't discover?
Let us know!
Background
Did we miss anything in this section? Is there something we didn't discover?
Let us know!
Background
This quest is mutually exclusive with
The Floating Prison. You'll receive it after choosing to go with Vernon Roche during the
At a Crossroads: Vernon Roche.
Walkthrough
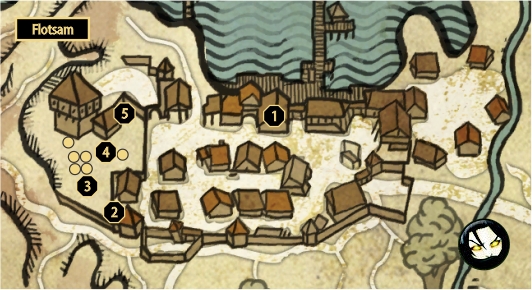
Roche will explain his plan to you and the Blue Stripes inside his residence at
#1. The whole plan boils down to capturing the Kaedweni merchant, kill Loredo and get out of Flotsam. Ves will act as a prostitute to get inside Loredo's quarters and open a window for you. That way you'll gain the element of surprise so you can sneak around and disable all the guards on the way. Anyhow, your first stop is at
#2 where you'll find ladders.
Once you're over at
#2, Roche's commando will tell you to come back after dusk. Meditate until after 20:00 and then climb the ladder. Drop down into the bushes and soon enough you'll see a man (
#3) with a torch walking around. That's the merchant Roche was talking about, so either avoid him or, a far better option, disable him with a stunning hit in the head from behind. Red dots on the map are the guards if you prefer stealthy methods.
After dealing with him, you should find Helen. That's the prostitute which ran away from him. Note that it doesn't matter much how you deal with the soldiers in the yard. You can either kill them all in an open fight or knock them down/avoid them. Events in the house will be the same. Helena is located at
#5. You can acquire the key from the guard patrolling nearby (
#4), or jump over the wall.
Talking to Helena reveals a few mother details about Ves' whereabouts and that Loredo's mother has the keys to the top floor. Jump up the platform behind Helena and enter the building through the window. If you still want to keep it stealthy way, make sure not to walk past anything resembling a bucket or a bottle as the noise they make when moved around will wake up all nearby guards.
Move into the next room, stun the guard and find Marietta. Once you encounter her, you'll ask for the key. She's an insane fisstech distiller and will mumble something about Ithline's prophecy while supposedly searching for the key. She'll instead spout fisstech from the table into your eyes, and a QTE will occur. Press the required button (left mouse click) or you'll die. Once she's dead, have a look around, loot the keys and proceed upstairs, without alarming any guards. You'll also get to see what's happening with Loredo and Ves in a short cutscene.
Next room is pretty hard to deal with in a stealthy fashion, so you might just as well skip it and continue upstairs. If you feel like clearing it all out, wait for one of the guards to come out of the room and start looking through the window. Then stun him and deal with the other two when they aren't looking.
The room on the upper floor should be full of sleeping thugs. Carefully move to the other side to reach a chest which has the key to the room above. Be mindful of the bottles and buckets, do not kick them around.
Once you enter the room, you'll see Ves tied and screaming that it's a trap set by Loredo. Another QTE appears with a left click button to dodge Loredo's halberd attack. Fighting Loredo can be hard at times, in a small space and his large reach of the halberd. Use Quen and Yrden/Aard along with your steel sword and he should go down in no time. His loot consists of Royal Mail key (quest
Mystic River, though it should be obsolete if you took much faster route with Louis Merse's key) and a few other minor items, including
Shiadhal's Armor.
Untie Ves and proceed into the next room. You'll see an elven woman by the name Moril, one Cedric told you about. She's been kidnapped by Loredo a year ago and impregnated nine months ago. Ves and you will try to get her out of there, but things will drastically change.
On your way down, she'll start giving birth and you'll have to improvise. Ves will tend to her while you defend them from incoming attacks. Defeat all the soldiers. They are really easy as they have low health. Once that's done, move into the courtyard where you'll see a fight between the thugs and the Blue Stripes. Once the fight subsides, he'll explain the reason why he was late. Apparently he had a duel with Iorveth which he won, but had to run away because his archers were coming close.
After that, Ves will show you the baby, stating that it's a boy. You'll then explain to Roche who Moril is and who's child is that. One of Roche's commandos will comment that he'd never touch a she-elf to which you may react (left mouse button) and slap him. You'll prepare to leave and the boy will be taken to Seherim in Lobinden. Moril commits a suicide though, as she couldn't live with the fact that Loredo made her a child.
Following these events, Roche, Ves, the rest of the crew and you will prepare to embark on a travel to Aedirn. The quest ends with 1750 experience points. This also marks the end of Act I and sets you on Roche's path for Act II. Congratulations!
1 - Blue Stripes & Roche
2 - Ladders (after 20:00)
3 - Merchant with a torch
4 - Guard with a storage room key
5 - Helena & the entrance to Loredo's building


