 Did we miss anything in this section? Is there something we didn't discover?
Let us know!
Background
Did we miss anything in this section? Is there something we didn't discover?
Let us know!
Background
Lifting the curse manifested in form of a mist that engulfs the middle of the valley will require four artifacts symbolizing war. One of such artifacts is the Dun Banner Standard, found in the dwarven catacombs.
Walkthrough
To get this quest, talk to Philippa Eilhart, who can be found at
#1 in her house. Ask her about the war artifacts and she'll tell you about the artifacts that you'll need. She'll take care of courage and faith, while leaving you to get death and hatred. Either way, your next step is Cecil Burdon, who knows a lot about the area and might be able to help you.
Cecil (
#2) is a veteran of the battle that happened three years ago. He'll tell you all the details about it, including how it started, who was winning, and how it ended. Sabrina cast a powerful firestorm in the end which killed everyone at the end, even the Kaedwenis with whom she was ally. He'll also tell you about the Dun Banner unit, whose standard is located in the dwarven catacombs (
#5) in the north.
To reach it, you'll have to traverse the small tunnel at
#4 first. Before going though, grab the surgical tools from Felicia Cori (
#3), as you'll be able to use them on a corpse found in the catacombs for another quest (
With Flickering Heart).
Once inside, you're free to examine the corpses if you wish, though you'll only summon the wraiths which spawn if you meddle with the dwarven bodies. Your main goal is to reach
#9, but before heading there, you might wish to take a look at the other rooms as well. Most of the rooms are blocked by walls which can be destroyed by using Aard.
Aard walls are marked with
#A not to clog the map with a bunch of numbers.
In the room marked with
#6, you'll find an interesting sword called Fate on one of the corpses. Over at
#7, you'll find additional lore on the Wild Hunt from the investigator's notes on the embalmed corpse. On the elven corpse at
#8, you'll recover a metal scrap if you bought surgical tools from Felicia in Vergen.
The final room (
#9) contains the ghost of Ekhart Henessy, the standard bearer of the Dun Banner. He'll ask you a few questions regarding the battle that took place three years ago. You can either try to deceive the specter and represent yourself as of the Dun Banner and answer all the questions correctly. The ghost will dissipate, leaving you with the sarcophagus which contains the items you need for the quest. On the other hand, you can also opt to kill him, and the ghost will attack you. The answers for his questions are these:
"You got it wrong." - Correct him about the positions from which the northern armies fought the battle
"Menno Coehoorn." - The name of the chief Nilfgaardian commander at Brenna
"Coehoorn is dead." - State that he won't be able to attack the North again because he died
"Vandergrift and Seltkirk." - Names of the northern army leaders
"Biggerhorn took me prisoner." - That's how you apparently "survived" the battle of Brenna
Also, if you've already completed
Baltimore's Nightmare, you've probably received Beaver cap and if you played Skalen Burdon in dice poker (three times), you could win Dun Banner cloak. These two items will enable you to make two mistakes if you're trying to figure out the answers on your own.
Either way, the sarcophagus nearby contains the items that you need: the standard for the quest, and a
Sword of the Dun Banner. The quest is completed and you can return to the other matters at hand.
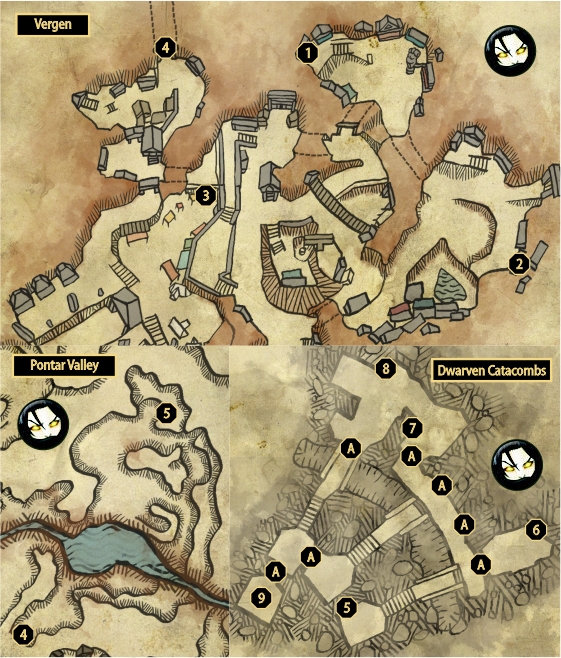
1 - Philippa Eilhart
2 - Cecil Burdon
3 - Felicia Cori
4 - Tunnel to the north
5 - Dwarven catacombs
6 - Silver sword Fate
7 - Wild Hunt Investigator notes
8 - Elven body (With Flickering Heart)
9 - Ekhart Henessy


