 Did we miss anything in this section? Is there something we didn't discover?
Let us know!
Background
Did we miss anything in this section? Is there something we didn't discover?
Let us know!
Background
This section of the walkthrough will cover all three main quests related to the kayran monster because splitting them up may become confusing for the reader. These quests are
The Kayran,
The Kayran: A Matter of Price and
The Kayran: Ostmurk.
This main quest is probably one of the most prominent in Act I, as it culminates with a challenging boss fight. It is started right after
By the Gods - Stringing Up Sods is finished, on the docks, in conjunction with the main quest
The Kayran - A Matter of Price. Just like a classic witcher's work, removing the threat from the rivers of Flotsam isn't free.
Walkthrough
As you get out of the tavern with Triss right after chatting with Zoltan and Dandelion, you'll notice a giant tentacle on the docks (
#1) swinging around and then getting back in the water as it gets hit by Sile's fireball. Talk to Sile and you'll get some general information about the beast and she'll also be your ally against it when the fight comes later on. During the conversation you'll notice Triss turning pale a bit. You can point this out later, once you're on your way to meet Cedric.
Since you've also received
The Kayran: A Matter of Price, you could go visit the merchant now and forge a deal about your payment right away. The merchant you're looking for is located at
#2. While talking to him you can persuade him for a double fee. Using either intimidation or Axii will yield results, though it is recommended that you use Axii, because it will open up an additional ability called Haggling later on. You can also make this deal later, as long as you do it before you fight the beast, but doing this right now saves up some time.
Also if you didn't read a book on kayrans so far, check on Einar (
#3) for a book called
The Kayran - A Monograph. It contains a lot of information on the beast.
Next, head for Cedric who can usually be located on the tree tops (
#4), or around a nearby campfire. Before reaching him though, Triss will bump into you and you can have a chat with her about Sile and further involvement with the kayran. Anyway, talking to Cedric reveals additional local lore on the monsters and its possible whereabouts.
He tells you that the beast which he calls "The Old Man" has grown much bigger than before, and that it caused a lot of shipwrecks due northeast in a swampy terrain. He also suggests that you should investigate that area if you plan to find anything related to the monster which might help you fight it. Triss opens up a portal to the place, leaving you to get there on foot. Have no worries though, journey to that place isn't so perilous.
Cedric also points out that he can make excellent traps which can help you fight the monster. Those are quest items called
Kayran traps, made from a
Diagram: Kayran trap that you can purchase from Cedric. They aren't necessary but they can make the fight easier if you get them. Note that one of the items needed to craft it is found only in Loredo's compound behind his house once you trick his guards (can be entered at
#5 during the main quest
Indecent Proposal). Note that making these traps is entirely optional and is not necessary at all to defeat the kayran.
Next step takes us to the swampy terrain around to the northeast. Once you meet up with Triss at
#6, head over to the shipwrecks a bit to the north. You'll be fighting a group of drowners as soon as you descend into the swamp (which is the kayran's lair). The item you're looking for is located at
#7 in one of the cocoons and it's called kayran's mucus. Triss will cast a diagnostic spell and you'll learn that this particular kayran has mutated from some disease, which made him much larger than an average-sized kayran, after which she'll teleport out of the area.
Examining the mucus will automatically open up a new quest called
The Kayran: Ostmurk. Since the kayran's acid breath is highly venomous, you'll need a good poison protection before fighting it. Therefore this quest is devoted to making the right potion to negate poison attacks. Its primary ingredient is a herb called ostmurk, which favors wet surfaces. The only location where it can be found is
#9. You can talk to Cedric (
#4) about it first, or you don't have to.
While you're in the area check out the shipwreck at
#8 and loot the captain's body for a key to open a chest on the other side of the wreck. Loot the captain's log and captain's report. This initializes the side quest
Mystic River, which is further discussed on its own page.
Once you reach the waterfall at
#9, go directly behind it to enter the obscure cave. It is largely infested with nekkers, so be ready for some heavy action. At the end of the cave, you'll come across a new type of enemy, greater rotfiend. It is best dealt with using strong attacks. Once you kill it, make sure to move away from the falling corpse as it creates a poisonous cloud, much like bloodzuigers in the first game. Loot the ostmurk (bright blue glowing moss at
#10) then and meditate to create a potion called
Mongoose, which you'll keep until you're ready to fight the river monster. This step is also optional, you can defeat the kayran without it, but it is highly recommended as you'll take a lot of damage if its acid spit catches you.
Once you feel like you're ready, head over to Sile at
#11. Her room is located above tavern, reached via the stairs. After a bit of chatter, you'll automatically move to
#6. She'll be casting spells from the ruined bridge nearby, while you should head down to the swampy land (
#7) which will trigger the boss fight. Before doing so, drink the Mongoose potion, along with any others which you might find useful (Swallow is recommended, along with Rook).
Boss Fight
There are a two main tactics with which you can approach the kayran. When it raises its tentacle, it means it's going to attack the area where you were standing when it was raised. Immediately dodge or run sideways to avoid getting hit. Use Quen intensively to help you out if you're getting hit. During the fight it'll also use a poisonous spit, which if you get caught in will immobilize you. Freeing yourself out of it requires rapid left mouse clicking.
The first tactic makes use of the kayran traps. Once you fight with the kayran, place the trap on the ground and lure the monster into attacking you over the area where the trap is located. If it hits the trap, that particular tentacle will immediately be cut off. Repeat this two to three more times and then move onto the QTE phase. Only the two leftmost and two rightmost tentacles can be trapped.
The second tactic is using Yrden sign instead of the traps. In the very same manner, coordinate yourself properly with your Yrden traps and then once you immobilize the tentacle, get up close to the bright orange spot and bash it with your silver sword. This way you'll cut off the tentacle if you're fast enough (which shouldn't be a problem if you have a good silver sword). Repeat this at least two more times and proceed to the QTE phase. Again, the two middle tentacles cannot be trapped.
After cutting off at least three tentacles, next phase commences. Another attack gets added to kayran's arsenal, and that's the sweeping attack. It will require you to click a right mouse button during the QTE when it occurs. Once you're up on the tentacle start slashing it by rapidly clicking left mouse button, and when the bar fills, the tentacle will shake violently, starting another QTE. Press space button when it happens.
As you could notice during the fight, during its violent swings, the kayran destroyed the bridge ruins even further. This causes the bridge debris to partially fall onto it, while also forming a path which you can walk on. Turn on your Quen shield and then carefully move upwards towards its head while avoiding the tentacle attacks through constant dodging. Once on top, Geralt will finish the job himself. Congratulations on beating your first major boss encounter!
Finishing Up
After defeating the boss, quests
The Kayran and
The Kayran: Ostmurk will get completed automatically. The first one grants 1750 experience, while the latter gives a new ability called
Strong Stomach which adds 10% resistance to poisoning critical effects. Looting the kayran, besides ingredients, gives an excellent trophy:
Kayran Trophy.
The only thing left to do is to simply get back to the merchant (
#2) to get your reward (1000 orens, or 500 orens if you didn't persuade him for a double fee) and complete
The Kayran: A Matter of Price. If you persuaded him for a double fee using Axii, you'll get the
Haggling ability, which reduces all prices at merchants by 20%. You'll also get a diagram for the best armor available in Act I:
Diagram: Kayran Skin Armor. The armor made is
Kayran Carapace Armor. The main ingredients are, of course, looted from the kayran's corpse.
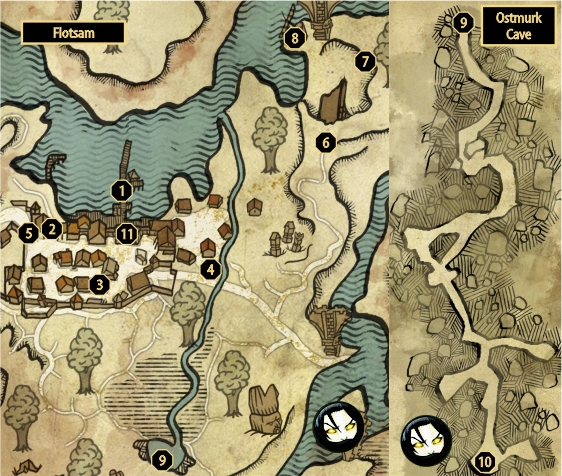
1 - The Docks
2 - Merchant in purple clothing
3 - Einar Gausel
4 - Cedric
5 - Loredo's estate
6 - Triss, Sile (later in the quest)
7 - Shipwreck with kayran's mucus
8 - Shipwreck
9 - Cave behind the waterfall & ostmurk
10 - Ostmurk
11 - Sile de Tansarville


