 Did we miss anything in this section? Is there something we didn't discover?
Let us know!
Background
Did we miss anything in this section? Is there something we didn't discover?
Let us know!
Background
Triss (#1 or #2) will give you this quest at the end of the quest
Lock and Key.
Walkthrough
Triss will send you over to Leuvaarden (#2), who will tell you that you'll need to raise an army to defeat the Salamandra. That means you'll either need the assistance of Yaevinn and the Scoia'tael or Siegfried and the Order of the Flaming Rose. Triss will also list Velerad and the city guards as an option, but Velerad will always say "no" if you ask him.
You won't be allowed to ask the Scoia'tael or the Order to join you until after you've completed the quest
Gold Rush, and then you'll have to pick the same faction for this quest that you picked in
Gold Rush (the other faction will be miffed at you). If you triggered this quest before
Gold Rush, then you'll be able to ask Siegfried or Yaevinn to join you at the end of
Gold Rush. Otherwise, you'll have to track them down. You'll find Siegfried at the Order Cloister (in the
Temple Quarter), just like normal, but Yaevinn will be in Vivaldi's house (also in the
Temple Quarter) rather than in the Druids' Gove (in the
Swamp Forest).
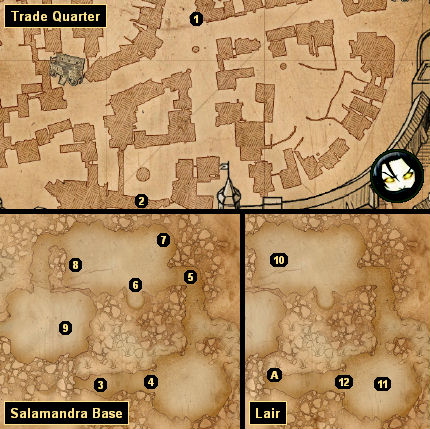
With an army to back you up, you'll next need to update Triss on your progress. You'll find her in her house (#1), even if it's nighttime, but she won't want to hear anything from you unless you've already completed the quest
The Source. At that point, she'll agree to set up a meeting at the New Narakort Inn (#2), but be warned: proceeding in the quest now will lead you to Chapter IV, and so you should complete as many quests as possible before entering the inn.
When you enter the New Narakort Inn, you'll have to fight a battle. If you killed Vincent Meis earlier in the chapter, then you'll face some of his men here. If you spared Meis and cured him, then he'll show up with some of his men and help you defeat some Salamandra warriors. If you spared Meis but didn't cure him, then he'll show up as a werewolf and help you with the warriors. The battle shouldn't be difficult if Meis is with you, but if you killed Meis then you might need to buff up first.
Upstairs, the meeting will start, but almost immediately Count de Wett will show up with the king's forces, and Triss will teleport you into the final Salamandra base (#3). You'll have to use the Aard sign to blow away some roots (#4), and you'll have to fight some Salamandra soldiers, but eventually you'll hook back up with Siegfried or Yaevinn (#5), depending on which one decided to help you.
Your ally (Siegfried or Yaevinn) will tell you about Alvaro's Portal (#6), which you'll need to activate to allow your army to reach you. The portal can be activated using a
Power Stone. You might already have such a stone from the quest
Lock and Key. If not, then you'll find one on the Salamandra mage in the nearby alcove (#7). Also in the alcove, you'll discover a Circle of Waning Magic, which will give you (or temporarily improve) the Yrden sign, and a
Sun Rune in a crate.
On the opposite side of the cavern (#8), you'll find the Professor and Azar Javed. They'll be standing next to their own portal, and they'll have a forcefield surrounding them. They'll also have some soldiers there to protect them. You can attack the soldiers if you want, but if you do then more will show up and so you won't really gain anything.
To get to the Professor and Azar Javed, you'll need to activate Alvaro's Portal (#6). That will cause your army to appear, the forcefield to fall away, and a grand melee to start up. However, when you approach the Professor and Azar, they'll regale you about "destiny" and the "grand plan," but then they'll flee -- Azar through the portal (which will then disappear) and the Professor through the corridor to the north -- and the forcefield will come back on, blocking you from your allies.
With nowhere else to go, you'll have to chase the Professor. You'll find him in the Salamandra laboratory (#9). Some Salamandra soldiers will show up to protect him, and some kikimore warriors will also try to aid him, but you should be able to take down those nuisances easily enough, leaving you with a one-on-one battle against the Professor. We didn't find this fight to be too tough, but if you need to you can always buff up at some point before the battle.
Once you've worn the Professor down, he'll beg you for mercy, but before you can land the killing blow, the floor will collapse, sending you down into the kikimore queen's lair (#10). The queen will quickly finish off the Professor, but then she'll burrow down into the ground and ignore you. You'll be completely safe for a while, so this is a good time to catch your breath and save your game.
When you approach the eastern exit from the lair, the queen will rise up and begin chasing you. Don't bother trying to kill her; if she hits you once then you'll die. Instead, you should run. As you make your way into the main cavern (#11), you should notice numerous support beams holding up the caves. If you use the Aard sign on the supports in the main cavern while you're standing in the tunnel to the west (#12), then the cavern will collapse on the queen and the other kikimores, killing them.
When you loot the queen's corpse, you'll find several things of interest:
The Professor's Report,
The Book of the Wolverine, the
Kikimore Queen's Nerve, the scroll
Kikimore's Ire,
The Professor's Letter, and more. If you read the report, then you'll learn that it was Princess Adda who was forging the royal edicts and working with the Salamandra.
When you exit the lair (Exit A), you'll run right into Princess Adda and her forces. She'll want to execute you -- or maybe kiss you -- but Triss will teleport you away, and you'll end up in
Lakeside and Chapter IV.
Note: The game frequently crashes during the transition from Chapter III to Chapter IV, so be sure to save before exiting the lair.
1 - Triss' House
2 - New Narakort Inn
3 - Starting Point in Base
4 - Roots
5 - Siegfried or Yaevinn
6 - Alvaro's Portal
7 - Alcove
8 - Professor and Azar Javed
9 - Laboratory
10 - Kikimore Queen's Lair
11 - Main Cavern
12 - Support Beams
Exits:
- Lair exit.


