 Did we miss anything in this section? Is there something we didn't discover?
Let us know!
Walkthrough
Did we miss anything in this section? Is there something we didn't discover?
Let us know!
Walkthrough
When you first enter the quarter, Order and Scoia'tael soldiers will be fighting each other. If you ignore them, then they'll mostly ignore you, but you might still need to kill a few people to open some doors. Later, after you've exited the quarter, the fighting will stop, and it'll be much easier to move around.
You'll encounter lots of people in the area who will ask you for things. Diseased people will ask you for food or for money. Nurses and medics will ask you for potions or for ingredients. If you bring these people what they want, then they'll sometimes tell you about creatures involved in the chapter, like ifrits and garkains.
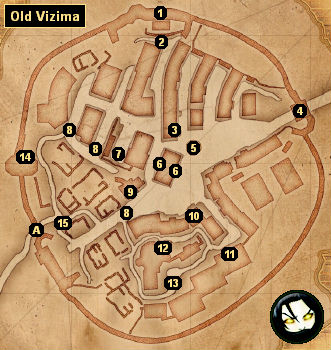
1 - Starting Point
This is where you'll appear in the quarter after leaving the
Castle.
2 - Nurses / Zoltan Chivay / White Rayla
If you're following the neutral path, then you'll encounter a pair of nurses here, and you'll need to escort them to the field hospital (#6) as part of the quest
Under a Fiery Sky. Once you've gotten them safely to the hospital, they'll move up to the upper floor, and then after completing
Under a Fiery Sky, you'll be able to sleep with them.
If you're with the Scoia'tael, then you'll encounter Zoltan Chivay here, and he'll update the quest
Hope Burns Bright. If you're with the Order, then you'll meet White Rayla here, and she'll update the quest
The Flame that Cleanses.
3 - Scoia'tael Hideout
If you're with the Scoia'tael, then you'll need to visit the hideout during the quest
Hope Burns Bright. Otherwise, you'll just find some Scoia'tael soldiers to kill inside, and they won't drop anything interesting.
4 - Gate to the Dike
This gate will remain locked for the entire chapter.
5 - Old Well
Despite being labeled on your game map, you won't ever have to do anything at the well.
6 - Field Hospital
The hospital is involved in your faction-specific quest
(
Hope Burns Bright,
The Flame that Cleanses,
Under a Fiery Sky), and regardless of the faction you're supporting, you'll have to defend the wounded soldiers inside from attack. You'll also meet Shani and perhaps Siegfried in the hospital, but they won't have much to say to you.
Outside of the hospital, on the eastern side, you'll find a notice board with five contracts on it. The contracts are covered in the
Contracts section of the walkthrough. If you have trouble looting the notice board because of all of the fighting nearby (mostly only a problem if you're following the neutral path), then you might want to try entering the hospital using the western door, hanging around inside for a minute, and then exiting through the eastern door. Some soldiers will probably attack you right away, but if you can defeat them quickly enough, then you'll have a chance at the notice board. You can also just wait until the fighting stops (after you've visited the
Swamp Cemetery).
7 - Fence
The fence will offer you a variety of goods, including weapons, jewelry, and books. You can kill the fence, but you won't really get anything if you do.
8 - Barricades
These barricades will prevent you from reaching the western part of the quarter until after you've completed your faction-specific quest
(
Hope Burns Bright,
The Flame that Cleanses,
Under a Fiery Sky). During that quest, you'll have to use the Aard sign to remove some barricades, which will clear a path to the breach in the wall (Exit A). Once you've exited the quarter, the rest of the removable barricades will disappear, and the fighting will stop, making it easier to move around.
9 - Order Command Post
If you're with the Order, then you'll need to visit the command post during the quest
The Flame that Cleanses. Otherwise, you'll just find some Order soldiers to kill inside, and they won't drop anything interesting.
10 - Forge
Depending on which faction you're supporting, you'll either find an Order armorer or a dwarven blacksmith here. The one that you find will deal with you, even if you're neutral, and he'll act as a shopkeeper and forger. He'll also help you with the quest
Armor, unless you're neutral, and then you'll have to go see Kalkstein (#11).
11 - Kalkstein's Laboratory
Kalkstein won't start out in his laboratory. Instead, you'll find him at the nearby tower (#12), and he'll only return to his laboratory after you've defeated the mutant at the tower.
Kalkstein will act as a shopkeeper, and he's the one responsible for two of the
Contracts. If you're neutral, then he'll also help you with the
Armor quest.
12 - Tower
When you first arrive at the tower, you'll encounter a mutant here rather than the expected striga. Killing the mutant will update three quests:
Her Highness the Striga,
Sweet Revenge, and your faction-specific quest
(
Hope Burns Bright,
The Flame that Cleanses,
Under a Fiery Sky). You'll also meet Kalkstein here, and after talking to him for a bit, he'll move over to his laboratory (#11).
13 - Cemetaurs and Graveirs
Cemetaurs and graveirs will spawn here every time you enter the quarter. You'll need to kill some cemetaurs for the
Cemetaur Contract.
14 - Executioner's Tower
You'll find the steps leading up to the tower on the northern side. Inside the tower, on the lower level, you'll once again meet the dwarven dentist Zahin Schmartz. You'll need to give him jaws and teeth for the quest
Won't Hurt a Bit.
15 - Jean-Pierre
Jean-Pierre is the mercenary captain. You might remember him from the
Swamp Forest in Chapter II. You'll have to talk to Jean-Pierre for the
Bruxa Contract and for the quest
Mud and Velvet. Depending on how you handle the latter quest, you might get to fight Jean-Pierre, and if you kill him he'll drop a
Mahakaman Rune Sihill.
Exits:
- Breach in the wall. Going through the breach will take you to the
Swamp Cemetery.


