 Did we miss anything in this section? Is there something we didn't discover?
Let us know!
Background
Did we miss anything in this section? Is there something we didn't discover?
Let us know!
Background
Raymond Maarloeve (#1) will give you this quest during the course of the quest
Vizima Confidential.
Walkthrough
Maarloeve will tell you that the prisoner you tried to question in the hospital died during the night, and that somebody might have helped him along. He'll then ask you to get together with Shani (at #2 or #3) to perform an autopsy on him.
To start off, you should go to the Gravedigger (#4). He'll seem inclined to give you the body, but since you won't know which one to ask for, you won't get very far. However, at this point you'll finally get a dialogue option to ask the Gravedigger to let you into the Cemetery, and if you complete the associated quest
A Gravedigger's Gratitude, then you'll be able to skip the autopsy and move right on to the next stage in the investigation (see the quest entry for
Vizima Confidential for more information).
If you want to (or have to) perform the autopsy, then the first thing you should do is talk to Shani at her house (#2). She'll tell you that you'll need to get the body of the prisoner from the Gravedigger and meet her at the hospital (#3) at night. She'll also suggest that you talk to Vincent Meis (#5) or find some books about anatomy and pathology.
Next you should visit with the Gravedigger again. This time he'll agree to hand over the body -- provided that you bring him some dwarven liquor. The liquor doesn't actually have to be dwarven. We've seen
Local Pepper Vodka work here as well as
Mahakaman Mead, and there are probably other options as well. Once you've given the Gravedigger the right liquor, he'll agree to deliver the body to the hospital at night.
There are two ways to prepare for the autopsy. You can learn about poisoning and Zerrikanian insects. You can get information on the former from the book
Forensic Medicine or from talking to Vincent Meis (#5). You can get information on the latter from the book
Zerrikanian Insects and Other Vermin or from talking to the Gardener (#6). Both books can be purchased from the Antiquary on Merchant Street (#7).
Note: Oddly, as of version 1.2 the autopsy sequence is easier if you don't learn about forensics.
For the autopsy itself, you'll need to show up at the hospital around midnight. You'll find Shani in the back room. To perform the autopsy, you'll have to talk to Shani a few times and make some dialogue choices. If you've learned everything you can, and if you make the "right" choices, then you'll discover who killed the prisoner and thus who's been helping the Salamandra. If you didn't learn enough, or if you make the "wrong" choices, then you'll implicate the wrong person. However, it doesn't really matter if you discover the real culprit or not (you'll figure it out soon enough regardless); the campaign will progress about the same either way.
Assuming that you've learned about insects and poisoning, these are the dialogue options that you should select to prove that Raymond Maarloeve is behind everything:
- Could a human have inflicted these wounds?
- The bone marrow has been sucked out.
- His neck muscles and palms look tense.
- This is too easy.
Note: If you've already completed
A Gravedigger's Gratitude, then you'll be given a simplified version of the autopsy, and every dialogue choice will lead you to the right conclusion.
If you make the right dialogue choices, then Shani will check the prisoner's brain, where she'll find eggs from the Zerrikanian tsetse fly. The eggs look like
Fisstech, Shani got
Fisstech from Maarloeve, and you'll put two and two together to figure out that Maarloeve must be the one behind the death of the prisoner, and that he must have later stabbed and poisoned the body to frame Ramsmeat and Kalkstein. Moreover, since Azar Javed is from Zerrikania, you'll decide that he must be impersonating Maarloeve, and that he's the one who's been causing all the problems in Vizima.
But regardless of who you find guilty, the quest will end once you've completed the autopsy.
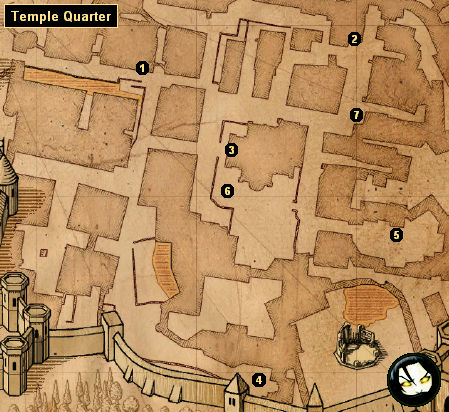
1 - Raymond Maarloeve's House
2 - Shani's House
3 - Hospital
4 - Gravedigger
5 - Vincent Meis
6 - Gardener
7 - Antiquary


