 Did we miss anything in this section? Is there something we didn't discover?
Let us know!
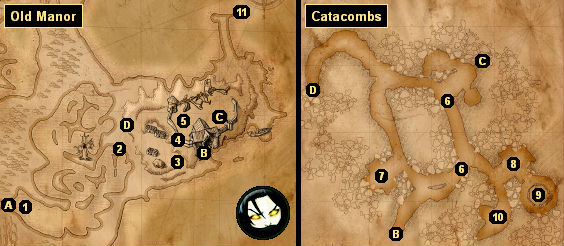
Walkthrough
1 - Count de Wett
Did we miss anything in this section? Is there something we didn't discover?
Let us know!
Walkthrough
1 - Count de Wett
Count de Wett and his men will block you from entering the area until after you've dealt with the striga in the quest
Her Highness the Striga. At that point he'll attack you, and you'll find a
Salamander Brooch and
Experiment Notes on his corpse.
2 - Corpse
You'll find a corpse next to the campfire here. If you loot it then you'll find an
Earth Rune,
Diamond Dust, and more.
3 - Mutant Rayla
At this spot you'll encounter Mutant Rayla and Azar Javed. Javed will talk to you for a bit, and then he'll sic Rayla on you and disappear. Rayla can cause pain, which is annoying, but she'll only have an
Illegal Sword, and so won't do a lot of damage. If you've been building up your Igni sign, you can kill her with about two casts of that.
4 - Trunk
Inside the trunk you'll find
Plum Cordial, a
Moon Rune, a
Yellow Meteorite, and more.
5 - Battle / Meeting Place
When you arrive here you'll be attacked by some mutants and greater mutants. Nearby, you should notice some friendly soldiers in combat as well. Once the fighting has stopped, you'll be met by one of three allies depending on which faction you're supporting -- Siegfried (Order), Triss (neutral), or Yaevinn (Scoia'tael).
To enter the Catacombs, you'll need to talk to your ally. Your ally will then direct you to one of the entrances into the Catacombs, but this entrance will only appear after you've completed the conversation. Siegfried will show you to a cave (Exit B), Triss will take you to a crypt (Exit C), and Yaevinn will lower you down into a well (Exit D).
6 - Locked Door / Rubble
Depending on the faction you're supporting, one route to Azar Javed (#9) will be blocked. You'll always have to take the longest route to his lab, and you'll always have to pass by the Koschey (#7) first.
7 - Koshchey
Just like earlier (#3), Azar Javed will appear here and sic a mutated creature on you. However, unlike Mutated Rayla, the Koshchey is pretty tough. It'll regularly knock you down and cause pain, so you'll spend a lot of time unable to defend yourself. The Igni sign is useful against it, but otherwise you'll just need to buff yourself up and then whack away at it using your silver sword and the strong style.
When the Koshchey dies, it'll drop a
Koshchey Heart, which you'll be able to use to create the potion
Koshchey's Core (after defeating Javed at #9). You'll also earn about 3000 experience points.
8 - Greater Brothers
You'll face two Greater Brothers here. Like everything else, they're susceptible to the Igni sign, but beyond that you're best off using your steel sword and the strong style rather than trying to hit them both with the group style. When the brothers die, you'll be teleported to Azar Javed (#9), so you might want to buff up with some potions before facing them.
9 - Azar Javed's Laboratory
You'll finally get to fight Azar Javed here. He'll start out by talking to you -- and he'll say, straight from the irony department, "I long ago learned only to rely on myself" -- but then he'll get down to business. If you spared Berengar in Chapter IV, then he'll show up now to help you out. Otherwise, you'll discover that
Berengar's Medallion has an effect on Javed, and Javed will be much easier to deal with. Either way, the encounter with Javed will complete the quest
Berengar's Secret.
The battle with Javed should be tough. Like with the Koshchey (#7), Javed will knock you down and cause pain, and so you might find yourself defenseless for long stretches of time. But if you whack at him with your steel sword and the strong style, and if you occasionally hit him with a sign, he should eventually go down.
When Azar Javed dies, you'll earn over 6000 experience points, and on his corpse you'll find the book
Greater Brothers, the scroll
Koshchey's Core, and more. You'll also discover a mirror in the lab. When you click on the mirror, you'll witness a cut scene where Jacques de Aldersberg will try to make contact with Javed (to get some more mutated knights), and you'll finally understand who is responsible for everything. At the end of the cut scene, you'll be teleported out of the Catacombs, and you'll just need to travel to your ally (#11) to advance the campaign.
10 - Crate
You'll find two pouches of
Diamond Dust plus more in this crate.
11 - Landing
You'll meet your ally (Siegfried, Triss or Yaevinn) here after you've defeated Azar Javed (#9). Talking to your ally will give you the option of sailing back to Vizima, but doing so will end the chapter, so you should complete all of the sub-quests that you can before departing.
Exits:
- Path to the
Swamp Cemetery.
- Catacomb entrance. This entrance won't appear until you've spoken to Siegfried (#5).
- Catacomb entrance. This entrance won't appear until you've spoken to Triss (#5).
- Catacomb entrance. This entrance won't appear until you've spoken to Yaevinn (#5). The entrance is one-way, but you'll be able to use Triss' entrance (Exit C) to leave.


