 Did we miss anything in this section? Is there something we didn't discover?
Let us know!
Overview
Did we miss anything in this section? Is there something we didn't discover?
Let us know!
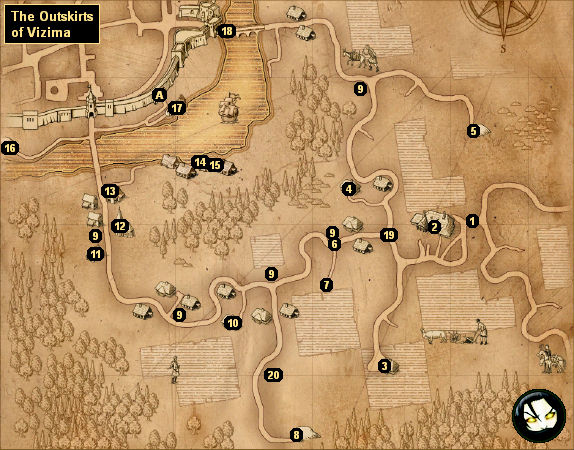
Overview
Although you'll arrive at the Outskirts of Vizima looking for information about the Salamandra, you'll quickly discover that the village is being terrified by a strange Beast, and the chapter will mostly involve you learning about the Beast and then eventually dispatching it.
The main two quests for the chapter are
Of Monsters and Men, which involves tracking down the Beast, and
The Salamander's Tail, which involves investigating the Salamandra and gaining access to Vizima. Progressing through these quests will cause certain NPCs (such as Abigail at #4 and the antiquary at #2) to disappear, so it's best to visit shopkeepers often rather than waiting until your inventory is full.
When you leave the Outskirts (via Exit A), you won't be able to come back, so be sure you've completed as many quests as possible before leaving, including hunting down the monsters mentioned by the Royal Huntsman (#7).
1 - Eastern Gate / Starting Point
You'll arrive in the Outskirts of Vizima just in time to be attacked by four barghests. This battle will trigger the quest
Of Monsters and Men. You won't be able to save Caroline, but Alvin will survive, and he'll eventually be sent to live with different people in the village. You'll run into Alvin quite a few times during the course of the campaign.
You'll also meet up with your old friend Shani here. Once you've finished talking to her, she'll move on to the inn (#2).
2 - Country Inn
You'll find four quests on the notice board outside of the inn. Three of them are for monster-killing contracts, and they're covered in the
Contracts section. The fourth quest is
Wanted.
You can also meet a dwarven blacksmith outside the inn, but he'll only appear during the day. You might not find enough meteorites during this chapter to upgrade your steel sword, but you can still use his "forge" option to sell off your excess weapons. The first time that you meet him, the blacksmith will also offer to sell you the formula for
Crinfrid Oil for 35 orens, and he'll throw in a sample of the product for free, so it's a pretty good deal.
Note: It's easy to offend the blacksmith (hint: don't ask him if he trades with the Scoia'tael), so it's a good idea to save your game before talking to him. If you offend the blacksmith, then you'll have to wait until the next day to talk to him again.
Inside the inn, you'll meet a few people of interest:
- Antiquary (daytime only). He buys and sells books, including
The Tome of Fear and Loathing, Volume I (useful for the
Ghoul Contract) and
Swamp Monsters (useful for the
Drowner Contract).
- Declan Leuvaarden (daytime only). He'll give you the quest
Dead Hand of the Past.
- Drunkard. If you beat the drunkard in the drinking game, then he'll give you
The Tome of Fear and Loathing, Volume I.
- Fat Fred. When you challenge him to a fight, you'll trigger the
Fistfight quest.
- Kalkstein. He's an alchemist, and he's responsible for the
Ghoul Contract. You'll see Kalkstein a few times during the course of the campaign.
- Olaf the innkeeper. If you pay him 5 orens, then he'll tell you a little about the plague and the Reverend (#12). You can use the "storage" option with him to access your storage container, and you can also ask him about a room, which will lead to you meditating, but at a cost of 5 orens.
- Shani. If you exhausted all conversation topics with her at the east gate (#1), then she won't really have anything new to say here, but you will get a chance to rescue her at the end of the chapter (see the quest entry for
The Salamander's Tail for more information).
- Vesna Hood the waitress (afternoons and evenings). Like all waitresses she'll act as a shopkeeper for food and drinks. You can also flirt with Vesna, but nothing will come of it until after you've completed her quest
She's No Early Bird (see #19). If you offend Vesna, then she'll stop talking to you, but only until the next day.
- Zoltan Chivay. He'll appear here after you've rescued him (or not) from the travelers (see #15). Zoltan will teach you about dice poker, and if you beat him in the drinking game, then he'll give you a
Diamond.
3 - Odo's House
To talk to Odo, you'll either need to show him the
Eternal Fire Signet Ring from the Reverend (#12), or you'll have to beat him in the drinking game using
Temerian Rye. Once you've done that, you'll be able to play him at dice poker, and he'll also give you the quest
Secret Garden.
Outside of the house, once you've completed Odo's quest, you'll witness a cut scene where Odo's dog will act strangely. However, this activity won't lead to anything. Odo won't comment on it, and neither will anyone else. It's just something that you can speculate about, since it might be a clue in what happened to Odo's brother (buried in the garden?), or it might just be that the dog is barking at the place where an echinops was.
4 - Abigail's House
When you arrive at Abigail's house, you'll encounter a man writhing on the ground in front of it. He'll say, "My stomach hurts! Cursed witch..." Inside the house, when you talk to Abigail, she'll tell you how the man mistook her for a whore, when she's really just a witch, and that she caused his affliction. This is just one example of many that you'll see in the campaign, where you won't really know who's right or who's wrong, or who's good or who's evil. You won't be able to do anything to help the man; he'll simply disappear when you leave the house.
Abigail is a shopkeeper. You can sell lots of ingredients to her, and she'll also have a few books in stock, including
The Book of Animals,
Swamp Monsters,
Field Plants, and
Barghests. Abigail will also offer to sell you a formula the first time you visit her. If you pay the 30-oren fee, then you'll learn about
Specter Oil and
Hellebore Petals, which will allow you to gather the petals from the hellebore plants growing in the village (provided that you've also learned the Herbalism skill).
Abigail is also responsible for the
Barghest Contract. You'll need 10
Barghest Skulls for the contract, but even after that if you bring more skulls to Abigail, she'll buy them for 5 orens each, making them a pretty good money-maker.
You can also meditate for free in Abigail's house.
5 - Crypt
This crypt will start out locked. You'll need to get the key from Mikul (#18) to open it. Inside, you'll find a dead girl and a
Glass Vial. You'll deduce that the girl killed herself using the poison in the vial, and that it's her corpse that has been drawing the ghouls to the crypt and the village.
There are four things of interest about the crypt. You'll need to kill the six ghouls in the front part of the crypt to complete Mikul's quest
Buried Memories. Also in the front part of the crypt, you'll find a Circle of Inner Fire. Clicking on it will give you the Igni sign. Next to the Circle you'll find a corpse with a
Dice Box on it. Picking up the box will give you the quest
A Game of Dice, assuming that you haven't already triggered it.
Finally, you might notice some rubble blocking the eastern part of the crypt. After turning in Mikul's quest, when you return to the crypt, the rubble will be gone, and you'll be able to explore a few more rooms. For most of them, you'll have to use the Aard sign to knock down some bricks so you can get inside. In the far eastern room, you'll encounter the boss ghoul Ozzrel.
Ozzrel is much tougher than the other ghouls, and he'll do around 50 damage per hit, so you'll definitely want to quaff a
Swallow potion before facing him. When Ozzrel dies, he'll drop an
Alghoul Head, which you can turn in to the Royal Huntsman (#7) for 200 orens. You'll also find a
Red Meteorite in the room with Ozzrel.
6 - Traveler
Somewhere around here you should run into a traveler. If you talk to him, then he'll remember who you are, and he'll pay you the 100 orens that he owes you.
7 - Royal Huntsman
The huntsman will tell you about two special bosses in the area: "the lakeshore monster" (aka Nadir) and the "creature from the crypt" (aka Ozzrel). You'll find Nadir near the Old Mill (#17) at night, and you'll find Ozzrel inside the crypt (#5).
If you defeat Nadir then you'll trigger the quest "The Monster of the Lake," and when you bring Nadir's trophy to the huntsman, you'll receive 200 orens, which will complete the quest.
If you defeat Ozzrel then you'll trigger the quest "King of the Crypt," and when you bring Ozzrel's trophy to the huntsman, you'll receive 200 orens, which will complete the quest.
8 - Cave
You'll find a fireplace in this cave, but you won't really have anything to do here until the end of the chapter.
9 - Eternal Fire Shrine
You'll have to light these shrines for the quest
Of Monsters and Men.
10 - Peasant House
You'll find the book
Swamp Monsters inside this house.
Note: In this section of the village, you can solve a couple of mini-quests. A "peasant woman" (with blond hair and a green dress) will sleep with you if you give her some
Tulips. Meanwhile, an "old woman" will tell you about the local flora and fauna if you give her food or bribe her with 25 orens. The woman's stories will give you the same information that you can find in books, but it's easier to keep track of what you've learned if you stick to the books.
Finally, you can also meet a beggar woman who will trade you an
Eternal Fire Signet Ring for some
White Gull, but only if you haven't already received the ring from the Reverend (#12).
11 - Vesna's Grandmother's House
Vesna is a waitress at the inn (#2), and you'll also encounter her on the road (#19). You won't be able to do anything at her grandmother's house.
Note: In this section of the village, you can solve a couple of mini-quests. One "townswoman" (wearing white) will talk to you about flowers, and if you give her some
Daisies, then she'll give you some
Tulips. Meanwhile, an "old townswoman" will tell you stories about different creatures if you give her food or 15 orens. The woman's stories will give you the same information that you'd find in books, but it's easier to keep track of what you've learned if you stick to the books.
12 - Reverend's House and Chapel
The Reverend's house and the chapel are located right next to each other, and you'll always find the Reverend at one or the other (outside the chapel during the day, and in the house at night).
When you talk to the Reverend, he won't be happy to see you (he'll call you "devil's breed"), but he'll give you a way to gain his trust -- to light the five Eternal Fire Shrines scattered around the village (#9). This is a necessary step in the quest
Of Monsters and Men.
If you ask the Reverend about the Salamandra, then he'll give you an
Eternal Fire Signet Ring, which will help you gain the trust of certain people in the village. This is a useful step in the quest
The Salamander's Tail.
13 - Stall-Keeper
The stall-keeper will buy and sell food. Many villagers will comment that the stall-keeper's meats seem strange, but nothing will ever come of it.
14 - Haren Brogg's House
You'll always find Haren Brogg either inside or outside his house. To talk to him, you'll need to gain his trust. The easiest way to do this is to show him the
Eternal Fire Signet Ring from the Reverend (#12). You can also bribe Haren with 60 orens, but since you're going to need to deal with the Reverend anyway, you might as well get the ring from him first.
Haren can do a few things. He'll act as a shopkeeper and buy weapons and related items from you, he'll play dice poker with you, and he'll give you the quest
Strangers in the Night. You'll need to complete Haren's quest in order to gain the support of the town, and to complete the quest
The Salamander's Tail.
15 - Zoltan Chivay
Zoltan is one of your old friends. When you spot him here, you'll find him surrounded by some travelers. They'll want to cut off his beard, he won't want it to be cut, and their relationship will deteriorate from there. It doesn't really matter if you help Zoltan or not, but you'll gain a lot more experience if you do. If you ignore Zoltan's plight, then Zoltan will kill the travelers on his own. If you decide to help him, then you'll kill the travelers together.
After the battle, you'll find a
Dice Box on one of the corpses. Picking it up will trigger the quest
A Game of Dice. Zoltan can describe the rules of the game to you. You can also talk to him to learn more about the Scoia'tael. After the conversation, Zoltan will wander off to the inn (#2), and that's where you'll find him for the remainder of the chapter.
16 - Cave
This small cave is involved in the quest
Dead Hand of the Past. You'll have to fight echinops inside, so it's a good idea to have Poison Resistance before you go in.
17 - Old Mill
You'll encounter the drowner boss Nadir by the mill, but only after you've completed Vesna Hood's quest
She's No Early Bird (#19), and only if it's night. Nadir will have some other drowners with him, and he'll do around 50 damage with each hit, so it's a good idea to quaff a
Swallow potion before facing him. If you have a lot of trouble with Nadir, then you can draw him back to one of the Vizima gates and let the gate guards there help you out. When Nadir dies, he'll drop a
Drowned Dead's Head, and when you take that trophy to the Royal Huntsman (#7), you'll receive 200 orens.
The Old Mill itself will always be locked. The only time you'll get inside is if you meet Vesna Hood there for a rendezvous (see #19).
18 - Mikul
You'll find the guard Mikul stationed at this gate. He won't let you into the city because of the "quaternine." If you show Mikul the
Eternal Fire Signet Ring from the Reverend (#12) or bribe him with 15 orens, then he'll talk to you and play dice poker with you. Mikul will also give you the quest
Buried Memories.
When you return to Mikul after completing his quest, you'll be attacked by some Salamandra lackeys. If you fought the Frightener in the Prologue, then you'll also face an armored hound. Mikul and the city guards will assist you in the fight, so the ambush shouldn't go over very well.
After completing Mikul's quest, he'll move over to the Mill Gate (Exit A).
19 - Vesna
During the night, you'll find Vesna Hood here surrounded by bandits. This encounter is described in the quest entry for
She's No Early Bird.
20 - Corpse
You'll find
Tulips, orens, and more on this corpse. You can give the
Tulips to a "peasant woman" nearby to sleep with her (see #10).
Exits:
- Mill Gate. This is the only gate that you'll be able to use to get into Vizima. However, when you reach the point in the chapter where the guards will let you through, you'll actually be arrested, and you'll end up in Vizima's jail.


