 Did we miss anything in this section? Is there something we didn't discover?
Let us know!
Walkthrough
Did we miss anything in this section? Is there something we didn't discover?
Let us know!
Walkthrough
During the course of Chapter II you'll come up with a list of six people who might be working for the Salamandra. There are a variety of ways to prove them innocent, including a pair of quests,
A Gravedigger's Gratitude and
Anatomy of a Crime, that can expose the real culprit and exonerate everybody else.
Listed below are the six suspects and the ways in which you can prove them innocent.
Kalkstein
You'll decide to suspect Kalkstein (#1) during the quest
The Crown Witness. Near the end of the quest, the witness will utter Kalkstein's name before passing out, making you wonder how the alchemist might be involved.
When you talk to Kalkstein, he'll readily admit to knowing the witness. He'll claim that the man helped him with his experiments. "He protected me from Salamandra and did other tasks. He risked his life for me!"
The only way to prove Kalkstein innocent is through the quests
A Gravedigger's Gratitude and
Anatomy of a Crime.
Leuvaarden
Leuvaarden (at the
Dike) will come under suspicion via Raymond Maarloeve (#2). Not long after completing the quest
The Crown Witness, Maarloeve will get attacked by assassins, and he'll decide to leave town for a while. But before going, he'll give you his notes, which will list Leuvaarden as a suspect.
When you talk to Leuvaarden, you'll accuse him of paying the Professor's bail, but he'll deny it. Depending on what else you've learned during the chapter, you might also point out some other things, like that Leuvaarden bribes guards, but none of these will lead to anything.
To prove that Leuvaarden is innocent, you'll just need to sell him three
Salamander Brooches. This is covered in the quest entry for
Wanted. When you make the transaction, Leuvaarden will confide in you that he's been working for a secret society that wants to destroy the Salamandra, and that will be enough to convince you that he's innocent.
Ramsmeat
You'll decide to suspect Ramsmeat (#3 or #9) during the quest
The Crown Witness. Near the end of the quest, when you're attempting to question the witness in the hospital (#4), Ramsmeat's thugs will attack you. You won't be sure if they were after you, after the witness, or there for some other reason, but you'll decide to look into how Ramsmeat might be involved.
When you talk to Ramsmeat, he'll claim that his men were at the hospital to "bring back one of ours," and that the battle was just a misunderstanding.
The only way to prove Ramsmeat innocent is through the quests
A Gravedigger's Gratitude and
Anatomy of a Crime.
Thaler
The first time that you talk to Thaler (#5), he'll tell you that he is in possession of Berengar's equipment. He'll claim that the items were sold to him, but you won't be so sure, and so you'll add him to your suspects list.
Note: If you manage to avoid talking to Thaler for long enough, then eventually Raymond Maarloeve (#2) will tell you to suspect him.
There are a couple of ways to prove Thaler innocent. If you show up outside of his house at night, then you'll encounter a "mysterious man" there, and you'll realize that Thaler works with the affluent as well as the disreputable. If you talk to Jethro (#6) after giving him
Fisstech, then you'll learn that Thaler works with the city guards as well as the criminals. Between the two, you'll decide that Thaler is a "little conniver" and an "insignificant fence," and that he isn't work investigating.
The other way to prove Thaler innocent is less likely but more accurate. If you haven't proved Thaler innocent by the time you go to Shani's party (see the quest entry for
Old Friend of Mine for details), then afterwards Shani will tell you that Thaler is the chief of Vizima's secret police, and so obviously he isn't working for the Salamandra.
Vincent Meis
You'll decide that Vincent Meis (#6 or #7) might be involved when you're attacked by assassins in the
Sewers at the start of Chapter II (since he's one of the few people who knew you'd be there).
When you talk to Meis after leaving the sewers, he'll tell you that he has an operation planned against the Salamandra tonight, in a warehouse in the Slums District (#8). When you show up at the warehouse around midnight, you'll find Meis there having a conversation with a few Salamandra mercenaries. No matter what you say, Meis will leave and you'll end up fighting the mercenaries. But if you follow Meis' lead, then you'll learn that these mercenaries were the ones who killed Raymond Maarloeve's family.
Afterwards, you'll still suspect that Meis might be working with the Salamandra. To prove that he's innocent, you'll need to talk to Coleman at the Hairy Bear Inn (#9) and accept his quest
The Rat. Near the end of that quest, Coleman will confide in you that he's working for Meis as an informant against the Salamandra, and that corroborating bit of evidence will be enough for you to declare him innocent.
When you relay this news to Meis, he'll be happy enough that he'll give you a
City Guard Signet Ring, which will allow you to pass through certain guarded doors in the quarter. If you can't prove that Meis is innocent, then you'll have to bribe your way through those doors.
Vivaldi
Vivaldi (#10) will come under suspicion when you learn from Jethro (#6) that the money for the Professor's bail came from Vivaldi's bank.
To prove that Vivaldi is innocent, you'll need to talk to both Vivaldi and Zoltan Chivay (who wanders around the
Temple Quarter). Between the two, you'll learn that humans now own Vivaldi's bank, and that Vivaldi doesn't have anything to do with its operations.
Note: Clearing Vivaldi will cost you some favor with the Order and gain you some favor with the Scoia'tael.
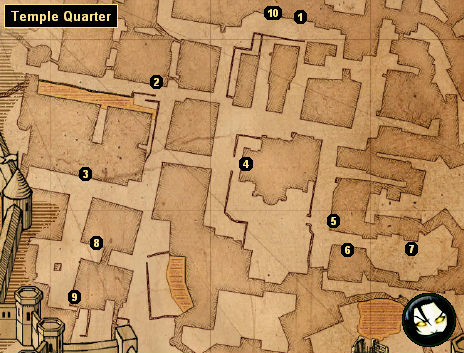
1 - Kalkstein's House
2 - Raymond Maarloeve's House
3 - Ramsmeat's House
4 - Hospital
5 - Thaler's House
6 - Prison
7 - Vincent Meis
8 - Warehouse
9 - Hairy Bear Inn
10 - Vivaldi's House


