 Did we miss anything in this section? Is there something we didn't discover?
Let us know!
Background
Did we miss anything in this section? Is there something we didn't discover?
Let us know!
Background
You'll receive this quest when you talk to the Grand Master (#2) in the Ice Plains.
Walkthrough
The Grand Master will reveal to you that this frozen wasteland will be the future of Vizima -- but only if you continue to get in his way. Then he'll teleport away to his temple (#14) and you'll be attacked by four special ifrits called Omens of Fire.
All you'll need to do in this quest is make your way to the Grand Master. As you travel towards him, you'll encounter a handful of allies and enemies, some of them depending on the choices you made during the course of the campaign. For example, early on you'll meet up with Triss or Shani (#3) depending on which one you chose in Chapter III. You can also encounter Abigail (#4), Alvin (#10), Adda (#12), and others.
None of the battles during the trek should be particularly tough, with or without allies. Also, you won't find any campfires or chests hidden along the way, so there isn't any reason to explore all of the nooks and crannies of the region. Just press forward and kill whatever gets in your way.
When you finally reach the temple (#14), the Grand Master will talk to you for a bit, and then, no matter what you say, he'll attack. He'll start out by summoning five regular mutants to combat you, and, once you've dispatched them, he'll attack you himself.
The Grand Master will appear with several Omens of Fire. Usually when you see this sort of arrangement in a boss fight, the minions are linked to the boss in some way, and they'll heal him or protect him or give him power. But in this case, the omens are just a nuisance, and you should ignore them and concentrate on the Grand Master. If you oiled up your steel sword, then it'll only take a few strong swings to take him down.
When the Grand Master falls, the King of the Wild Hunt will appear. He'll call you his "greatest champion, a perfect means of destruction," and then he'll demand the Grand Master's soul. If you give it to him, then he'll leave peaceably; otherwise you'll have to fight him. This decision won't change anything.
After dealing with the King of the Wild Hunt, you'll finish off the Grand Master by skewering him with your silver sword, which will cause you to re-appear in the Order Cloister in the Temple Quarter. You'll encounter Dandelion there, as well as the Grand Master's body. When you loot the remains, you'll find the
Secrets Stolen from Kaer Morhen, as well as a
Dimeritium Amulet.
Note: Yes, that's right. When Alvin teleported away at the end of Chapter IV, he actually went back in time, and he eventually became the Grand Master. If you play through the campaign again, you'll see lots of hints for this, like when you meet up with the Grand Master in the
Swamp Cemetery and he says that he knows about you from a "very trustworthy source" -- that is, himself.
After looting the Grand Master's corpse, when you walk over to Dandelion, you'll automatically start up a conversation with him, and that will conclude the quest as well as the campaign.
"Something ends, something begins."
Note: In the ending movie sequence, you're not supposed to recognize who the assassin is. You're just supposed to notice that he has witcher eyes. So presumably the Grand Master's experiments with the witcher mutagens bore fruit -- by somebody, somewhere -- but we'll have to wait for the sequel to see how it plays out.
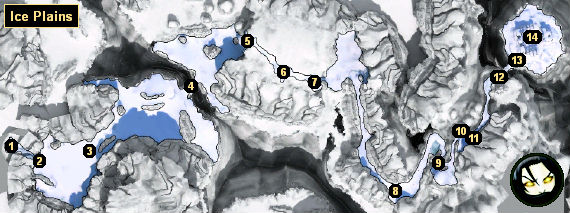
1 - Starting Point
2 - First Visit with Grand Master
3 - Shani / Triss
You'll meet up with Shani or Triss here, depending on which one you chose during Chapter III. The one you chose will follow along and help you until the final fight (#14).
4 - Abigail
If you let the mob have Abigail in Chapter I, then she'll attack you here. Otherwise she'll give you some
Swallow and
Tawny Owl potions.
5 - Second Visit with Grand Master
6 - King of the Wild Hunt
The King of the Wild Hunt will appear here and tell you, "Death follows you!" Then he'll disappear and four wraiths will attack you.
7 - Celina / Toruviel / White Rayla
If you selected the neutral path, then you'll meet Celina (a nightwraith) here, even if you "killed" her in Chapter IV. If you tell her, "I know it's hard to act contrary to your feelings," then she'll give you the "soulcatcher" buff, which will return vitality to you every time you kill something. If you tell her, "There's always a choice," then she'll follow along and help you out.
If you selected the Scoia'tael path, then you encounter Toruviel here. If you tell her, "I understand," then she'll give you the "fiery swords" buff, which will add fire damage to your swords. If you tell her, "We all make choices throughout our lives," then she'll follow along and help you out.
If you selected the Order path, then you'll encounter White Rayla here. If you tell her, "Ours was a tumultuous relationship," then she'll give you the "soulcatcher" buff, which will restore some of your vitality each time you kill an enemy. If you tell her, "There are worse things than dying in battle," then she'll follow along and help you out.
Note: All of your followers will leave you before the final fight (#14), but your buffs will stay with you, and so the buffs are the better option.
8 - Third Visit with Grand Master
9 - Siegfried / Yaevinn
You'll have to fight Siegfried or Yaevinn or both here, depending on the faction you chose to support (neutral players will encounter both; otherwise you'll only see the one from the opposite faction). It won't make any difference if you killed one or both during the quest
The Ashes of Vizima.
10 - Alvin
Alvin will only appear briefly. He won't attack you or say anything.
11 - Fourth Visit with Grand Master
12 - Adda / Vincent Meis
If you spared Adda (in Chapter V) or Vincent Meis (in Chapter III), then you'll meet up with one of them here, and they'll help you out in the next battle (#13).
13 - Battle / Meditation Spot
At this spot you'll fight two Order commanders and two greater brothers. After the battle, your allies will leave you, and you'll automatically meditate, even though there isn't a campfire in the area. Obviously, you should heal up and buff up before proceeding to the final battle (#14).
14 - Grand Master's Temple
This is where you'll duke it out with the Grand Master.


