 Did we miss anything in this section? Is there something we didn't discover?
Let us know!
Background
Did we miss anything in this section? Is there something we didn't discover?
Let us know!
Background
This is really two quests in one. During the course of the quest
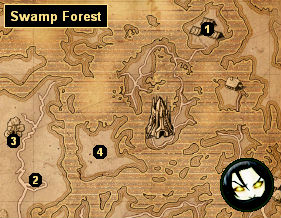
Worth Its Weight in Gold, tensions will mount between the Order of the Flaming Rose and the Scoia'tael. Yaevinn will move over to the Rebel Camp (#1) and Siegfried and the Order will occupy a campsite (#2) south of the Druids' Grove (#3). If you talk to Yaevinn, then he'll offer you this quest, and if you talk to Siegfried, then he'll offer you the mirror image of the same quest.
Walkthrough
Yaevinn and Siegfried will tell you roughly the same thing, that the rebels are planning to buy weapons from some hawker merchants at the Golem Burial Ground (#4). If you accept Yaevinn's quest, then you'll have to protect the rebels while they complete their deal. If you accept Siegfried's quest, then you'll have to attack the rebels and the hawker merchants.
As far as we can tell, this quest won't change anything later in the campaign, so it's just a matter of who you want to support. If you like the Order, then you'll have to fight some Scoia'tael scouts. If you like the Scoia'tael, then you'll have to fight some Order scouts. Regardless, when you return to the quest giver after completing the battle, you'll receive 200 orens and 3500 experience points, and the quest giver will tell you that Berengar is still alive.
Note: If you don't really care about the factions, then you should support the Scoia'tael here. The Order scouts will drop more money and better equipment when they die.
Another Note: Whichever faction you don't support will disappear from the
Swamp Forest. That means you should complete
Worth Its Weight in Gold before taking Siegfried's version of the quest, or else you won't be able to complete it (since Yaevinn will disappear with the rest of the rebels).
1 - Rebel Camp
2 - Order Camp
3 - Druids' Grove
4 - Golem Burial Ground


