 Did we miss anything in this section? Is there something we didn't discover?
Let us know!
Overview
Did we miss anything in this section? Is there something we didn't discover?
Let us know!
Overview
When the chapter opens up, you'll find yourself in a Vizima prison cell (#19), where you'll witness the Professor being released from his cell by the captain of the guard, Vincent Meis. After that, you'll have a few moments to look around and notice, among other things, that most of your inventory has disappeared, and then Meis will announce that the king will pardon whoever is able to "subdue" the cockatrice in the
Sewers.
As the chapter progresses, you'll make your way out of the prison and the
Sewers, and you'll get to explore Vizima's Temple Quarter and the
Swamp Forest outside. You'll meet some important people, like Raymond Maarloeve (#1), Thaler (#18), and Kalkstein (#15), and you'll learn some more about the Salamandra and who might be behind their schemes.
The main quests for the chapter are
Prison Break (where you'll escape from the prison and defeat a cockatrice),
Vizima Confidential (where you'll investigate Salamandra's presence in the quarter), and
A Mysterious Tower (where you'll figure out how to enter a long-deserted mage's tower).
The chapter will culminate with you facing off against Azar Javed and the Professor at the mage's tower. Unlike in Chapter I, completing this chapter will not prevent you from going back and visiting the places you've been before, but many of the quests will close, and so you should still try to complete as many quests as possible before triggering the big fight at the end.
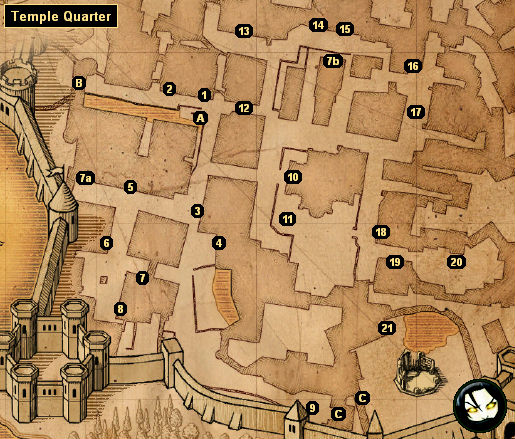
1 - Raymond Maarloeve's House
Note: If you allowed the Scoia'tael to claim Haren Brogg's cargo in Chapter I, then talking to Maarloeve will cause Coleman to get killed in the Hairy Bear Inn (#8). So if you want to deal with Coleman, you should go to see him first.
Inside the house, you'll meet Raymond Maarloeve, a detective. When you ask him about the Salamandra, he'll tell you that he's been investigating them for quite a while (they killed his wife and used his son in a mutagen experiment). He'll inform you that a Salamandra agent was recently taken prisoner, and that you should question him. This will trigger two quests:
The Crown Witness (to interrogate the prisoner) and
Vizima Confidential (to investigate the Salamandra). As the chapter progresses, Maarloeve will act as your guide in the investigation, and he'll give you even more quests. You should probably talk to him any time you get stuck.
When you leave the house, you'll get attacked by a half dozen assassins. They shouldn't be difficult to kill, but if you have problems, just draw them to the gate to the
Dike (Exit B), and the guards there will help you out. Some of the assassins will probably drop
Salamander Brooches or
Fisstech. It's a good idea to hold onto some of these things, but one stack of each is enough.
Just outside the house, you might run into a "con artist." He'll give you the quest
Finders Keepers.
2 - Abandoned House
In the basement of this house you'll find four graveirs and three bottles of
Old Wine. You'll need the wine for the quest
A Most Uncommon Wine. You'll also need to visit this house for the quest
The Rat.
3 - Order Armorer
If you're friends with the Order of the Flaming Rose (by supporting them over the Scoia'tael), then the Order armorer and his apprentice will deal with you, and they'll offer to sell you some interesting things, including an
Excellent Leather Jacket and
Blue Meteorites. If you can't shop here, then you should be able to shop with the dwarven blacksmith (#13), who will offer you exactly the same things. The armorer and his apprentice will only appear here during the day.
Note: If you worked with Siegfried in the
Sewers to kill the cockatrice, then you'll automatically start out friends with the Order.
4 - Order Guard Post
Inside the guard post you'll find a trunk containing the book
Specters, Wraiths, and the Damned. Eventually Siegfried will move to the guard post, and that's where he'll stay for the rest of the chapter.
5 - Ramsmeat's House
Ramsmeat will hang out here in his house or at the Hairy Bear Inn (#8), but you won't be able to do much with him in either place. Eventually you'll suspect him of working with the Salamandra (see the
Suspects section for details).
6 - Eager Thighs Brothel
Either inside or outside the brothel you'll meet Carmen, the madam. She'll give you the quest
Working Girls, and she'll play dice poker with you, but she won't sleep with you (she's about the only named female in the game who won't).
7 - House
Inside this house (#7) you'll meet a thug who will give you the quest "A Ghost Story." He'll tell you that he knows of a haunted house nearby (#7a), and he'll make you a deal: if you can defeat the ghosts inside, then the two of you can split the treasure hidden there. However, when you enter the house you'll discover that it's a trap, and a handful of bandits will attack you.
"You're so stupid, hiring a witcher against yourself."
The battle shouldn't be too tough, and afterwards you'll find a half-elf girl in the house, who the bandits had probably planned to rape. Talking to the girl will complete the quest and earn you 2000 experience points. Then the girl will ask you to see her again. In the original release of the game, the girl's dialogue was buggy, and she told you to meet her at the wrong place (the blacksmith's house at #13). In the Enhanced Edition her dialogue was fixed, and she tells you to meet her at the "nonhuman's house" (#7b). When you talk to her there, she'll quiz you on the elven language, but then she'll have sex with you (provided that you don't choose the "stupid white wolf" dialogue option).
Note: One of the bandits will drop a key, but we have no idea what, if anything, it opens.
8 - Hairy Bear Inn
Inside the inn, you'll meet several people of interest:
- Boozer. You can play the drinking game with him. If you win, then you might receive the formula for Wives' Tears, but the Boozer seems to be linked to the Drunkard from Chapter I, and if you beat the Drunkard earlier in the game, then you won't get a prize from the Boozer.
- Butter Bean. He's a fighter in the
Fistfight quest.
- Coleman (back room). If you let the Scoia'tael have Haren Brogg's cargo in Chapter I, then Coleman will get killed when you visit Raymond Maarloeve in his house (#1). Otherwise, he'll act as a source for
Fisstech, and he'll offer you the quest
The Rat. If you accepted the quest
Hot Potato from Haren Brogg in Chapter I, then talking to Coleman will complete that quest. Finally, you can play the drinking game with Coleman, but you won't get anything if you win.
- Conrad (night only). He'll give you the quest
A Most Uncommon Wine. You can also play the drinking game with Conrad, but nothing will come of it.
- Gambler. You can play dice poker with him, but he'll barely bet anything. You're better off playing against Munro (here) or Carmen (right outside). The Gambler is also involved in the quest
Memory of a Blade.
- Messenger (evenings only). He'll only show up after Jethro (#19) has mentioned that someone at the inn is buying
Salamander Brooches. The only way to learn anything from the Messenger is to play the drinking game with him. If you beat him, then he'll tell you that he works for Leuvaarden (located at the
Dike).
- Munro Bruys. He's a professional dice poker player in the quest
A Game of Dice.
- Ramsmeat (back room). He'll introduce himself as the "king of the underworld," and he'll imply that he might have work for you, but he'll never give you a quest. Eventually you'll suspect that he might be working with the Salamandra (see the
Suspects section for details) and he'll retire to his house (#5).
- Zoltan Chivay. He'll give you information to prove that Vivaldi is innocent (see the
Suspects section for details). If you ask him about work, he'll suggest that you talk to Leuvaarden (at the
Dike), and this will trigger the quest
Safe Haven. Zoltan will also wander around the quarter, so he might be tough to track down.
Outside the inn, you'll find a notice board with five contracts on it. This is exactly the same notice board as the one in front of the prison (#19). The contract quests are handled in the
Contracts section.
9 - Gravedigger / Hildegard Zollstock
During the day you'll meet the Gravedigger here. If you ask him about the Cemetery Gate (Exit C), then he'll tell you that it's locked because "the dead refuse to rest in peace." You won't be allowed into the Cemetery until later in the chapter (see
A Gravedigger's Gratitude for details), or you might have to wait until Chapter III to get in. The Gravedigger is also involved in the quest
Anatomy of a Crime, and he's the one responsible for the
Dog Contract.
Also at this spot, around noon, you'll encounter Hildegard Zollstock. She'll give you the quest "A Restless Ghost." She'll tell you that her dead husband haunts this part of the city at night and "flies around ... shouting lies about me." You'll encounter the husband, a wraith, at this same spot around midnight. He'll start out neutral, and you'll be able to talk to him, but he won't say much. If there's a way to take his side in the quest, we've never found it.
To complete the quest, you'll need to draw a weapon and attack the wraith. You'll get nearly 1000 experience points for killing it, and then when you meet with Hildegard again, she'll give you 20 orens and 2000 more experience points.
10 - Hospital
If Siegfried is guarding the door to the hospital, then he'll allow you to go right in. Otherwise, if a city guard is in his place, then you'll have to bribe the guard with 30 orens or show him the
City Guard Signet Ring from Vincent Meis (#20). The side door to the hospital is only an exit. You can't use it to sneak in.
You'll have to enter the hospital for a few quests, including
Anatomy of a Crime and
The Crown Witness.
11 - Gardener
If you ask the Gardener about his mercenary days, and if you bring him some food (or bribe him with 50 orens), then he'll tell you about Pretty Kitty's mercenary corps, and you'll gain a location entry for Zerrikania. If you don't want to hear the story, then you can request some roses instead, and the Gardener will allow you to choose which color you want (red, yellow, or white). You can repeat this dialogue option as many times as you'd like.
The Gardener will also act as a shopkeeper (for flowers and some ingredients), and he's the one responsible for the
Echinops Contract. You can also play dice poker with the Gardener.
12 - Bootblack / Gossip
Bootblack and the Gossip both wander around (especially the Gossip), but you'll usually find them around this spot during the day.
Bootblack is a shoe shiner. If you pay him 2 orens to clean your boots, then he'll give you a lot of background information about Vizima. It should be clear from talking to him that at one point he was more than just a simple shoe shiner, and if you give him the book
Shadow People (from Thaler at #18), then you'll "recognize" who he is, and he'll give you
The Prophet Lebioda's Signet Ring, which you can use to impress Grandma (#16). There aren't really any hints that you should give the book to Bootblack; it's just something you can do.
The Gossip is a potential sexual partner. If you introduce yourself as Geralt of Rivia, then the Gossip might ask you for a present (just keep trying if she doesn't), and if you give her
Gold Women's Gloves or a
Diamond, then she'll sleep with you.
13 - Dwarven Blacksmith's House
You'll find a dwarven blacksmith and a trader here. They'll function just like the Order armorer and his apprentice (#3), except that they'll only deal with you if you support the Scoia'tael.
14 - Vivaldi's House
You'll meet the dwarf Golan Vivaldi inside this house. He's involved in the quests
A Mysterious Tower and
Suspects. Once you've cleared his name, when you talk to him again, he'll let you know that Azar Javed once attended the sorcerers' school in Ban Ard, and that he studied dark magic there.
15 - Kalkstein's House
You'll meet Kalkstein the alchemist here. When you talk to him, he'll give you the quest
A Mysterious Tower, which will last for the remainder of the chapter. After telling you the importance of the tower, Kalkstein will give you a
Teleporting Crystal, which will allow you to teleport from Places of Power to his lab (aka the basement of his house). Kalkstein will also act as a shopkeeper and offer you a variety of ingredients and books, and he's the one responsible for the
Alghoul Contract.
Eventually, after the quest
The Crown Witness, you'll decide that Kalkstein might be working with the Salamandra. This is covered in the
Suspects section.
16 - Shani's House
When you enter Shani's house, you'll be greeted by Grandma. Grandma's dialogue is random, and so sometimes you'll have an easy time getting past her, and sometimes you won't. If one tactic fails, just re-enter the house and try again.
If you get the "take pity on the kitty" dialogue, then you can bribe Grandma with 25 orens. If you get the "entertaining" dialogue, then you can give her
Gold Women's Gloves. If you get the "cold house" dialogue, then you can give her alcohol. If you have
The Prophet Lebioda's Signet Ring (from Bootblack at #12), then you can just show it to her. If you use a bribe or a ring to get past Grandma, then she'll like you for the rest of the game. If you talk your way past her, then you'll have to start over with her the next time that you enter the house.
Note: After the quest
Old Friend of Mine, you'll get a dialogue option to kill Grandma. Nothing bad will happen if you do.
Inside the house, on the ground floor, you'll find three odd things:
Grandma's Pickles and Lard,
Grandma's Cordial, and
Grandma's Diary. You'll need one of these items for the quest
Old Friend of Mine, but it's okay to pick them up now (they'll go with your quest items, so they won't waste any space).
Finally, you'll encounter Shani in her house during the night, and at the hospital (#10) during the day. Shani is involved in a few quests, including
Memory of a Blade,
Old Friend of Mine, and
Anatomy of a Crime.
17 - Merchant Street
You'll find four shopkeepers in this part if the quarter, including an antiquary and an herbalist. If you ask the herbalist where she gathers her herbs and give her a
Red Shawl, then she'll tell you that she goes to the
Swamp Forest at night, and she'll warn you to be careful there. We've never seen the herbalist's comments update our journal, but perhaps the information she gives is just a repeat of something from Chapter I.
Note: You can find two
Red Shawls in Shani's house (#16). You can also buy one from the nearby peddler.
18 - Thaler's House
Thaler is a fence -- of information as well as goods -- and so he'll pop up in a few quests, including
Memory of a Blade,
Berengar's Secret,
Suspects, and
A Game of Dice. Thaler is also available for most activities. You can shop with him (and buy, among other things,
The Book of the Golden Oriole and a
Sun Rune), you can drink with him (and win the book
Shadow People, which you can turn around and give to Bootblack at #12), you can play dice poker with him, and you can meditate with him.
19 - Prison
The first time you visit the prison, you'll find Vincent Meis, the captain of the guard, waiting inside. You can talk to him about a few things while he's there, but these topics are covered in his courtyard entry (#20), since that's where you'll usually encounter him.
You'll also meet Jethro in the prison. Talking to him after dealing with the cockatrice will complete the quest
Prison Break and cause him to unlock the gate leading to your equipment. Although Jethro will hint that he'll sell anything that you leave behind, he won't actually do it. You can leave items in the depository in the prison for as long as you'd like. Jethro is also involved in a bunch of quests, including
Hot Potato,
Suspects,
The Crown Witness, and
Wanted, and so you should exhaust all conversation options with him.
Outside the prison, you'll find a notice board with five contracts on it. These are the same contracts that you can pick up from the notice board in front of the Hairy Bear Inn (#8). The contract quests are covered in the
Contracts section.
20 - Vincent Meis
Vincent Meis is the captain of the guard. He'll start out the chapter in the prison (#19), but then he'll move to this courtyard so he can watch his men. You'll always find him here during the day. At night he'll disappear, and you won't learn why until Chapter III.
If you ask Meis about the Salamandra investigation, then he'll tell you that he has an operation planned in a warehouse in the Slums District tonight. This is covered in the
Suspects quest entry. If you can prove that Meis is innocent, then he'll give you a
City Guard Signet Ring, which you can use to get through some of the doors in the quarter, such as the gate to the
Dike (Exit B).
Meis is also the person to talk to about trophy monsters. He'll tell you about the two of them for this chapter -- the cockatrice in the
Sewers and Coccacidium in the
Swamp Forest -- and he'll pay you 400 orens for each trophy that you show him. If one of these trophies is your third, then he'll also reward you with a
Svarog Rune Stone, but you'll have to exit the conversation and then talk to him again to get it.
Note: We've heard that Meis can dislike you enough that he won't reward you for turning in trophies. So you should be careful what you say to him until you've gotten what you need from him.
21 - Crypt
If you can get into the cemetery (via Exit C), then inside this crypt you'll find several items of use:
Diamond Dust, a
Svarog Rune Stone, a
Red Meteorite, and more. You'll also encounter some of the tougher undead creatures: ghouls, alghouls, fleders and graveirs.
Exits:
- Entrance to the
Sewers. You can also reach the
Sewers via the floor grating in the prison (#19). The "relief" next to the entrance will play a role in a quest in Chapter III.
- Gate to the
Dike (and
Swamp Forest). If Siegfried is guarding this gate, then he'll allow you to pass through. Otherwise, you'll either have to bribe the gate guard or show him the
City Guard Signet Ring from Vincent Meis (#20).
- Gate to the Cemetery. This gate will start out locked, and you won't be allowed to go through it until later in the chapter after you've triggered the quest
Anatomy of a Crime. Even then you might not be able to go through, and for that case you'll have to wait until Chapter III to get inside.


