 Did we miss anything in this section? Is there something we didn't discover?
Let us know!
Walkthrough
Did we miss anything in this section? Is there something we didn't discover?
Let us know!
Walkthrough
This quest is a tutorial. It will introduce you to the mechanics of the game. It might seem like you should hurry to meet the objectives of the quest, but you don't need to. Your allies can defend themselves, and the bandits not near allies will wait for you. So feel free to take your time and get your bearings.
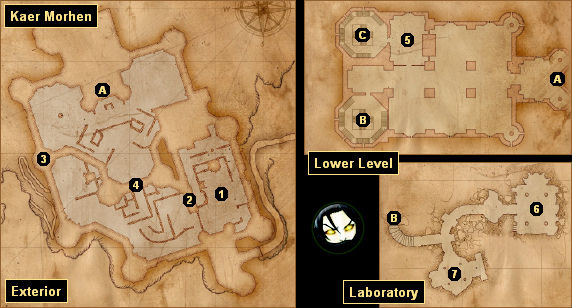
You'll start in the exterior of the castle (#1). You'll find a
Rusty Sword next to you, which you'll need to pick up and use on the nearby bandits. You'll only have the strong style available to you for this fight; you'll gain the other two styles shortly. Remember to wait for the attack cursor to change to a flaming sword before clicking on an enemy.
After the skirmish, one of the witchers will use the Aard sign to disperse some rubble and clear a path to the ramparts, and then the other witchers will ascend to a gate (#2). You'll need to follow them up. If you lose sight of them, just look for Leo. He'll wait for you.
When you reach the gate, you'll be ordered to open the gate to the upper courtyard (#4), but to reach the winch that opens it, you'll have to circle around to the northern side. If you're not sure where to go, the red markers on the map will show you the way. As you make your way to the winch, you'll have to fight some Salamandra bandits by yourself, and you'll be introduced to the fast fighting style. Use the strong style on the big bandits with the hoods, and use the fast style on the smaller, hatless bandits and also on the archer bandits.
Note: When you reach the tower (#3), the steps inside of it will collapse, but you'll automatically climb to the top. If your sword disappears during this sequence, it's a bug, and you'll need to load your game to get it back.
When you click on the winch, your allies will fight their way into the courtyard with you, and Triss will collapse the gate, preventing the Frightener from following you. Then you'll be given a new objective: to enter the keep (via Exit A) and deal with the bandits inside. Leo will accompany you for this. Vesemir will also give you a
Thunderbolt and
Swallow potion, and you'll have to drink the
Thunderbolt potion (by right-clicking on it) before you can go inside. You should save the
Swallow potion for a tough fight.
Inside the keep, you'll first face a group of strong opponents, and then you'll face a group of weak opponents, and you'll receive the group fighting style. When you reach the laboratory (via Exit B), the mysterious mage will create a barrier to prevent you from reaching him, and you'll have to find Triss so she can dispel it. However, at the same time, rubble will fall and block the stairs back up to the keep, and you'll have to visit the Circle of Whispering Stones (#6) to learn the Aard sign so you an remove it.
Right after removing the rubble, you'll be forced to make a decision: to help Vesemir defeat the Frightener, or to help Triss re-take the lab.
If you choose the Frightener...
... then the Frightener will break into the courtyard, and Vesemir will give you a
Tawny Owl potion. You should quaff the potion right away, since it will improve your endurance regeneration and allow you to cast Aard more quickly. If you still have the
Swallow potion, then you should quaff it, too. You'll need to cast the Aard sign on the siege cauldrons and the bell in the courtyard to make some noise and weaken the Frightener. You'll only be able to damage the Frightener when all three are ringing. If you get badly hurt, then just run away for a bit and let the Frightener attack your allies. The strong style is best for the Frightener.
If you choose the lab...
... then Triss will give you a
Tawny Owl potion, and you'll enter the keep. However, the mage Savolla will teleport into the keep as well, and he'll attempt to stop you. He'll create a fiery ring around you, and he'll attack you. To damage Savolla, you'll first have to kill the bandits feeding his shield. Once they've been dealt with, use the Aard sign to knock him down, or just begin whaling on him using the strong style. He shouldn't take too long to die.
Afterwards...
... you'll run into Triss, who was wounded by the mysterious mage in the laboratory (#7). When you reach the laboratory yourself, the bad guys will use a portal to escape with the mutagens, and the Professor will kill Leo with a crossbow bolt. "Ah. Another fairy tale."
Regardless of the fight you chose, you should have earned enough experience points to gain a level. To meditate and spend your bronze skill points, you'll need to talk to Vesemir and select the meditate option (Vesemir won't allow you to return to the keep until you've done this). You'll earn a ton of bronze skill points during the course of the campaign, so just pick whatever talents sound best to you. That being said, it's probably best to build up your attributes first, since those will help you at all times.
After meditating, when you talk to Vesemir again, he'll give you the quest
A Potion for Triss, and he'll tell you to talk to Lambert outside of the kitchen (#5). To complete this quest, you'll need to finish off all of the bandits remaining in the keep (you'll find them on the upper level). You'll also need to brew the potion for Triss. Once you've completed these objectives, the Prologue will end, and you'll move on to the
Outskirts of Vizima. You'll never return to Kaer Morhen, so be sure to explore it thoroughly before you leave.
1 - Starting Point
2 - Lower Gate
3 - Tower
4 - Upper Gate
5 - Kitchen
6 - Circle of Whispering Stones
7 - Laboratory
Exits:
- Entrance to the keep.
- Stairs between the lower level of the keep and the laboratory.
- Stairs to the upper level of the keep.


