 Did we miss anything in this section? Is there something we didn't discover?
Let us know!
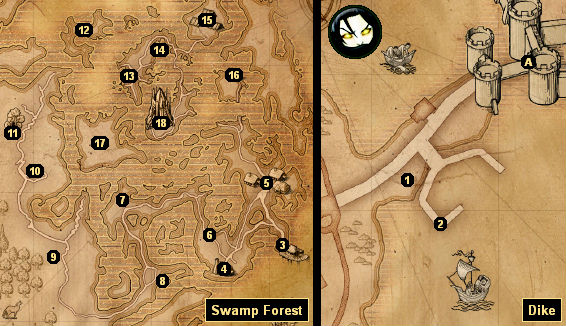
Overview
Did we miss anything in this section? Is there something we didn't discover?
Let us know!
Overview
The Swamp Forest is a dangerous place, especially at night. The first time you go through it, you should start during the day, and you should probably quaff a
Swallow potion just to be safe.
You'll also stumble across several obelisks in the Swamp Forest. They're involved in the quest
A Mysterious Tower.
1 - Declan Leuvaarden
Note: Leuvaarden sometimes moves around the Dike, but the area isn't very big, so you shouldn't have much trouble locating him. He'll also only appear here during the day.
Leuvaarden is a rich merchant, and he's involved in a few quests, including
A Mysterious Tower,
Safe Haven,
Suspects, and
Wanted. He'll also act as a shopkeeper for gems and jewelry.
2 - Ferryman
You'll find the Ferryman wandering around the docks here and also patrolling the landing in the Swamp Forest (#3). If you pay him 5 orens, then he'll transport you between the Dike and the Swamp Forest.
3 - Landing
You'll find a few people at the landing:
- Ferryman. He'll transport you between the Swamp Forest and the Dike for 5 orens.
- Fisherman. You can buy fish from him.
- Gramps. If you tell Gramps that you're looking for work, then he'll ask you to escort him to the Melitele shrine (#7), and you'll automatically agree to take him. This will trigger the quest "A Pilgrimage" and cause Gramps to begin following you. We don't think Gramps can actually get killed during the trip, so you don't have to worry about protecting him during fights. However, you should go directly to the shrine. We've heard people say that if they make detours along the way (such as by entering the cave at #8), then Gramps will stop following them, breaking the quest. When you reach the shrine, you'll receive 1500 experience points, and Gramps will invite you to visit him at his cabin (#16).
- Jean-Pierre. He'll tell you about a colleague of his named Bonhart who used to kill witchers, but this won't lead to anything. Jean-Pierre will also accept the
Wolf Contract.
- Nosy Dog. The nosy dog will follow you around and probably get itself killed. It's not involved in any quests, so nothing will happen if you keep it alive. On the brighter side, the dog should drop
Dog Tallow when it dies, which you might find useful for the
Dog Contract.
4 - Clay Pits
You'll find two mutilated corpses on the southern side of the pits, including one with a
Split Salamander Brooch. You'll speculate that only a witcher's sword could have split the brooch. If you've already talked to Vaska (#5), then you'll decide that the other corpse must belong to Berengar.
Near the Clay Pits you'll find a vodyanoi altar. A vodyanoi warrior will visit the altar at night. You'll learn what to do with the altar and the warrior in the quest
A Long Way from Home.
5 - Brickmakers' Village
You'll find lots of brickmakers, huts and barrels in the village, but the only thing of importance is Vaska's house. Inside you'll meet Vaska, the village "eldress." She'll update the quest
Berengar's Secret, and she'll tell you about the Sentry golem at the mage's tower (#18), which will trigger the quest
The Sentry.
If you ask Vaska about the village's monster problems, then she'll give you the quest "Clay Pits," and she'll ask you to kill the drowners at the Clay Pits to the south (#4). Once you've done that, she'll reward you with the
Kezath Sephirah, which you'll need for the quest
A Mysterious Tower. You can also shop, meditate, and play dice poker with Vaska.
"Wonderful! Now we can prepare for the coming of the Lords!"
After completing "Clay Pits," the village will shift slightly and turn into something of a cult for their Lords, the vodyanoi. If you talk to Vaska at this point, then she'll give you the quest
A Lost Lamb, which you won't be able to complete until Chapter III.
One of the brickmakers in Vaska's house will also thank you for helping the village, and he'll offer you 100 orens. If you decline the offer, then he'll teach you the recipe for
Perfume. You might need to exit and then re-enter Vaska's house to get the brickmaker's dialogue to show up.
6 - Coccacidium
The Coccacidium can appear in multiple places in the swamp, but every time we've started out the area by accepting Gramps' quest (see #3) and heading for the Melitele shrine (#7), we've found it here.
The Coccacidium is a nastier version of the echinops plants, and it's one of the two trophy monsters for the chapter. The Igni sign and the
Golden Oriole and
Swallow potions are good ideas when facing it, and if you're using the point-and-click interface, then you might need to manually move Geralt next to the plant to attack it.
When you kill the Coccacidium, you'll find an
Archespore Head on its corpse. When you take that trophy to Vincent Meis (in the
Temple Quarter), he'll reward you with 400 orens.
7 - Melitele Shrine
The shrine is involved in Gramps' quest "The Pilgrimage" (see #3).
8 - Cave
You'll encounter lots of wolves in the cave, making it a good source of
Wolf Pelts for the
Wolf Contract (which you can turn in at #3). In the back of the cave, you'll also find a couple things of interest: a Circle of Hanging Stones, which will give you the Quen sign, and Vran's sarcophagus, where you'll discover the
Y'esath Sephirah.
9 - Lumberjacks' Clearing
Yaren Bolt is the leader of the lumberjacks. You'll find him in the center of the clearing, and he'll give you two quests:
Flowers and Gold and
A Long Way from Home. One of the regular lumberjacks will also talk to you. He'll offer you a collection of items, including the formula for
Wives' Tears,
Sodden Mead, a
Silver Ring, and a
Red Meteorite (if you're playing the Enhanced Edition) for 200 orens. You can get the price down to 150 orens by bargaining with him, but beyond that he'll give up on you.
10 - Order Camp
The Order of the Flaming Rose will set up camp here after you've accepted the quest
Worth Its Weight in Gold from Yaevinn the rebel leader (see #11). Siegfried will arrive with the Order, and he'll offer you the quest
Force Recon.
11 - Druids' Grove
You'll encounter a few people and things of interest inside the grove:
- Circle of Unwanted Power. When you click on the circle, you'll gain the Yrden sign.
- Druid. If you talk to a regular druid, he'll update two quests:
A Lost Lamb (see #5) and
Flowers and Gold (see #9).
- Elder Druid. The elder druid is a shopkeeper. He'll offer you a variety of ingredients, consumables and books, including the
Formula for Maribor Forest and
The Druid's Herbarium. The elder druid will also have
Beggartick Blossoms for sale, but it's much cheaper to pick them yourself.
- Morenn. Morenn is a dryad. She'll update the quest
A Lost Lamb, and afterwards she'll give you a chance to sleep with her. All you'll need to do is give her a
Wolf Pelt and convince her that sex without procreation is worthwhile. You'll only be given three dialogue options for the latter. The right one starts with "sex relieves stress." If you give Morenn the wrong answer, then you'll need to wait a day before trying again.
- Yaevinn. Yaevinn will give you the quest
Worth Its Weight in Gold. After you've accepted the quest, when you leave the Swamp Forest Yaevinn will move over to the rebel camp (#15), and when you talk to him there he'll also offer you the quest
Force Recon. Both of these quests are optional, but they can give you favor with the Order or the Scoia'tael.
12 - Wyvern Island
You'll encounter half a dozen wyverns on the island. Wyverns aren't too bad if you fight them one-on-one, but if two or more start attacking you, you might be in trouble. So try to lure the wyverns to you rather than charging at them, and buff up as much as possible before facing them.
If you can defeat the wyverns, then you'll find a messenger's corpse in the middle of the island. On the body you'll find a
Blood-Stained Letter, the sword
Harvall, and more. The letter looks like it might prove Leuvaarden's innocence (since it implies that he's in a secret society), but it won't really change anything when you talk to him.
13 - Fireplace
At night you can sometimes find alghouls near this fireplace. So if you're having trouble with the
Alghoul Contract, this is the place to go.
14 - Collapsed Tower
This tower is just a landmark. You can't do anything with it.
15 - Rebel Camp
If you click on the regular Scoia'tael in the camp (not the warriors or the scouts), then she'll start up a conversation with you. If you tell her, "I don't remember elven history," then she'll give you the book
Lara's Gift. If you tell her, "You're blinded by hatred" and give her
Feainnewedd, then she'll say that she'll teach you about Burmarigold, but there's no such plant in the game. However, if you return to her on later days and repeat the
Feainnewedd conversation, then she'll teach you about other plants, including
Green Mold.
Eventually Yaevinn will show up at this camp after starting out in the Druids' Grove (#11). For more information on him, see the Druids' Grove entry.
16 - Gramps' Cabin
Inside the cabin in a bookcase you'll find the book
Ain Soph Aur, which you might need for the quest
A Mysterious Tower. Later, after you've completed the quest "A Pilgrimage" (see #2), you'll encounter Gramps in the cabin, but when you approach him you'll notice gnawed human bones and brains. This will trigger the quest "The Cannibal," which will give you the option of killing Gramps or letting him live.
If you attack Gramps, then he'll run outside, and five echinopsae (including one archespore) will spring up to protect him. For defeating all six enemies, you'll get about 5000 experience points. If you let Gramps live, then he'll give you the
Formula for Hanged Man's Venom, and you'll earn 1500 experience points. Gramps isn't involved in any other quests, so the decision is up to you.
17 - Golem Burial Ground
You'll find golems and pylons here. You'll learn more about them in the quest
The Sentry.
18 - Mage's Tower
Kalkstein (in the
Temple Quarter) will ask you to figure out a way to get inside this tower. For more information on how to do this, see the quest entry for
A Mysterious Tower. Inside the tower you'll find a Gate of Water, which will give you the Axii sign, plus a
Red Meteorite, two packages of
Diamond Dust, the
Tower Mage's Book, and more. When you exit the tower, you'll finally face off against Azar Javed.... but you'll lose the battle, and that's how the chapter will end.
Exits:
- Gate to the
Temple Quarter. During the quest
The Rat, Coleman will leave the Hairy Bear Inn (in the
Temple Quarter) and hide out here. Once you've completed the quest, he'll disappear for good.


