 Did we miss anything in this section? Is there something we didn't discover?
Let us know!
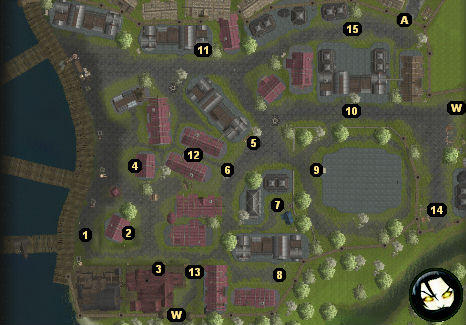
Walkthrough
1 - Starting Point
Did we miss anything in this section? Is there something we didn't discover?
Let us know!
Walkthrough
1 - Starting Point
"So this is Neverwinter? Suppose it's passable -- for a city built by humans."
2 - Sand's Shop
Sand's Shop will be closed and locked when you first arrive in Neverwinter. It will only open up after you've met Sand at the Sunken Flagon (#3). At that point you'll be able to buy a variety of spells, potions, and crafting supplies from Sand, and you'll also be able to use the alchemist's workbench in the back of his shop. Sand will give you much better prices on your equipment than any other merchant in the city.
3 - The Sunken Flagon
You'll meet your uncle Duncan here. He'll give up his
silver shard when you ask for it, and he'll hint that your mother had something to do with the shards, although he won't go into detail. He'll leave that for Daeghun to tell you, later. Then the two of you will decide that a spellcaster might have better luck evaluating the shards, if he had two shards to work with rather than one.
At that moment the wizard Sand will walk into the tavern. He'll trade some barbs with Duncan, and then he'll attempt to scry the two shards -- only to knock everybody to the floor! If the shards were dormant before, then they're certainly awake now. With the scrying clearly beyond him, Sand will recommend that you speak to Aldanon the Sage in the
Blacklake District.
Of course, you'll soon learn that the City Watch recently closed the
Blacklake District due to Lord Dalren's murder (which you saw in a cutscene upon arriving at the city), and so getting into the district won't be easy. In fact, you'll learn that you'll only have two options: to join the City Watch and enter the district through legitimate means, or else join Moire's gang of thieves and sneak into the district. This choice will start a long branch in the campaign, so choose carefully. If you decide to join the City Watch, then you'll need to talk to Marshal Cormick in the City Watch building in the district (#9). If you decide to join Moire, then you'll need to speak to Caleb in an alley in the southern part of the district (#8).
At the end of the conversation, Duncan will invite you to use the Sunken Flagon as your home away from home. If you played either of the Knights of the Old Republic games, then the Sunken Flagon will act like your Ebon Hawk: all of your companions will hang out there, and when you leave the building you'll be asked which ones you want to take with you. You'll find some workbenches in the tavern, in case you want to do some crafting, but while you'll also find a room labeled as your "personal room," you won't find any containers around, and so you'll have to use your companions for storage.
Note: People have reported that if you try to use the workbenches for storage, the equipment you place on them will eventually disappear.
Another Note: You might notice a man named Bishop in the tavern. He'll come into play later.
4 - Hagen's Imports
You won't be able to enter this shop when you first arrive in the district. Later, you'll receive a quest that will allow you to go inside.
5 - Repko the Weaponsmith
Repko will sell you a variety of regular and +1 weapons, plus a few named items like the
Elven Court Bow and
Krotan's Skullcrusher.
Note: If you use "sleight of hand" on Repko, then you'll eventually steal a
Blade of the Gladiator from him.
6 - Ambush
The first time you make your way through this part of the district, four bladelings will jump out and attack you.
7 - Werth the Armorsmith
Werth will sell you a variety of regular and +1 pieces of armor, plus a few named items like
Armor of Comfort and
Flaming Gloves +2.
8 - Caleb
Caleb is the contact for Moire's gang. If you join with Moire, then you won't be allowed to join the City Watch.
Joining the Moire's gang will begin a long branch in the campaign, which will eventually lead to you gaining access to the
Blacklake District. For more information on Moire's quests, check the "Act I: Bandit Quests" section of the walkthrough.
9 - City Watch Building
Inside the City Watch building, you'll meet Lieutenant Roe and Marshal Cormick. Cormick will pay you 300 gp for your work in
Fort Locke, and then he'll suggest that you join the City Watch. But be warned: if you join the City Watch then you won't be allowed to join Moire's gang (#8).
Joining the City Watch will begin a long branch in the campaign, which will eventually lead to you gaining access to the
Blacklake District. For more information on the City Watch quests, check the "Act I: City Watch Quests" section of the walkthrough.
10 - Bennon
If you have Neeshka in your party, then the first time you walk along this street you'll encounter Bennon and a couple of his street thugs. Bennon will tell you that a man named Leldon has put out a bounty on Neeshka -- and then he'll try and collect on it! None of the bounty hunters will drop anything interesting when they die.
"I guess the Watch will clean these bodies up. Or maybe there'll be a rain or something. Let's go!"
11 - Moire's Office
You'll only be allowed to enter Moire's office if you join Moire's gang (see #8).
12 - Wounded Wolf
After defeating the bladeling ambush (#6), the next time that you enter the Docks District, you'll find a wounded wolf here. If you have Elanee in your party, then you'll discover that the wolf is really a druid from the Circle of Swords, and that things seem to be going badly for druids everywhere. The druid will suggest that you use the
Skymirror to talk to the druids of the Circle of Swords, and he will mark the
Skymirror on the world map. Then the druid will leave, and you'll earn 250 xp.
Note: If you kill the druid, then you'll never get to visit the
Skymirror, but you won't break Elanee's line of quests. See
Elanee's character page for more information on her quests.
13 - Qara
At some point in Act I (usually during the "guard post" quest for either the City Watch or Moire), you'll encounter three female Academy students next to the Sunken Flagon (#2). They'll be setting up for a fight, and Duncan will ask you to calm them down -- but not so Khelgar: "Mreow... someone get me a tankard, this is going to get good."
There are two ways the encounter can go: you can either convince Hetha and Glina to leave peacefully, or else you can encourage a fight and then kill them. Either way, afterwards Qara will enter the Sunken Flagon, and she'll become available as a companion.
14 - Reylene
At about the same time that Qara (#13) shows up, you'll also meet a gnome merchant here named Reylene. If you joined Moire's gang, then after a long, roundabout conversation, you'll be able to demand protection money from Reylene. If you joined the City Watch, then you'll find some thugs trying to shake Reylene down, and you'll probably end up killing them. Either way, Reylene will eventually act as a shopkeeper, and she'll offer you a variety of equipment from all five categories.
15 - Encounter with Wolf
After receiving the quest for the Back Alley (Exit A) from the City Watch or Moire, then the next time you walk along this street you'll encounter a thug trying to force Wolf to work for him. If you take the thug's side, then Wolf will run off. If you take Wolf's side, then Wolf will walk off. That is, it doesn't really matter how you play the encounter.
After you've had two encounters with Wolf (the other encounter is in the
Merchant Quarter), then the next time you exit the Sunken Flagon, you'll meet up with him again. No matter how you've treated Wolf and his street urchins in your first two encounters with them, Wolf will invite himself and his merry band to stay with you in the Sunken Flagon, and they'll begin working for you as messengers.
Exits:
- Exit to the Back Alley. The Back Alley is involved in a quest. You won't be able to visit the area until that time.
- World exit.


