 Did we miss anything in this section? Is there something we didn't discover?
Let us know!
Walkthrough
Did we miss anything in this section? Is there something we didn't discover?
Let us know!
Walkthrough
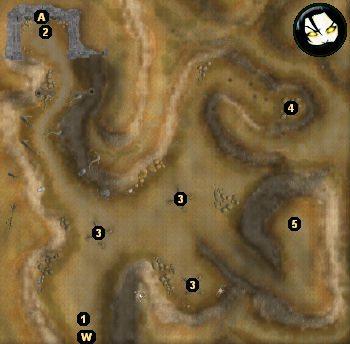
You'll find some gargoyles and shadow mastiffs scattered around when you first enter the area, and it might look like you'll just need to fight your way to
Ammon Jerro's Haven (Exit A). But when you get to the haven entrance, you'll meet a Jerro Guardian (#2), and it will tell you that in order to enter the haven, you'll need to walk three paths: one each for Determination, Righteousness, and Sight.
Path of Determination: "The ability to disregard pain and loss and suffering and reach your goal -- any goal." When the guardian tells you about this path, he'll give you an
empty vial. To complete the path, you'll need to run up to the geyser (#4) and collect some water from it. As you approach the geyser you'll take magical damage (that can't be evaded), but this is sort of a dopey penalty since if you die, you'll be able to just get right back up and keep moving. When you reach the geyser, you'll be given dexterity and tumble options for collecting the water, but failing these checks only means that you'll take some acid damage. Regardless of the choices you make, you should end up with a
vial of burning water, and you should earn 500 xp.
Note: Since only the main character can complete the Path of Determination, you should tell your other characters to stand their ground so they won't get hit with magical damage as well.
Another Note: 16 dexterity is enough to pass the dexterity check.
Path of Righteousness: "It is the will to do what
must be done to achieve the greater good." When the guardian tells you about this path, he'll describe a barbarian shaman (#5) who will one day cause untold death and destruction. When you reach the shaman, if you refuse to fight him, then he'll summon five barbarian spirits, and you'll have to fight them instead. If you decide to kill the shaman, then you'll only have to face him. The shaman is the easier fight, he'll give you more xp than the five spirits combined, and you'll find
Eberond's Flail and an
Uthgardt Holy Shield on his remains, easily making his fight the more worthwhile option. But either way you'll earn 500 xp once the dust has settled.
Path of Sight: "It is the ability to seek out dangers you sense but cannot see." For this path you'll need to visit each of the three braziers in the area (#3). At each brazier you'll encounter a trio of fire elementals, one of which will drop a
fiery heart when it dies. You can use the
fiery hearts to light the braziers, although when you do several shadow creatures will appear. To complete the path, you'll need to light all three braziers and defeat all of the shadow creatures.
After completing the three paths, when you return to the guardian, he'll reward you with more xp (2000 xp in total, making each path worth 1000 xp), but he'll require Shandra to provide a drop of her blood as proof of her ancestry. Once she does that, she'll disappear, and the gate to the haven (Exit A) will open.
1 - Starting Point
2 - Jerro Guardian
If you've talked to Guyven at
Crossroad Keep, then when you approach the guardian you'll receive a message that this is a location that Guyven would be interested in hearing about, and you'll earn 100 xp.
3 - Braziers
4 - Geyser
5 - Shaman
Exits:
- Haven entrance. You'll have to complete the guardian's tasks (#2) before you'll be allowed inside.
- World exit. Once Shandra has disappeared, you won't be allowed to use the world exit until after you've explored
Ammon Jerro's Haven (Exit A).


