 Did we miss anything in this section? Is there something we didn't discover?
Let us know!
Walkthrough
Did we miss anything in this section? Is there something we didn't discover?
Let us know!
Walkthrough
This is the final area in the campaign. Here you'll fight Black Garius and then the King of Shadows. But, as you might expect, things won't be easy. The battle will take place in several stages, and each stage will present you with a different challenge. If you're not sure what you should be doing at any time, then listen to Ammon Jerro. He's the one who will provide you with instructions.
Stage 1: Black Garius
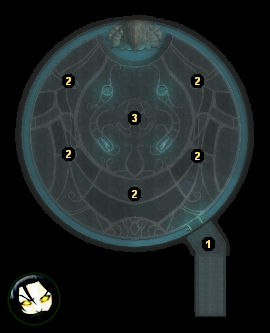
When you first enter the Inner Sanctum, you'll appear in a small foyer (#1). All of your companions (minus Neeshka abd Bishop) will be with you. It is safe to rest in the foyer, so if you have companions who need to be leveled up, you can do that and change their spells and then have them rest so that they'll be at full strength for the fights ahead. If you have extra equipment lying around, you might also want to distribute some to companions who you haven't used very much.
As soon as you enter the inner sanctum itself, a cutscene will start up. You'll be reunited with Neeshka, but then Black Garius will show up and attempt to lure some of your companions to his side. He'll always try to seduce Neeshka, Sand, Qara, and Ammon Jerro. From our experience, Ammon Jerro will never switch sides, but you'll probably lose either Sand or Qara. For Neeshka, you'll just have to beat an influence check.
Bishop will also show up during this time, and while you won't be able to lure him back to your side, it is possible to convince him that he won't fit in with the King of Shadows, either, and that he should simply leave the conflict.
If Bishop stays with the King of Shadows, and if the Construct is with you, and if you
fail an influence check with Grobnar, then Bishop will
take control of the Construct, and the Construct will join the King of Shadows.
When the battle starts up, forcefields will appear between the statues (#2), forming a "U" around the portal (#3). If you try to circle around the forcefields to get to Black Garius, then more forcefields will pop up, and your party will be separated, probably with your melee characters in one part of the sanctum and your ranged characters where you started.
Since Black Garius will summon a balor and perhaps some undead creatures (like dread wraiths) at your starting position, it's best not to move your party around. Have your melee characters deal with the summoned creatures, and have your ranged characters take down the enemies on the other side of the forcefield (spells and arrows can pass through the forcefields, but people can't). For sure, deal with Sand or Qara first, if one of them betrayed you. Then concentrate on Garius. Since you recited his true name during the battle at
Crossroad Keep, you won't need to do it again here. Garius might move over to the portal and regenerate his health, but it appears that he can only do this once or twice, and so you should eventually be able to wear him down.
Note: The forcefields can be attacked and destroyed, but it will take a while. We'd only recommend that you destroy forcefields if your melee characters don't have anything else to attack, and if you want to clear a path to Black Garius.
Stage 2: Meeting the King of Shadows
After defeating Black Garius, you'll be given a short respite. You can use this time to rest and to loot equipment from whichever companions betrayed you and died. This is also a good time to save. When you're ready to continue, click on the portal (#3).
When the King of Shadows comes through the portal, one of two things will happen. If you're evil, then he'll try to convince you to join him. If you agree, then you'll have to demonstrate your loyalty to him by killing your remaining companions. If Bishop left prior to the battle with Black Garius, then he'll return to help you now, but even with Bishop this can be a very difficult battle since you'll be thoroughly outnumbered.
The easiest way to deal with this battle is to sabotage your companions beforehand. Strip them of their equipment (perhaps dumping it all on one character to weigh that character down), empty their spellbooks, and don't let them rest after the battle with Garius. If you succeed in the battle, then the campaign will end here, and you'll see an ending sequence far different than the one for good characters.
"I've wanted to do that to them since we started traveling together -- that was the most fun I've had in years."
If you're playing a good character, or if you don't want to join the King of Shadows, then you'll have to fight him. Ammon Jerro will tell you to "use your powers from the ritual," but this isn't necessary. You'll just need to drop the King of Shadows to about 10% health (which should be fairly easy to do), and that will cause him to disappear.
"So was that it then? Not what I was expecting."
Stage 3: Send in the Clones
After a brief delay, several smaller versions of the King of Shadows will appear in the sanctum, and more will appear after that. There isn't really any trick for dealing with them; you'll just need to kill the clones in any way that works for you. Ammon Jerro will suggest using "web of purity" (his feat) along with "cleansing nova" (your feat), and that's certainly one way to get the job done. In all, you'll need to kill 20-30 of the mini-kings.
Stage 4: The Bigger They Are...
Eventually, a much bigger version of the King of Shadows will appear, and Zhjaeve and Ammon Jerro will tell you that he is relying on the statues (#2) for his power, and that you'll need to destroy them to make him vulnerable. While the statues are still standing, the King of Shadows will quickly regenerate any damage done to him, and so you should ignore him as much as possible. Send your melee fighters out to bash the statues, and use your casters to buff and heal. The King of Shadows has a nasty area effect spell that does cold and negative energy damage, but he doesn't use it very often, and otherwise he probably won't do much while you're busy with the statues.
Once the statues are down, Ammon Jerro will tell you to attack the portal (#3) with the
Silver Sword of Gith. The portal has about 500 hit points, and it can take a while to destroy. If you have any haste spells left, cast one on your main character to make the bashing go quicker, but otherwise just do what you were doing before, healing your party as necessary.
Once you've destroyed the portal, the King of Shadows will stop regenerating his health, and you'll finally be able to kill him. If you've kept your party mostly or completely alive, then this shouldn't take very long, and it shouldn't cause you any problems. Once the King of Shadows dies, the campaign will end, and an ending cinematic sequence will start up.
Note: In case you're curious, the ending sequence for evil characters is way more fun than the one for good characters.
1 - Starting Point
2 - Statues
3 - Portal


