 Did we miss anything in this section? Is there something we didn't discover?
Let us know!
Area Note
Did we miss anything in this section? Is there something we didn't discover?
Let us know!
Area Note
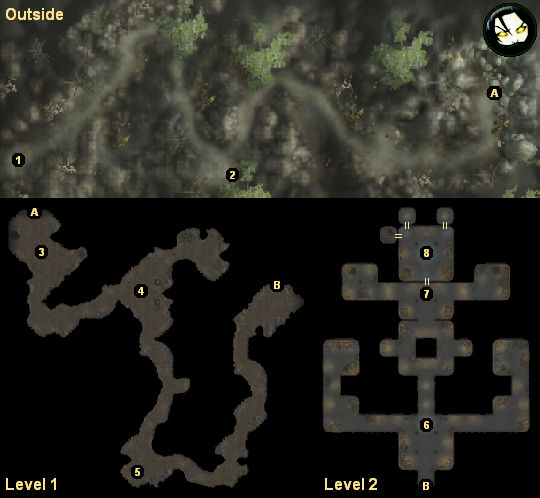
The first thing you might notice when you enter this area is that there isn't an exit to the world map. That means that once you've arrived here, you'll have to push forward until you've dealt with Zeeaire (#8). Since this area is your last stop before the end of the Act, you should try to progress your optional quests as much as possible before coming here. In particular, it appears that you can only go to
Skymirror during Act I, and so you should definitely go there while you still can.
Walkthrough
When you reach the githyanki cave (via Exit A), you'll be stopped by a sword stalker (#3). You can talk to the sword stalker if you want -- he'll tell you a few things, like what
kalach-cha means, for example -- but at the end of the conversation, he'll always attack you. The sword stalker isn't much tougher than a regular githyanki, and it shouldn't take much effort to kill him. He'll drop
Scales of Truth +1 and
Sword Saint Legacy +1 when he dies.
As you advance farther into the cave, you'll discover that the githyanki have come under attack. You'll witness an unnamed warlock (#4) sending his demons after the githyanki, and you'll also find a construct (#5) that doesn't seem to belong to the githyanki or the warlock, meaning that there are at least three groups after the silver shards. Well, the more the merrier, we always say.
At the start of the lowest level of the cave, you'll run into a devil surrounded by three succubi (#6). After defeating the succubi, the devil will tell you that the only way to lower the forcefield next to him is to grant him his freedom. It sounds like a trick, but the devil is bargaining in good faith, and this appears to be the only way to lower the forcefield. When you banish him, you'll learn that the devil's name is Mephasm, and you'll end up with an
interdimensional sphere (which you'll be able to use later at #8). You'll meet Mephasm again.
Just outside Zeeaire's chamber (#8), you'll meet the demon Zaxis (#7). If you talk to him, you'll learn that he's having trouble getting through the door next to him. There are two ways to deal with Zaxis. You can fight him (which is worth about 350 xp), or you can convince him that he's taken too long at the door, and that his mission has failed (which is worth no xp). Regardless, when Zaxis goes away, he'll drop an Amulet of Will +3, and the door will open.
At the end of the cave, you'll meet Zeeaire (#8), the chief sword stalker. She'll blame you for the theft of the silver shards since you're the one carrying them now, and she'll take the shards from you -- all but one, that is, because you'll learn that one shard is actually inside your body.
As far as we can tell, you'll have to fight Zeeaire. If you're diplomatic, you can make this fight a little easier by asking Zeeaire to recount your crimes. She'll stumble when she describes what the shards are a part of, and if you call her on it, then two of the githyanki guards will leave when the fighting starts. But note: it appears as though you'll only find an
Adamantine Heavy Shield and
Bracers of Armor +4 if you fight all of the githyanki guards.
Zeeaire is a spellcaster, and she'll have a barrier protecting her. Two remove the barrier, you can either use the
interdimensional sphere (#7) on Zeeaire, or else you can attack the three groups of "portals" surrounding the barrier. You might have an easier time in the battle if you defeat the githyanki guards first and then remove the barrier.
Once you've done enough damage to Zeeaire, she'll stop and talk to you. You'll learn that the githyanki were trying to collect the silver shards to keep them away from the King of Shadows, but that you've destroyed the last githyanki base capable of supporting the fight, and so now you'll stand alone against him.
Zeeaire will die at the end of the conversation, whether you snap her neck or not, and on her corpse you'll find a
Greatsword +2,
Gauntlets of Ogre Power,
Enkidu's Armor, and all of the silver shards you had before, plus two new ones: one shard for
mental bonuses and another for
paralysis immunity. (As of version 1.03, we got the
shard for mental bonuses twice. The bonuses don't stack, but you can give shards to your companions if you want.)
Besides Zeeaire, you'll discover two other things of interest inside the final room: a chest and Shandra. You can pick up a
Cloak of Elvenkind from the chest, and when you talk to Shandra, she'll agree to let you take her back to the Sunken Flagon. If you'd rather continue exploring the cave before departing, then you can just talk to Shandra again to leave.
When you return to the Sunken Flagon, you'll start up an extended cutscene. Shandra will join your party, the Act will end, you'll be accused of slaughtering the entire village of Ember, and Sand will become available to help you out.
1 - Starting Point
2 - Guyven of the Road
Guyven will tell you that he came to this area to explore the Illefarn ruins at the top of the hill. Instead, he found a bunch of githyanki here, and they captured him. If you ask Guyven for a story, then he'll give you a short introduction as to why the Illefarn created a Guardian to protect themselves from the Netheril. Just talking to Guyven will net you 250 xp.
3 - Sword Stalker
If you examine the sword stalker, you'll see that he is the one who killed Amie during the battle at
West Harbor.
4 - Warlock
This is the warlock who killed the nobles in the
Blacklake District.
5 - Construct
This is the same Construct you fought at the
Githyanki Hideout (although it was called a blade golem then). Eventually you'll be able to fix the Construct and use it as a companion. See the
Construct's character page for more information.
6 - Mephasm
You'll need to free Mephasm in order to get past the barrier next to him.
7 - Zaxis
You'll need to defeat or trick Zaxis to get through the door next to him.
8 - Zeeaire's Chamber
You'll find Zeeaire and Shandra here. After defeating Zeeaire, Shandra will agree to accompany you back to the Sunken Flagon, where she'll join your party.
Exits:
- Entrance to the githyanki cave.
- Doorway between the two levels of the cave.


