 Did we miss anything? Is there something we didn't discover? Let us know!
This apartment complex on Grand River Road is just across from the
Chiron Building, but can only be accessed via a fire escape in the alley outside. While you'll technically be able to reach this building during your first visit to Detroit, it only becomes plot-relevant after you've hunted down Isaias Sandoval's location. Depending on how you handled the situation with Taggart, Isaias will react to you in one of two ways a bit later on.
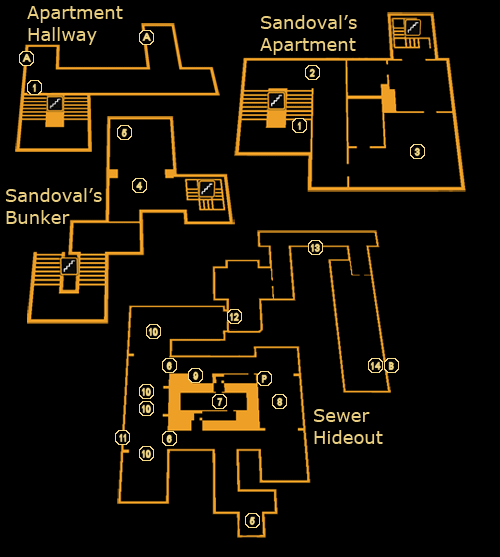
1 - Stairs
Open the gate and take the stars down - you won't find anything interesting in the other direction.
2 - Purity First Thugs
Two Purity First goons are waiting around here, indicating that Taggart's information may have been good after all. Knock them out or kill them and move on.
3 - Sandoval's Apartment
If Zeke Sanders is alive, you'll walk into the apartment and spot a
Praxis Kit on the floor. Picking it up will trigger an EMP blast and Zeke Sanders will charge into the room ready to attack. You'll then have to take out Sanders, lethally or non-lethally. To avoid the ambush, sneak into the bedroom and take out Zeke - his trap won't do him very well now. The
Praxis Kit will be free for the taking afterwards (as will the EMP Mines underneath the corpse). Note that Zeke here appears regardless of what your status with him was, so the outcome is the same regardless of whether you had him arrrested, let him go, etc. Be sure to loot Zeke's body for some
Painkillers and a Pocket Secretary containing the code "5463". Meanwhile, if Zeke is dead, then you won't find him here, nor will there be an ambush or a Praxis Kit waiting for you.
With that out of the way, get to searching the apartment. You'll find a safe in the next room behind the picture frame with a level 4 lock, code "5463" - loot the inside for two Credit Chips, two
Frag Mines, two boxes of
Tranquilizert Darts, and a box of
Stun Gun Darts. Not bad! Upon more thorough searching, you'll find Sandoval isn't int he immediate area... however, check the bathroom (behind the crates), and you'll find both a weak wall to destroy (+200 XP bonus for getting in), and a breaker box behind a stack of boxes in the corner, which will open a hidden door in the previous room. Seems like these Illuminati types pull out all the stops. The weak wall route is a bit more covert than the stairs leading down, but either way you'll gain +750 XP for finding Sandoval's bunker.
4 - Sandoval's Bunker
Sandoval's hidden bunker isn't too well-guarded - there's a couple of Purity First goons, but little else stopping you. Your goal is to reach the ladder inside the shipping container leading down to Isaias, so you can safely ignore the thugs if you don't want to loot the room. Otherwise, you'll find a good deal of gear: three
Revolvers, two
Shotguns and a
Combat Rifle in the weapon cabinets, and, in the lockers, three
Sniper Rifle Ammo boxes, four
Combat Rifle Ammo boxes, two packs of
Revolver Ammo, and two packs of
Shotgun Cartridges. Locked and loaded. When you're ready, head down the ladder in the cargo container to find a sewer route to Sandoval.
5 - Ladder
Check the shipping container for a ladder that takes you down into Sandoval's hideout in the sewers. The sewer hideout below has about 5 guards on patrol, as well as some basic security systems.
6 - Laser Grid
The lasers here can't be disabled, but using the
Stun Gun or dragging a guard's body nearby will allow you to take them down temporarily, granting you passage and allowing you to avoid some of the guards.
7 - Duct
Duck into the duct for a +100 XP bonus and a way to bypass the guards outside.
8 - Guards
Three guards rest around this barrel - conveniently, two are having a chat, while another has his back turned. If you've got the ability to take down two at once, then you should be able to perform takedowns on all three without being detected.
9 - Dedicated Panel
This level 4 panel will disable the laser grids marked at (6). The code, "8218", can be found on one of the patrolling guards.
10 - Frag Mines
You'll find
Frag Mines mounted to the railings all throughout this side of the sewers. Blow them up or disable them to reach Sandoval.
11 - Weak Wall
You know the drill by now. Break down this wall for a +200 XP bonus and a
CyberBoost ProEnergy Bar.
12 - Isaias Sandoval
Two things can happen with Sandoval depending on your actions. If you hacked into Taggart's computer bak at the
Convention Center and
didn't upload the recording of Sandoval's involvement in the conspiracy, then you'll break into his office and restrain him by force. He'll admit to trying to remove the GPLs from the Sarif scientists, but it turns out he was unable to do so - instead, he lowered the frequencies they broadcast at to effectively render them undetectable without someone specifically looking for them. Although he doesn't know where the scientists are, the GPLs could very well provide their locations. During the interrogation, another glitch will hit Adam, and Sandoval will take the moment to push Adam away and grab his
Revolver, so you'll have to either kill him or knock him out. Doing so will grant you +1000 XP.
If you publicly exposed Isaias to the press,
or hacked into Taggart's computer and uploaded the recording of Sandoval, things will be quite different. For one, Sandoval will be much less murderous. In the conversation, he'll admit to trying to remove the GPLs from the Sarif scientists, same as above. Although he doesn't know where the scientists are, the GPLs could very well provide their locations. As you go to leave, however, Isaias will produce a Revolver and a single bullet, with his intent on suicide rather than public humiliation clear.
You'll enter into a social battle to talk Isaias out of killing himself at this point. During the conversation, you'll need to try to bring out the good in him - but doing so too abruptly will cause him to only become more desperate, as he's convinced the problem isn't his ability, it's the decisions he's made. Instead, make him own up to his decisions, and empathize with his situation - heaping blind praise and inspiration on him will only ruin your chances. Last, you'll be able to use your CASIE augmentation ("pressure" option) if you need to give him that extra push to get him to surrender.
When you're finished, you'll receive +1000 XP for getting the information from Sandoval, as well as a +1000 XP "Silver Tongue" bonus and the
achievement The Last Straw if you convinced Sandoval to put his gun down. If he pulled the trigger, you won't get the achievement, and you'll only receive a +100 XP bonus. Either way, there's little long-term consequence whether he lives or dies. You'll contact Pritchard afterwards to tell him of the news, and he'll get started cracking away at a method to track the GPLs once again. If Sandoval died, be sure to check his body for a Pocket Secretary with the code "0110". Before leaving to return to the
Chiron Building, search his office for an eBook, "Practical Shootist Monthly", on one desk, a copy of "No Better" on the bed, and a
Scholar eBook, "Dermal Modification Process" on his main desk for +200 XP. You'll also find some
Revolver Ammo on his bed.
13 - Weak Wall
Make with the smash-smash-boom-boom to find a couple of Credit Chips and an
Ammo Capacity Upgrade inside this hidden room, along with +200 XP.
14 - Gate
Hack the level 1 keypad here or use the code "0110" to get through this gate and into the sewers under
Derelict Row. Derelict Row itself is actually rather vacant these days, so there's no reason to bother exploring it before leaving, unless you want to give it a quick run-down to see if you missed anything the first time through.
A - Exit to Detroit City Streets North (Return)
B - Exit to Derelict Row (Sewers)
P - Alarm Panels


