 Did we miss anything? Is there something we didn't discover? Let us know!
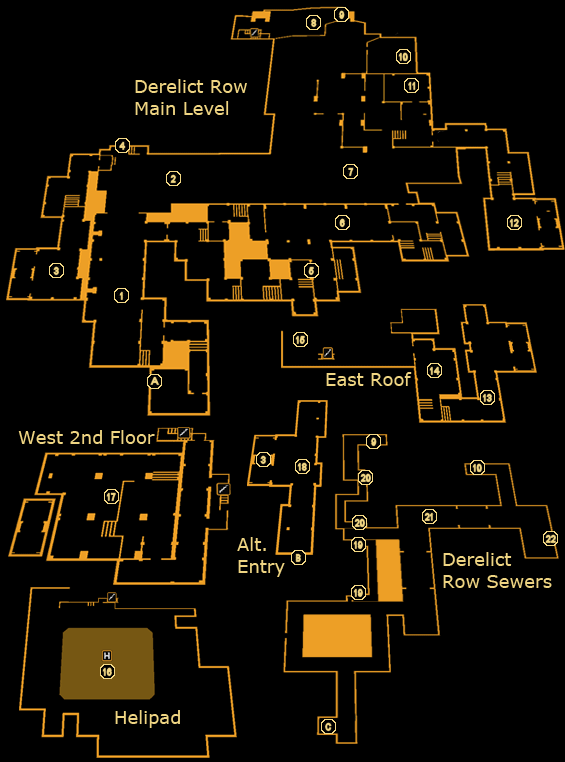
Derelict Row is an old abandoned construction site, now inhabited by the Derelict Row Ballers, a gang with a distinct anti-augmentation bent. You'll need to visit the 'Row both for Jenny Alexander during the Cloak & Daggers quest, and the main storyline, when you're asked by David Sarif to take down the transmitter tower keeping a backdoor open into Sarif's network. You'll also be leaving to
Highland Park from the helipad in Derelict Row a bit later in the game. The hostile gang members who hang out here aren't augmented, but they've got numbers on their side, so if you go in guns blazing, this will likely be your toughest fight yet.
Note that if you're doing the Cloak & Daggers quest, it's a seconary objective to find the weapons cache without being seen by the DRB gangsters on patrol. As such, you'll need to exercise caution if you want to get the extra XP. Additionally, you can go clear out Derelict Row before accepting the quest, ensuring you have an easy time finding the weapons cache.
1 - Entry
The first corridor you find yourself in is guarded by three DRBs, equipped with standard
10mm Pistols and
Machine Pistols. The first one will have his back turned to you if you came in the main entrance, and the other two are in conversation with each other further on. If you fancy the stealth route, you can knock out the first guard and then climb underneath the walkway on the right-hand side of the room, for the most part avoiding the two other guards.
2 - Yard Entry
Crawl under the damaged garage door and you'll find yourself inside a courtyard. The entry area to the yard has a few DRB thugs up ahead, but you should be able to sneak past them if you want to avoid a confrontation. There's a lot of cover in the area, in the form of shipping containers and concrete baririers, so you won't have to worry too much about being spotted if you're careful. You'll receive +100 XP for reaching Derelict Row when you enter this area.
3 - Elevator Shaft
If you took the side entrance into Derelict Row, up the fire escape, then you'll need to use the Icarus Landing System to get down safely, but this route does bypass some of the goons at the front gate. See more details at (18). Otherwise, there isn't any loot or equipment to find in here.
4 - Vent
This vent, hidden behind some wooden crates, leads up an elevator shaft, and eventually to the second floor in the west building (17). You'll need to hop on top of some of the crates inside the elevator shaft to reach the top (+300 XP bonus).
5 - Weak Wall
If you have explosives or can punch through walls, you'll be able to take this alternate entry into the basement area. Just watch out for the guard on patrol nearby, and note that the noise you make may attract other DRB thugs.
6 - Basement
The basement here has three guards on patrol, two of whom start out in conversation with each other. Stealthy players will find the option to sneak underneath the scaffolding appealing, but everyone should be wary of the gangsters outside, who will be able to notice you through the window if you're not careful. Search near a pallet of barrels for a
Scholar eBook, "Vestibular Augmentation and Enhanced Agility Factoring" (+200 XP), and check the floor nearby for a Pocket Secretary containing the code to disable the transmitter tower (15), "5962".
7 - Yard
The bulk of DRB forces are assembled in the yard here, some casually hanging out and others on patrol. You'll need to be careful if you want to remain undetected, but thankfully there's a good deal of cover that should help you maintain a low profile, including a couple of shipping containers you can duck into if things turn sour.
8 - Fenced Area
You'll be able to hop this fence with the Jump Enhancement upgrade, giving you fast access to the closed-in section here that's normally only accessible via the sewers under Derelict Row. Alternately, you can climb a nearby shipping container, head onto a fire escape and climb inside to reach a door leading to the fenced-in area as well. You'll receive +100 XP for reaching it. Inside, search the shipping container for a Pocket Secretary containing the code "3290", which opens the storage locker just outside Derelict Row.
9 - Manhole
The manhole here leads to the sewers under Derelict Row, giving you another option to be discreet as you sneak your way around.
10 - Manhole
Another manhole, this time accessible from the main yard.
11 - DRB Weapon Cache
Sneak your way through the crack in the wall near the manhole at (10), or enter by crawling under the boarded-up door nearby, and you'll find the weapons O'Malley has been sending the Derelict Row Ballers, as well as a +100 XP exploration bonus, and +750 XP for the objective. Be sure to mark the briefcase near the weapons for evidence that O'Malley has in fact been supplying them for another +100 XP.
That out of the way, you can turn your attention towards the weaponry: a
10mm Pistol,
Combat Rifle, and
Machine Pistol, an
Ammo Capacity Upgrade, two
Frag Grenades, and some 10mm Pistol Ammo. If you're an old-school shooter fan, you might also catch the reference in the graffiti on the wall nearby. Take what you need, then hoof it back to Jenny Alexander to continue with the Cloak & Daggers quest.
12 - Common Room & Elevator Shaft
You'll find three DRB gangers in here, one on patrol and two lounging on the couches, complaining about Picus. Pick off the patrolling guard and then either sneak by the two, or take them out. You'll find a
CyberBoost ProEnergy Pack on a nearby concrete block.
Turn your attention to the elevator shaft nearby, which will give you access to the upper floor of the east building.
13 - Frag Mines
You'll find a series of
Frag Mines blocking your path at this location. Either carefully trip them by approaching and then backing off before they explode, slow-sneak forward and disable them, or use a weapon to detonate them from a distance. If you're coming from the nearby elevator shaft, the guards nearby at (14) will become suspicious at the noise, but unfortunately aren't stupid enough to set off the mines themselves.
14 - Guards
There are two DRB members hanging around here, watching elevision and guarding the transmitter tower (15), though they may be disturbed by the
Frag Mine explosions if you're approaching from (13). Deal with them in your usual way and move onto the roof.
15 - Transmitter Tower
Here's the tower that's been keeping the backdoor open into the Sarif network. Check for a terminal on the side, and either hack it (level 1), or use the code "5962", as found on a Pocket Secretary in the basement. If you've been given the objective to stop the transmission already, Faridah will come and pick you up at (16) to head off to
Highland Park. If you're here before you received the mission, Pritchard will instead radio in and tell you he's noticed something odd, but will hang up before he tells you any more. Either way, you'll receive +2500 XP for disabling the transmitter.
16 - Helipad
Conveniently, there's a helipad in Derelict Row, where Faridah will pick you up after you've disabled the transmitter tower (15)
and examined the hacker's neural hub in your apartment at the
Chiron Building. Leaving with Faridah won't cancel out your existing side-quests, so don't worry about losing your progress, but she's willing to wait for you indefinitely if you want to finish them up now. When you're ready, hop inside (+1000 XP) and prepare for your next major mission at
Highland Park.
17 - Thugs & Rocket Launcher
There are two thugs guarding this room, including one who patrols around a little bit. Take them out and you'll find a Pocket Secretary on one of them, with the code "3290" (used for the storage locker just outside the Row). Check the hand cart nearby for this room's prize - the
Rocket Launcher, and two packs of
Rockets to go along with it. Although the
Rocket Launcher is very powerful and quite useful against robots and some of the game's other difficult enemies, its large size and scarce ammo make it a dicey proposition.
18 - Alternate Entry
If you climb up the fire escape outside Derelict Row, you'll find a weak wall section you can smash your way through. You'll automatically kill the guard standing on the other side of the wall (which will ruin your non-lethal streak, so be careful if you want to avoid killing), and a second DRB thug will come over to investigate. If you have the Icarus Landing System, you'll be able to jump down the elevator shaft to reach (3), and you'll receive +200 XP for surviving the fall to boot.
19 - Duct
The duct here will give you a clear access to the second one at (20), which in turn will allow you to climb up the ladder at (9) unhindered.
20 - Duct
This duct provides an easy means of bypassing some of the guards in the sewers, but it's blocked by toxic gas, which will be lethal for you unless you have the Rebreather upgrade. You'll find a red crank near the duct entrance (on the north side) that will cut off the flow of gas, allowing you safe passage, as well as a Credit Chip along the way.
21 - DRB Barricade
You'll spot three DRB members on the other side of this barricade. They won't give you any problems if you stay on one side, but they'll open fire if you attack or try to cross it. You can sneak underneath through the dirty sewer water if you want to avoid them. One of the guards has a Pocket Secretary on him containing the code to disable the transmitter at (15), "5962".
22 - Weak Wall
Smash the weak wall, either with your first or an explosion, and you'll find a
Praxis Kit inside for your trouble, not to mention two Credit Chips and +200 XP as an added bonus.
A - Exit to Detroit City Streets North
B - Exit to Detroit City Streets North (Fire Escape)


