 Did we miss anything? Is there something we didn't discover? Let us know!
You'll find yourself in here after traveling through the shipping yard and interior of the Sarif Plant. In the Assembly Labs, your primary goal is to hunt down the
Typhoon, with the secondary objective to free the hostages held in Assembly Lab 1.
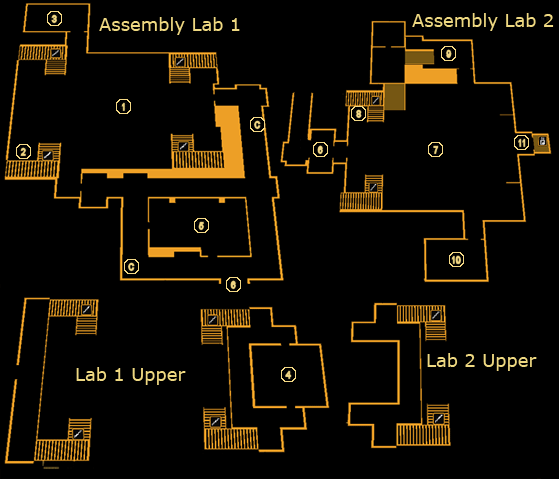
1 - Assembly Lab 1
There are four Purity First thugs in the first Assembly Lab, with a couple more in rooms off to the side. These guys are more heavily armed than the others you've seen, with a couple toting
Machine Pistols. From the looks of it, one of the thugs got a little "jumpy" and ended up killing a hostage... obviously rookies, but it's up to you if you want to show them mercy.
You have a number of options in getting through the Assembly Labs, with a number of vents to crawl through for stealthy players, and lots of cover for those who want to take the direct route. Alerting the guards won't get the hostages executed, but it might draw out others in deeper parts of the Assembly Labs.
If you want loot, you've come to the right place. You'll find
Combat Rifle Ammo on a crate near the northwest stairs,
Stun Gun Darts on a crate against the western wall, some
Tranquilizer Darts inside an opened crate on the north wall,
Machine Pistol Ammo on one of the central counters, and
Revolver Ammo on a counter in the southeast corner.
2 - Vent
Stealthy players will want to sneak down to the corner of the stairwell - the crate against the wall can be moved to reveal a vent, one which goes to the support beams above Assembly Lab 1, and eventually, directly to the hostages at (4), making for a bloodless rescue. Climbing inside the vent will earn you +100 XP.
3 - Storage Room 01
This storage room is guarded by a single Purity First goon. Take him out with a swift kick to the head, and loot the room for some
Combat Rifle Ammo and a
Concussion Grenade inside the opened crate.
4 - Hostages
Assuming you didn't waste too much time back at Sarif Industries, the hostages are in this room overlooking Assembly Lab 1. What's more, there's a bomb rigged to explode after 25 seconds if you step through the door. You can either rush in and disarm the bomb, or take the route from the vent at (2), which will bypass the door and won't set off the countdown. Disarming the bomb requires you hack the control panel attached to it (security level 1).
Rescuing the hostages grants you a +400 XP bonus. Failure to rescue the hostages causes them to die, and you'll miss out on both the XP and the kind words from some of the game's characters. If you let the bomb go off, you'll likely die, but you can escape through the vent, in which case you'll radio back to Pritchard about your failure.
5 - Meeting Room
Two thugs occupy this room, but they'll split up after their conversation has finished, making them easy prey. You can grab some
Combat Rifle Ammo and
Revolver Ammo from the table, and there's some reading material in the form of a newspaper and an eBook on the nearby shelf. The television, tuned to Picus Network, is also reporting on the plant's takeover if you're interested in listening.
6 - Assembly Lab 2 Door
A single Purity First goon patrols the area, and there's two Security Cameras watching the approach. Either avoid the Security Cameras or destroy them, but note that destroying them will set off the alarm for all to hear.
When you reach the door to Assembly Lab 2, you'll need to hack it to open it, and you'll find yourself in another airlock, similar to the one back at Assembly Lab 1. Grab the
CyberBoost ProEnergy Bar from the hand cart as the airlock cycles, and head out.
7 - Assembly Lab 2
Assembly Lab 2 is a bit more dangerous to stealthy characters due to its layout, though it's actually got one less guard in it than Assembly Lab 1. Once again, there are sneaky and shooty options for you, with enough cover and alternate routes for either.
As far as equipment goes, you'll find some
Combat Rifle Ammo, a Credit Chip, and two packs of
Stun Gun Darts on the counters around the room. When you're done dealing with the guards and ransacking the place for loot, head to the elevator at the other end of the room (11) and take it down.
8 - Vent
Check behind the stack of crates in the northwest corner of the room, and you'll find a vent leading to Storage Room 02 (9), along with a +100 XP bonus. Useful for sneaking around the guards in the main Lab 2 area.
9 - Storage Room 02
There's a sole guard on patrol in here, so get the jump on him while his back is turned. Inside, you'll find a vent leading back to the entrance at (8), and, in the storage room proper, a
Frag Grenade and some
Stun Gun Darts.
10 - Storage Room 03
Another guard with his back turned. Smack him in the head, then search the crate he was rummaging through for a
Damage Upgrade, which will, as its name implies, improve the damage output of the weapon it's combined with.
11 - Elevator
This elevator heads where your main objective awaits, the
Sarif Plant Server Room.


