 Did we miss anything? Is there something we didn't discover? Let us know!
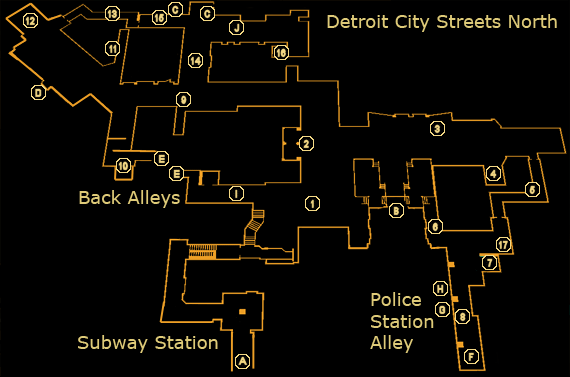
The Detroit City Streets North are a bit more interesting and significantly larger than the South portion. In addition to the
Police Station, which you'll need to ivestigate during the main storyline, you'll find that several side-quests take place here as well.
1 - Garbage Can
Check inside this trash can for a
CyberBoost ProEnergy Bar. Yummy!
2 - Garbage Can
Another garbage can, this one out in front of the bank. It's got a
Beer (Hot Devil) inside if you want to continue your role-playing fantasy as a hobo version of Jensen.
3 - Garbage Can
Yes, another one of these. Check the trash outside the MDM theater for more
"Hot Devil" Beer, if you're collecting them for Letitia back in the
South City Streets.
4 - Barrier
You'll find a barrier here up against the building that's not all it seems. If you have the Jump Enhancement, you can just jump on the dumpster and up and over the barrier - meanwhile, if you don't, you can find some crates in the area (5) and stack them up to climb over. At the bottom, you'll find a dead man, with a
10mm Pistol on the ground, and a
CyberBoost ProEnergy Bar,
10mm Pistol Ammo, and a Pocket Secretary on his body. The Pocket Secretary has the code to the "chop shop" in the West Apartments area, "2356".
5 - Electrified Tunnel
The floor here is electrified and will spell near-instant death for you if you touch it. Unless you have the EMP Shielding augmentation, you'll need to use the nearby crates (one is just outside the north door) to get through. Pick them up and form a bridge, hopping from crate to crate until you reach the breaker box in the middle (+300 XP). Shut down the power and you'll have yourself a shortcut into the alley behind the
Police Station.
6 - Fence
If you stack up some nearby crates or have the Leg Enhancement upgrade, you can hop over this fence and save a bit of time reaching the alley behind the Police Station. If you move one of the dumpsters on the street-facing side, you'll find a
Stop! Worm Software underneath as well.
7 - Storage Locker
This storage locker is relevant to the Motherly Ties quest. It's shut by a level 1 keypad, but you can use the code "4891" as provided by Detective Chase earlier as well. Opening the door will net you +100 XP. There are four eBooks around the storage locker, including Megan Reed's autopsy, which all reveal a few inconsistencies in the official story given by the police - reading all the eBooks will net you +300 XP and advance the objective.
If you wish, you can also attempt to open the level 3 safe with the code "7196", revealed by Chase if you were able to persuade him to cough it up. Inside you'll find
Megan's Reed's Bracelet, and some of her lab notes. Taking Megan's bracelet will open up some new options later in the quest.
8 - Fire Escape
You can reach this fire escape by placing one of the nearby crates down under the ladder. Climbing up it will lead you to two alternate entrances to the Police Station: one on the second floor, through a level keypad-locked door, and another through a vent on the roof. Reaching the roof grants a +100 XP bonus.
9 - Jenny Alexander
One of the "working girls" will call you out by name as you walk by. Turns out it's actually an old ex-cop friend of Jensen's, Jenny Alexander, who's currently working undercover. Predictably, she needs your help in uncovering a corrupt police officer, Jack O'Malley. Accepting her proposal to help will start the Cloak & Daggers quest, which has several parts to it: searching O'Malley's apartment for incriminating evidence, posing as a hitman to confirm suspicions about his treatment of certain "obstacles", and finding evidence of the Derelict Row Ballers receiving new weapons shipments. You'll find O'Malley at (17) in the alley behind the Police Station, his room in the
West Apartments, and the weapon cache in
Derelict Row.
Before you head on your way, search the garbage can across the street from her for a
"Hot Devil" Beer if you want it.
When you return to Jenny after completing all her tasks, you'll receive +1000 XP, and +750 XP if you were able to stay undetected while infiltrating Derelict Row. Depending on what evidence you found in O'Malley's apartment (the stash of drugs, and the e-mails on his computer), you'll be able to provide Jenny with extra evidence. You'll also have the option to give Jenny the
Crossbow O'Malley intended you to use to murder Double-T, or to keep it for yourself if you've taken a liking to it. For your help, Jenny will give you +1000 Credits, and an
Ammo Capacity Upgrade (unless you kept the 'bow, in which case you only get the Credits).
Finally, you'll have the option to arrest O'Malley yourself. If you decline, the quest will finish immediately, and you'll receive the Cloak & Daggers
achievement. Otherwise, head back to O'Malley's place in the West Apartments to tie up the remaining loose end.
10 - Storage Locker & Passage
You'll find a storage locker in this alley with a level 2 keypad. Hack it open and you'll find a
Stun Gun and two
Stun Gun Dart packs as your reward.
Just near the storage locker, you'll also notice a stairwell going down. This leads to a small duct that forms a shortcut between the North and
South City Streets areas. Going inside for the first time will net you a +100 XP bonus.
Additionally, on your way in, you may have noticed two dumpsters on the other side of the fence. If you check behind them, you'll find a Credit Chip hidden in a box.
11 - Fire Escape
This fire escape leads into an apartment rooftop overlooking the entrance to
Derelict Row, and can serve as an alternate means past the gang members guarding it. Reaching the rooftop will earn you +100 XP.
12 - Storage Container
Search the back of the storage container near the blocked-off road and you'll find some
Painkillers inside, along with a +100 XP bonus.
13 - Tunnel & Murder Weapon
This tunnel provides an alternate route into
Derelict Row. There are three large boxes blocking the way, but even if you can't lift them, you should be able to jump over them with a little finesse. The tunnel beyond is guarded by a couple of gangsters, who will let you pass unless you hang around for too long.
If you're doing the Cloak & Daggers quest and have spoken with O'Malley, you'll find the murder weapon he wants you to use, a
Crossbow, in the pile of trash near the entrance. Grabbing it will award you +100 XP.
14 - Derelict Row Guards
Despite the fact that these gang members are guarding the path to
Derelict Row, they don't seem to attack you unless you move against them first, though they will generally harass you. A prostitute will speak with one of the guards and give you a hint about a way in, via the fire escape at (11).
15 - Fire Escape & Weak Wall
Head up this fire escape and you'll find yourself inside an unfinished building. If you have the ability to smash through walls, you'll find a weak wall at the top providing an alternate means of entry into the 'Row proper. Additionally, if you have the Jump Enhancement, you can jump to one of the nearby outcroppings on the wall, and then up to the fire escape above, to find a
Reload Speed Upgrade amongst the trash, as well as a +200 XP bonus.
16 - Storage Locker
You may need to deal with the gangsters guarding the locker before hacking its level 3 lock, or using the code "3290" as found on some of the DRB members inside "D-Row". Inside, you'll find three Credit Chips, a
Remote Detonated Explosive Device (DLC only), two boxes of
10mm Pistol Ammo in the lockers, and, in the weapons locker (one is hidden behind a large crate), two
10mm Pistols, two
Shotguns, and two
Machine Pistols. With enough armaments to destroy a small country, head on your way.
17 - O'Malley Meeting
During the quest Cloak & Daggers, you'll need to meet up with O'Malley to pose as a hitman. You'll find him in the alley behind the Police Station. Speak with him (+100 XP) and you'll be given the task of using a
Crossbow to kill Double-T, a prominent Motor City Banger, then planting the murder weapon in the Derelict Row Ballers' weapon cache, in order to start a gang war. Of course, you won't be going along with that plan (unless you want to fail the quest, of course). You can try to grill him for more details, but he won't provide any. However, you can convince him to give you some of your payment in advance if you have the CASIE/Social Enhancer augmentation ("appease" option), for a free 1000 Credits.
You'll have two new tasks: knock out the MCB gang members in the
North Apartments for arrest (killing them isn't an option), and find the Crossbow in the passage at (13). Don't harm O'Malley while you're here, as doing so will cause you to fail the quest, even if it's probably the more efficient option.
A - Exit to Detroit City Streets South
B - Exit to Police Station
C - Exit to Derelict Row
D - Exit to Chiron Building
E - Exit to Detroit Back Alley
F - Exit to Detroit Sewers (Manhole)
G - Exit to Police Station (from Fire Escape)
H - Exit to Police Station (from Vent on Roof)
I - Exit to Detroit Sewers (Manhole)
J - Exit to Derelict Row (Manhole)


