 Did we miss anything? Is there something we didn't discover? Let us know!
After climbing into the storage pod back at the
Hengsha Seaport, Adam will be reawakened by the mechanism inside the pod three days after leaving. Climbing out of the pod, Pritchard makes contact and reveals that Adam is now in Singapore, in an old WHO facility, Omega Ranch. According to Pritchard, there's a transmitter of some sort blocking out Adam's GPL signal, and possibly the other scientists' as well. First order of business is to get the signal jammer offline, and the second, to hunt down the missing scientists if you can.
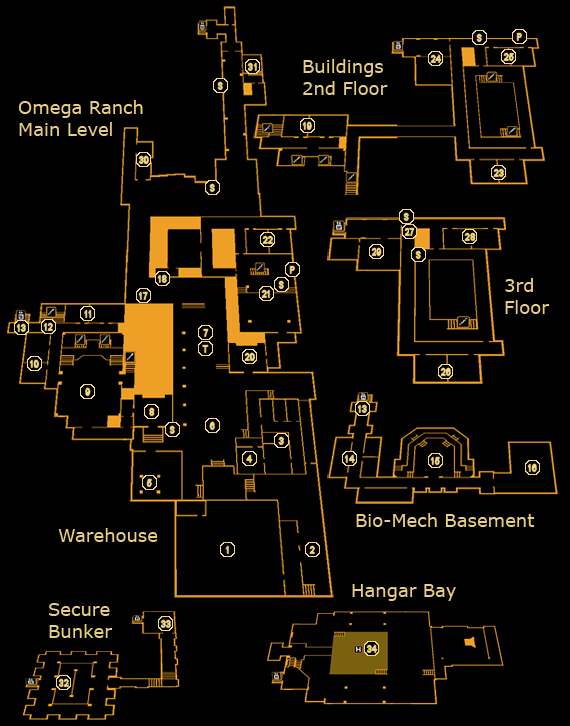
Omega Ranch is a fairly large and open area, with heavy guard (including Ogres and Sneakers) all around, and about four buildings to explore. The way you approach it is up to you, especially as there is no fixed path for your objectives, so you can take them on when and how you wish. This guide will assume you want to take the jammer down first, and then deal with finding the scientists. Last, you'll need to break into the secure bunker to find Megan Reed.
1 - Warehouse
You won't find much in the warehouse you start out in, but the storage room in the northwest corner is of some interest. You can either hack the level 5 keypad to get in, or climb in using the vent on the roof. Getting in will provide +200 XP, and you'll be able to grab a Revolver and
Ammo Capacity Upgrade from the shelves inside.
2 - Guards
Be careful coming out of the warehouse door, as two guards will be waiting for you, though fortunately, they're busy speaking with one another. Listen in or use the opportunity to smack them about. One of them is carrying the code to a barracks dorm, "1385".
3 - Barracks
The barracks is a medium-sized building occupied by two guards. Although you can get in through the front door, it's a bit easier to climb up to one of the windows and get in that way. As far as loot goes, you'll find a
10mm Pistol and Credit Chip stashed in the lounge lockers, a Credit Chip,
Revolver Ammo and a Pocket Secretary with the code to the transmitter, "0111", in the unlocked bedroom, and, in the two locked ones (both level 4 security; one can be opened with the code "1385"), two Credit Chips,
Reload Speed Upgrade,
Typhoon Ammo,
Grenade Launcher Ammo (DLC only), and some
Stun Gun Darts.
4 - Security Room & Signal Jammer Control
You'll be able to use the dedicated terminal in here to shut down the signal jammer, code "0111", or an easy level 2 hack. Disabling it will grant you +250 XP and any relevant bonuses. Next, turn to the unlocked security hub to shut down the Security Camera outside the transmitter tower, and hack the level 4 computer to read some e-mail correspondence by the guards. Before leaving, hack the level 5 keypad or break down the door to get into the armory, and you'll find a
PEPS,
Remote Detonated Explosive Device (DLC only), two packs of
Heavy Rifle Ammo, some
Rockets, and a
Damage Upgrade.
5 - Transmitter
You'll find the signal jammer inside this fenced-in area. Although the front is covered by a laser grid (level 3 hack to disable it), you can alternately try jumping over the fence if you've got the Jump Enhancement, or move the crate on the fence's southeast corner to reveal a small hole in it. Keep an eye out for the guard on patrol inside the fenced area, as he'll spot you climbing up the ladder inside. At the top of the ladder, you'll find a dedicated panel - hack it or use the code "0111" to shut the transmitter down. Pritchard will contact you and tell you the GPLs are showing up loud and clear - but Megan isn't among the ones he can see. You'll receive +250 XP and orders to hunt down the remaining scientists whose locations you do have. Note that if you already disabled the transmitter back at (4), you won't be able to do so here.
6 - Courtyard
Getting through this courtyard without making a fuss can be pretty difficult - it's covered by two Sneakers and two Ogres, and there's a Turret to the north watching over it. You might be able to use some of the planter boxes scattered around as cover, but you'll probably want to rely on your cloaking augmentation to sneak through. Alternately, if you can reach its security hub at (7), you can hack it and use it as your own personal gun platform - one you can take with you through the whole level if you're able to lift it.
7 - Turret & Security Hub
The Turret in the courtyard here will likely give you some problems, but thankfully the security hub to disable it can be found immediately behind it - it's getting there that's the problem. Hacking it will, however, allow you to shut down the Turret as well as the Sentry Bot and Security Camera in the north section of the Ranch.
8 - Bio-Mech Lab Lobby
The Bio-Mech Lab is one of the main buildings you'll need to explore to find the Sarif scientists. Start out by checking the front desk drawer for a Pocket Secretary with the password "morpheus" on it, as well as a
PEPS Energy Pack. Next, try hacking into the level 2 lobby computer or use the password "morpheus" to learn of an employee at the Ranch who is being sent some... interesting e-mail messages by his co-workers. When you're ready to move on, head through the decontamination chamber.
9 - Bio-Mech Hall
The large hall here is guarded by an Ogre and Sneaker. Apart from the large window in the floor, revealing one of the Sarif scientists below (15), you won't find much else of interest in here.
10 - Offices B-13 & B-14
Both of these offices are unlocked. In B-14, you'll find a computer terminal with information on "test subjects" and a not-so-subtle nod to Half-Life. B-13, meanwhile, is guarded by a single soldier, and contains a
Stun Gun and
Stun Gun Darts on one of the tables, as well as a
CyberBoost ProEnergy Pack on a counter. The vents in both offices connect to the same system, and you'll be able to get the drop on that single soldier if you enter B-13 using it.
11 - Offices B-11 & B-12
B-12 is locked, so let's start with B-11 first. Inside, search the small drawer to find a Pocket Secretary with the password "techsmex", then hack the level 2 and 3 computers (using the password you just found if you wish) to read some inter-office banter. B-12 is slightly more interesting. Hack its level 3 keypad to get in, then pillage the office for two
CyberBoost ProEnergy Bars. The computers are unlocked, and contain more banter between Ranch workers.
12 - Laser Grid
Either disrupt this grid with an
EMP Grenade or the
Stun Gun, or hack the level 4 panel on the wall to disable it.
13 - Elevator
This elevator will give you access to the Bio-Mech Lab basement.
14 - Test Subjects
You'll find a whole bunch of test subjects in the basement, though you won't be able to do much to help them. If you're feeling cruel, you can grab some
Painkillers from the bedside of one of them, in the westmost room.
15 - Operating Room & Declan Faherty
One of the Sarif scientists, Declan Faherty, is waiting for you in the operating room here. Depending on whether you've spoken to the other scientists, your dialogue will be a bit different, but it will more or less end up with the reveal that Megan Reed is alive, and the creation of a plan to break into the secured zone of Omega Ranch by causing three simultaneous accidents as a distraction - which means you'll need to talk to all the remaining scientists and convince them to get in on the plan as well. You'll receive +250 XP for talking to Declan, and you can spend some time and ask him a bit more about the other scientists and their captors if you like.
If this is your final scientist found, the next phase of the mission will begin. Koss will have given you a
Data Disc to feed to a security terminal near the secure zone at the north end of the compound. Getting there isn't too difficult, but will require you penetrate the throngs of forces outside if you haven't yet done so already. However, beyond that, you shouldn't have much trouble with accomplishing this next stage.
16 - Morgue
You'll find two things of interest in the morgue: one, Declan's computer, which can be hacked into provided you've got level 3 capture software. On it, you'll find an e-mail from Megan, confirming that she is indeed still alive. Two, a weak wall in the back can be blasted open for a +400 XP bonus. Inside you'll find some toxic gas, as well as a valve to turn it off if you don't have the Rebreather implant. The vent will eventually exit at (17), back in the courtyard.
17 - Vent
If you're able to get on top of this large ventilation unit, you can take the shaft on the top down for a +400 XP bonus. This will take you directly to the basement of the Bio-Mech Lab. However, you'll need to pass through a cloud of toxic gas to get there, so don't bother unless you've got the Rebreather augment.
18 - Weak Wall
Smashing through this weak wall will give you easy access to the Micro-Gen Lab. The storage rooms it empties into are, well, empty, but the route is unguarded.
19 - Offices B-21 & B-22
B-21 is a security office guarded by two soldiers - opening the door will alert them, but you won't have much trouble cleaning them up. The two computers are level 2 and 3, but you'll be able to get into one of them using the password "keppler" (found on one of the guards' bodies). On them, you'll find e-mails implicating the involvement of the augmented mercenaries you've been fighting, and another with background details on Adam Jensen, Megan, and the other scientists. Of particular note is the code "5377", which will get you into Sevchenko's former lab in the Micro-Gen building (24). Next, search the room for a Pocket Secretary with the code "2535", which shuts down the laser grid near the elevator downstairs, and the weapons cabinet for a
Tranquilizer Rifle and some
Tranquilizer Darts. Last, the vent will take you to the B-22 office.
Speaking of, you'll only be able to get into B-22 via hacking the level 4 keypad or through the aforementioned vent. Inside, you'll find an eBook on Omega Ranch's history, a drawer with some
Tranquilizer Darts and
Stop! Worm Software, and another Half-Life reference on the computer.
20 - Micro-Gen Lab Lobby
The Micro-Gen Labs contain two of the Sarif scientists, and can be accessed via the weak wall at (18), the bridge from the Bio-Mech Lab, and, of course, the front door. Before moving through the airlock, check behind the front desk for a Credit Chip, and hack the level 2 computer for some inter-office banter.
21 - Micro-Gen Main Hall
If you're trying to remain stealthy, this room will likely pose a serious challenge to you. Although it's not too large, the fact that there are multiple stories and a Security Camera watching over it means that you'll be hard pressed to stay invisible. The vent near the front entrance may help, but it will only take you to the back of the room. You'll have to contend with about nine guards in total, as well... frankly, if you want to avoid stirring up the hive, you'll want to either approach this room from above (take the bridge from the Bio-Mech Lab), or from the rear (break through the weak wall at (18)).
Your priority in here should be the security hub on the main level. Though it requires a level 4 hack, it will let you disable the very pesky Security Cameras in the area. Once you've secured the room, check the front desk for a Pocket Secretary containing a code to a storage room, "9992", and underneath you'll find an ammo case with
Sniper Rifle Ammo,
Revolver Ammo and
10mm Pistol Ammo inside. Next, you can loot the bodies of the guards for a couple of passwords: "topfrag" and "ruckus", which will work on some of the security computers in the area.
22 - Storage Rooms G-11 & G-12
G-12 is unlocked and mostly empty, save for an Automatic Unlocking Device (DLC only), but you can smash through the weak wall to avoid having to hack the level 4 keypad to G-11. Take care, as there's a guard on patrol in the area. Inside G-11, you'll be able to grab some
Tranquilizer Darts from the shelves, and move the boxes on the floor to reveal a vent, which will take you directly to Nia Colvin's office (25).
23 - Offices G-24 & G-25
G-25 will be a welcome sight, as it contains both an Automatic Unlocking Device (DLC only) and a level 4 security hub which allows you to disable the Security Cameras on this floor. G-25, meanwhile has a guard inside resting in his chair. Take him out and grab his Pocket Secretary in order to get the code to Nia Colvin's office "1504", then loot the room for a Credit Chip and a
CyberBoost ProEnergy Bar. The computer is unlocked and contains some e-mail on the scientists' communications with one another.
24 - Sevchenko's Lab
You can either use the nearby weak wall to break in here, hack the level 4 keypad, or use the code "5377". There's little loot to speak of, but check the back room for the
Scholar eBook "Delgado and the Stimoceiver" for +200 XP, and if you're able, you can move the heavy crates in front of the elevator, which will take you up to the third floor.
25 - Nia Colvin's Office
In here, you'll find the second of the Sarif scientists, Nia Colvin, who you may remember from the beginning of the game. To get in you can use the air vent down in the storage room at (22), or open the doors via hacking the level 3 keypads or using the code "1504". Inside, Nia initially doesn't recognize Adam and initially displays some signs of Stockholm syndrome. Eventually she'll come around to the idea of escape. If you haven't met any Sarif scientists, the conversation will change a bit, but it will more or less end up with the reveal that Megan Reed is alive, and the creation of a plan to break into the secured zone of Omega Ranch by causing three simultaneous accidents as a distraction - which means you'll need to talk to all the remaining scientists and convince them to get in on the plan as well. When you're done speaking to Nia, you'll get +250 XP. Remember to check the office computers before leaving for more back-and-forth between the kidnapped scientists.
If this is your final scientist found, the next phase of the mission will begin. Koss will have given you a
Data Disc to feed to a security terminal near the secure zone at the north end of the compound. Getting there isn't too difficult, but will require you penetrate the throngs of forces outside if you haven't yet done so already. However, beyond that, you shouldn't have much trouble with accomplishing this next stage.
26 - Offices G-36 & G-37
These two offices are unlocked, but don't contain much of importance. Check the computers for some office banter, and grab the Painkillers from the drawer on your way out.
27 - Laser Grid & Security Camera
The laser grid protecting Eric Koss's lab (29) will cause you few problems if you have EMP Grenades, the Stun Gun, or disable it by hacking the level 3 wall panel. Additionally, one of the patrolling guards will shut down the field as he walks by, so take him down and drag his body around for an easy way through. The Security Camera here is a bit of an issue, but you'll be able to disable it down on the second floor at (23).
28 - Offices G-31 & G-32
These offices are unguarded and actually house some other "employees" of Omega Ranch. The only thing of real interest is the computer inside, which contains an e-mail related to the scientists' efforts in reducing augmentation rejection syndrome.
29 - Eric Koss' Lab
Koss' lab is located directly above Sevchenko's (24), and can either be accessed using the elevator inside it, or simply through the front door. Get inside and speak to him to learn that he has a working version of the GPL-disrupting virus Sevchenko had been developing before he got killed, which should allow the scientists to escape without being followed. The dialogue will change a bit depending on who you've spoken to before, but it will more or less end up with the reveal that Megan Reed is alive, and the creation of a plan to break into the secured zone of Omega Ranch by causing three simultaneous accidents as a distraction - which means you'll need to talk to all the remaining scientists and convince them to get in on the plan as well. Speaking to Koss will net you +250 XP. Before leaving, check the desk near him for an eBook, and his computer in the next room contains more e-mails between the scientists.
If this is your final scientist found, the next phase of the mission will begin. Koss will have given you a
Data Disc to feed to a security terminal near the secure zone at the north end of the compound. Getting there isn't too difficult, but will require you penetrate the throngs of forces outside if you haven't yet done so already. However, beyond that, you shouldn't have much trouble with accomplishing this next stage.
30 - Storage Lockers
The level 4 keypad on one locker might prove difficult to get through, but doing so will net you a large reward in the form of a
Laser Rifle,
Laser Rifle Battery, a
Crossbow and
Crossbow Arrows, and four boxes of
Heavy Rifle Ammo. Getting in the second locker behind the shipping container is merely a matter of crouching underneath the broken door. You'll receive a +200 XP bonus for finding it, and inside, look around for a
Shotgun,
Sniper Rifle,
Mine Template,
EMP Grenade, and
Remote Detonated Explosive Device (DLC only).
31 - Security Room
The security room here requires you get past a Security Camera, and a Sentry Bot if you end up sounding the alarm. Inside, check the lockers for an
EMP Grenade,
Mine Template, and Credit Chip, then turn your attention to the control system. The security hub requires a level 3 hack, but will let you disable the nearby Security Camera and reprogram the Sentry Bot as well.
When you're ready to continue your mission (assuming you've spoken to all three Sarif scientists), use the Disk Reader and upload Sevchenko's virus (+750 XP). Immediately after, Adam will contact Pritchard and get him to vibrate the scientists' GPL implants, signaling them to start the accident. Sure as can be, the alarms will sound and a few soldiers will rush out of the now-open security door. Ignore them or take them out, then head inside. The storage room on your way holds some equipment for you: a
10mm Pistol, three boxes of
Heavy Rifle Ammo, some
Combat Rifle Ammo,
Sniper Rifle Ammo,
Machine Pistol Ammo, and a
Target-Seeking System on top of one of the lockers. When you're ready to go be reuinited with Megan Reed, head down the nearby elevator.
32 - Namir
If you were looking towards another boss fight, then you won't be disappointed. This one takes place in the grotesque gallery within, and you'll be fighting Namir, one of the mercenaries involved in the conspiracy. Before you meet him, however, you'll find Zhao, who, depending on your choices earlier in the game, will either disable your augmentations with the flip of a switch, or simply look like a fool and run away. Hmph. Either way, Namir will rise up and knock Adam over, triggering a fight between the two.
The fight with Namir can be either the most challenging or one of the easiest in the game depending on how you approach it. If your augmentations were left disabled by Zhao's kill-switch, then you'll have to deal with not only limited functionality, but a scrambled heads-up display as well. This alone will cause you a huge number of problems. However, there are some easy ways to get around this (which will also apply if your augmentations are in working order). For one, Namir is highly susceptible to
EMP Grenades, and they will disable him for a significant amount of time, useful if you need to catch your breath. Second, mines and other explosives are your best friend - any you have will cause him major problems, and you can actually throw them into the room before starting the fight if you don't step off the elevator. Third, if you have the ability to reprogram Turrets, you can actually drag one all the way back from outside and use it to do most of your damage for you.
Taking Namir on in a fair fight can be a bit more of a challenge. He does huge damage with his
Plasma Rifle, and will periodically throw
Gas Grenades. Additionally, he frequently cloaks and jumps over the walls in the room to give you the slip. The Typhoon will do major damage to him, as will the Grenade Launcher if you have it left over from the DLC mission, and other heavy weapons like the Rocket Launcher and Laser Rifle are similarly useful. Letting him take the first shot can be suicide, however, so you'll want to use Smart Vision and your Jump Enhancement to help equalize the playing field. Beyond that, there aren't many tactics on hand - simply run, shoot, run, and shoot until he goes down, putting as much distance between you and him as you can when you need to recover.
When he's down, you'll receive +1000 XP. While Namir's parting words are cryptic, you'll actually meet up with Megan in a minute. First, grab his
Plasma Rifle, which is a heavy weapon useful against both robots and humans, though unfortunately its ammo is quite limited and you won't have muich change to use it. Search around the room for a
Combat Rifle and
Heavy Rifle if you want them, then check Namir's body for 1000 Credits and some
Plasma Capsules. When you're ready to go, move on into the white hallway ahead.
33 - Megan Reed
Your reunion with Megan will be strained, to say the least. She reveals to Adam the big secret about her research: her samples, the "Patient X" named in the literature, come from Jensen himself, most likely as a result of his prior biological engineering by White Helix. If Adam's augments were disabled by Zhao, then she'll also use this chance to inoculate Adam from the effects of her malicious code. Megan insists that she's working with Hugh Darrow as a double agent within the Illuminati, but a sudden broadcast by him aboard Panchaea will quickly turn for the worse, as he flips a kill-switch of his own... and all the augmented people on board begin to slaughter one another. Well, that settles where your next destination is.
Megan will leave you alone shortly and give you some time to explore her room before heading out (+250 XP). The eBook on her desk, "Down to Cases", is a "final interview" with Hugh Darrow, while her computer (with the login for Hugh Darrow) contains an e-mail between Darrow and a VersaLife employee regarding nano-augmentation. The fruits of JC Denton, perhaps? Before leaving, hack the level 5 safe for a Credit Chip with nearly 2000 Credits on it, and the final
Scholar eBook in the game, "Reimagining Retinal Implants: Doctor Dobelle's Success", which will grant the usual +200 XP, and the Doctorate
achievement if you've found all 29 during your current play-through. Last, the phonograph nearby has a hit of nostalgia for you if you've played the original Deus Ex.
34 - Hangar Bay
When you arrive via the elevator and hit the button to open the hangar doors (+250 XP), one of two things will happen. If Malik is alive, she'll come in and pick up the scientists as they run in. Otherwise, you'll see another VTOL there (with a different model number), and the scientists will escape with Megan flying it... wait, since when could she do that? The core difference between these is that Malik will bomb the hangar bay as she enters, killing the insane augmented soldiers inside, while if she's dead, you'll have to handle them yourself. They won't use any weapons, but instead will rush you in melee.
Once they're dealt with, check the rear of the bay, behind the hangar control room, for a small crate you can move... crawl inside the hole behind it and you'll gain +100 XP for finding a hidden area. You'll find a
Cooling System inside, but more importantly, a level 5 computer, username "MSTAINE"... if you manage to hack into it, you'll gain the Hangar 18
achievement, and you'll get to read some re-written lyrics to Megadeth's "Hangar 18". How metal.
Aside from the insane soldiers, the rest of the hangar bay is mostly empty. When you're ready to leave, head over to the rocket at the back of the room and press the nearby button. Apparently, this thing serves as a fast transportation system for your most esteemed colleague, Mr. Darrow, but the computer is happy to let Adam in as well. Hop inside and begin one of the fastest and prettiest trips you'll ever take, destination:
Panchaea.
P - Alarm Panels
S - Security Cameras
T - Turrets


