 Did we miss anything? Is there something we didn't discover? Let us know!
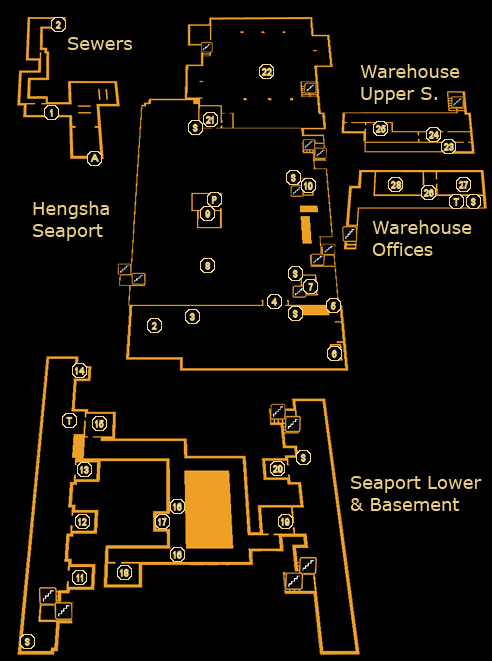
Hengsha's seaport has been crawling with Belltower forces lately, and Tong has offered his assistance in getting to the bottom of their activities in China, along with their involvement with the Sarif kidnappings. The seaport is one of the larger and more open environments of the game, and you'll find that there's a lot of opportunities for different tactics.
Your primary goal upon arrival is to find a bomb that Tong has left you - he needs the warehouse at the port gone for his own ends, but it will also serve as a distraction for you to get on board one of the Belltower ships. You'll find it kept inside a storage building beyond the front gates.
1 - Lu Ping Rong
How convenient that an arms dealer should be located immediately before you begin a frontal assault of a fortified Belltower sanctuary. The wares available are:
- Explosive: Frag Grenade (2x, 150 Credits), Gas Grenade (1x, 200 Credits), EMP Grenade (1x, 200 Credits), Mine Template (3x, 75 Credits)
- Weapon Upgrade: Reload Speed Upgrade (1x, 250 Credits), Ammo Capacity Upgrade (1x, 250 Credits), Cooling System (1x, 1500 Credits), Target-Seeking System (1x, 1500 Credits)
- Ammunition: Tranquilizer Darts (5x, 100 Credits), Stun Gun Darts (5x, 50 Credits), Heavy Rifle Ammo (4x, 250 Credits), Sniper Rifle Ammo (2x, 150 Credits), Machine Pistol Ammo (5x, 120 Credits)
- Weapon: Heavy Rifle (1x, 2500 Credits), Sniper Rifle (1x, 3000 Credits), Machine Pistol (1x, 750 Credits)
2 - Ladder
This ladder (through the duct in front of the arms dealer at (1) will take you up to the parking lot outside the seaport.
3 - Portable
You won't be able to get inside here, but if you have the Jump Enhancement, you'll be able to climb over the fence from its roof. However, that roof is electrified, so unless you have EMP Shielding, you'll want to switch the breaker box in the booth at (6). Getting over the fence rewards +750 XP unless you've already got into the compound.
4 - Gate
The front gate is guarded by a Security Camera and two Belltower guards, whose backs are turned from you. Keep up the good work, guys. One of the guards has a Pocket Secretary on him, with the password "collosus" on it. Getting past the gate will earn you +750 XP.
5 - Fence
Move the heavy crate here to gain an alternate way past the fence, through a small hole in it. Duck in for +750 XP assuming you haven't already breached the gate.
6 - Parking Lot Booth
You'll find two computers in this booth, as well as a couple of other knick-knacks. The regular computer requires a level 2 hack, and has a couple of Belltower e-mails on it. The security hub only takes a level 1 hack, and allows you to shut down the nearby Security Camera, the Sentry Bots, and open the front gate (4). Before going, check the ammo case for some
Tranquilizer Darts and
PEPS Energy Packs, the desk for an
Automatic Unlocking Device (DLC only), the small shelf for a Credit Chip, and the wall hanger for a
Crossbow. Note that opening the gate via the computer will cause at least one nearby guard to investigate, so keep your distance for a little while after opening it. Last, the breaker box on the wall will shut down the electricity on the roof of the portable at (3).
7 - Portable
Opening the door to this portable will cause the guard inside to become alerted, though he won't notice you open the window behind him. Check his body for a Pocket Secretary with the code to a storage unit, "5895", then grab the
Concussion Grenade from the table. The regular computer requires a level 2 hack or the password "collosus", and contains some Belltower correspondence and a hint as to where the ships in port are headed. The security terminal nearby is unlocked, and will allow you to disable one of the Turrets in the shipyard, as well as two cameras down near the storage units.
8 - Shipping Containers
If you've got the Jump Enhancement, you'll be able to jump on top of this shipping container. As well as providing a tactical view, you'll also find a
Target-Leading System inside the container on top. The container directly below this one (entered on the opposite side, ground level) also has some
Combat Rifle Ammo inside.
9 - Building & Tong's Explosives
The first thing you'll notice about this building is likely the sniper sitting on top of it. If you can take him out, you'll find a Pocket Secretary with the code "6555" on it for the taking. You'll be able to get in here one of three ways: via the front door, via a weak wall on the southwest side of the building, or using a ladder in the underground below the office.
In the south room (which itself is protected by a keypad-locked door), you'll find
Tong's Explosive "Package" in the locker. Upon grabbing it, you'll gain +1000 XP. Tong will contact you and tell you that it needs to be planted in the warehouse administrator's office, which will provide you an adequate distraction to sneak into one of the storage pods. Before leaving towards the warehouse, be sure to check the lockers in the north room for
10mm Pistol Ammo and
Combat Rifle Ammo.
10 - Portable
Note that the guard outside carriers a Pocket Secretary with the code to Storage Unit C, "3343". Similar to the one at (7), this portable is guarded by a Security Camera and contains a level 4 security computer that will let you drop some of the shipyard's defenses (Securit Cameras and Sentry Bots in this case). The second computer on its right requires a level 3 hack, and will give you the code to Storage Unit A, "7785". Before leaving, grab the
Heavy Rifle Ammo from the upper shelf,
10mm Pistol Ammo from one of the desks, and the
Tranquilizer Rifle from the large shelf near the door.
11 - Storage Unit A & Vent
Keep your eye out for the Security Camera to the south of this storage unit. You'll need a level 3 hack to get in, or the code "7785". Inside, check the open crate for a
Rate-of-Fire Upgrade,
Sniper Rifle Ammo and
Crossbow Arrows. After looting the storage unit, check underneath the nearby stairs for a vent taking you to the basement area at (18) for +200 XP.
12 - Storage Unit B
Hack your way in or use the code "5895" for a
PEPS and a
Damage Upgrade.
13 - Storage Unit C
You'll need to make a level 4 hack or use the code "3343" to get inside this storage locker. Inside, a
Rocket Launcher and some
Rockets await you.
14 - Nook
Check out the storage-unit-that-never-was at the end of the way for some
Heavy Rifle Ammo sitting on a pallet.
15 - Underground Entrance West
Hack into the level 3 keypad to gain access to the underground, which will give you a way to the other side of the shipyard as well as to the office in the middle. Note that there's a patrolling Sentry Bot inside, so come prepared.
16 - Toxic Gas
You'll need to pass through this gas to reach the room at (18), as well as the ladder at (17).
17 - Ladder
Take the ladder here up to the building at (9) for an easy way to claim
Tong's Explosive "Package".
18 - Storage Room
While this room is mostly empty, activating the breaker box will turn on the fans and clear out the toxic gas at (16). The vent will provide a +200 XP bonux for exploring inside.
19 - Underground Entrance East
Hack into the level 3 keypad to gain access to the underground, which will give you a way to the other side of the shipyard as well as to the office in the middle. Note that there's a patrolling Sentry Bot inside, so come prepared.
20 - Storage Locker D
Open up Storage Locker D to find
Combat Rifle Ammo,
Shotgun Cartridges, and
Grenade Launcher Ammo (DLC only).
21 - Warehouse Door & Office
Keep an eye on the Security Camera nearby when hacking this level 1 keypad. Alternately, the code "4589" will get you in.
Inside, check the desks and drawers for a
Stun Gun,
Stun Gun Darts and a
PEPS Energy Pack, then turn your attention to the computers. The standard system requires a level 2 hack and will reveal Belltower's abuse of the warehouse employees, while the level 2 security hub will allow you to disable the Security Cameras outside and inside the warehouse.
22 - Warehouse Floor
To get into the warehouse, you'll have four options: the first, take the front door; the second, hack the level 3 keypad on the balcony outside, or use the code "6555"; the third, climb up the ladders to the roof and break through the glass on top; and the fourth, a vent above the loading area outside (+200 XP bonus). Your entrance will no doubt vary based on your Jensen's strengths and weaknesses. Note that if you didn't kill Narhari Khan, he'll be on patrol on the upper level here. There's about five more guards in total, including one sniper, and additional two in the room to the northwest. Last, the Turret and Security Camera on the north catwalk will make your life miserable if you run into them.
Once you've dealt with the most immediate threats, check out the northwest room for a Credit Chip,
Concussion Grenade, and a level 1 security computer that will let you disable the Security Camera and Turret upstairs. Despite being a warehouse, though, you won't find much other loot. One of the guards on the north catwalk has a Pocket Secretary with some info on it, however: the code to the offices "3295", and the admin computer's password "mainman".
23 - Warehouse Upper Door
This door's level 3 keypad can be hacked into, or opened using the code "6555", in order to gain access to the upper area of the warehouse. The pallet immediately inside has some
Sniper Rifle Ammo resting on it for you.
24 - Shelf
Check the shelf in this hallway for a
Reload Speed Upgrade, if you feel your guns aren't already tricked out enough.
25 - Lounge
While you're here, you'd might as well grab the
Stun Gun Darts and Credit Chip from the tables, along with the
CyberBoost ProEnergy Jar near the microwaves.
26 - Office Door
Though the level 1 security on the office door isn't much to be afraid of, you can also use the code "3295" to get in, or take the ladder onto the office roof and follow the vent down inside (grabbing the
Heavy Rifle Ammo on the way).
27 - East Offices
The offices on the east contain a couple of computers, as well as a Credit Chip on the rear table, and some
Nuke Virus Software and
Stop! Worm Software on an employee's desk. The level 2 computers contain evidence of Belltower's poor treatment of the warehouse employees and some foreshadowing about the storage pods.
28 - West Offices
You can hack into the admin's level 3 computer or use the password "mainman" to find a mention of Tracer Tong ("Tong's son"), and some evidence that the warehouse administrator hasn't been running his establishment particularly well.
When you're ready to continue, place
Tong's Explosive "Package" on the desk nearby. Note that doing so will mark the point of no return for Hengsha, so if you have any side-quests or items you want to return to, do so now. The bomb's fuse is extremely short and Jensen is nearly killed by the blast, but manages to jump out the window just in time. In the following confusion, Jensen will make his way inside one of the storage pods on the docks - actually a cryostasis unit - and proceed to spend what are probably some of the most boring few days of his life, before waking up at
Omega Ranch.
A - Exit to Harvesters' Hideout


