 Did we miss anything? Is there something we didn't discover? Let us know!
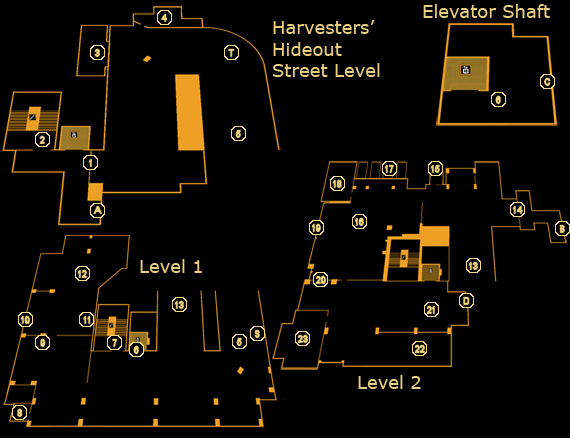
The Harvesters are holed up in this abandoned car park, and as such, the place is both quite large and heavily fortified. Stealthy players will find it's difficult to get from place to place, but the stairs at (2) provide easy access to the different levels. Meanwhile, action-oriented players will have to go up against powerful and well-armed Harvesters, many of who are the strongest human enemies you'll have faced off against so far. Your goal in here is to make it to Sevchenko's GPL signal at (23), after which the Harvesters will no longer be hostile, and you'll have free reign of the place. Unless you want to take everyone out, it's recommended you simply make it to the end as quick as you can.
1 - Door
This door opens out into the main level, which is fairly well guarded. Players without a death wish may want to use the stairs at (2).
2 - Stairway
The door to this stairway is locked with a level 4 keypad. Hack your way through to take an easier route down to basement level 1, near (7). Alternately, you should be able to blast or shoot your way through, though that might alert the guards.
3 - Fenced Area
The electricity on the floor will likely catch your eyes here as you walk by. There's no direct way into here, but you can smash a weak wall just next to the fence to get inside. Obviously, you'll need EMP Shielding to survive the electric current, though you can disable it at (4). Crawling into the vent inside will net you +300 XP and will take you to the floor below.
4 - Office
Check out this makeshift office for a level 3 security hub that will allow you to disable the nearby Turret and Security Camera, though be careful not to bother the napping guard. You'll also find a breaker box to disable the electricity at (3) on the rear wall, and if you've got the Explosive Mission Pack DLC, a
Remote Detonated Explosive Device nearby.
5 - Ramp
The way down is guarded by a Turret (T), which can most easily be disabled from the office at (4). You'll also find two Harvesters camped out at the bottom, making things more difficult. Before moving on, grab the
Automatic Unlocking Device from the concrete barrier, provided you have the DLC enabling it.
6 - Elevator Shaft
You won't be able to get into the elevator from any of the other doors, and unfortunately, it won't give you access to the lowest level. However, if you entered via the rooftop, you'll end up at the very top of the elevator shaft after exiting the vent you came in through - the fall down to the lower level shouldn't cause any damage, though the Icarus Landing System provides an insurance policy.
7 - Door
The keypad on the door requires you get past its level 3 security, or a few smacks to destroy. Unfortunately, you'll find the door at the botoom of the stairs blocked off, meaning that getting to the bottom level is a bit more difficult.
8 - Storage Room & Weak Wall
Those with eagle eyes will likely spot a Pocket Secretary hidden in one of the bins on the floor of the storage room here, which will provide the password "hirollr". Smash through the weak wall at the back to get to a hidden area behind the main complex. You'll receive a +200 XP bonus for finding it. Inside, you'll find a ladder taking you down to level 2.
9 - Crates
These crates make good cover in infiltrating the rear section of this level, and you'll also be able to grab a Beer from the top of one of them, just near the door.
10 - Weak Wall
Break through the weak wall here to find a hidden passage behind the wall, which will grant you a +200 XP bonus. Inside, you'll find a ladder taking you down to level 2.
11 - Cabinet
Check this tool cabinet for two boxes of
Sniper Rifle Ammo and, if you've got the DLC, three
Automatic Unlocking Devices.
12 - Computer Room
You'll find two computers set up around this area. One is unlocked, and the other has level 1 security and can be unlocked with the password "hirollr". Both have some e-mails on Harvester lifestyle, for lack of a better term, though no integral information. Provided you have the necessary DLC, you'll also find a
Remote Detonated Explosive Device on one of the counters nearby.
13 - Ramp
This ramp will take you down to level 2, the lowest you'll be able to explore. It's much more fortified than the previous one, giving you a little bit more cover for shooting or sneaking. Before heading down, search the crates and boxes at the top for some
10mm Pistol Ammo. Once again, you'll find two Harvester guards at the bottom waiting for you, with some
Combat Rifle Ammo sitting on a nearby concrete barrier.
14 - Sewer Exit
The door here will take you to an exit into the Hengsha sewers. Note that if you didn't dispose of the Harvesters in the sewers, and they aren't yet friendly towards you, you'll likely be instantly attacked when you leave.
15 - Washroom & Weak Wall
Smash through the weak wall at the rear of the washroom to find a hidden passage behind the prison cells. Finding it will provide a +200 XP bonus and access to one the cells (17) and an operating room (18).
16 - Common Room
The couches and television indicate this is where the Harvesters spend some of their downtime. You'll find about four of them in here, both relaxing and on patrol.
17 - Prison Cell
Either hack the level 4 keypad or break the weak wall at the rear side (accessed through (15)) in order to get in. Inside you'll find a
Damage Upgrade and an eBook on "The Singularity Church on the MachineGod", exposing some Harvester philosopy.
18 - Operating Room
Here's where most of the Harvesters presumably get their augmentation work done. If Malik died earlier, you'll find her corpse here, sans cerebral implant, indicating that Belltower are in the business of selling the Harvesters corpses with augments on them. Take a moment to grieve if necessary, then comfort yourself by reading the
Scholar eBook "Understanding Vision (Part 2)" on the nearby desk for +200 XP. If that's not enough, you'll find
Painkillers nearby, as well as
Typhoon Ammo and a
Remote Detonated Explosive Device (DLC only) on a nearby table.
19 - Weak Wall
Another weak wall leading to the same section behind the walls as you'll find at (8) and (10). You'll get a +200 XP bonus for finding it, and a ladder leading between levels 1 and 2.
20 - Barrier Hole
Move the cardboard boxes here to find a more covert route inside the next room.
21 - Mess Hall
Search a trolley for some Beer, as well as under the bed for some
Heavy Rifle Ammo. Guess Jensen isn't very hungry.
22 - Personal Quarters
Last but not least, the bunks that some of the Harvesters call home. Sift through their lockers for some
Heavy Rifle Ammo, two packs of
Machine Pistol Ammo, some
Tranquilizer Darts, and a
CyberBoost ProEnergy Bar. The rear wall is a bit more interesting - there's a level 3 computer with an
Automatic Unlocking Device nearby (DLC only), as well as a level 5 safe. Turns out the computer is Tong's, and the "TT" mentioned in other e-mails... could it be Tracer? Next, crack into the safe for a Credit Chip worth 1000 Credits, some
Typhoon Ammo and an
Ammo Capacity Upgrade. Not too shabby.
23 - Office & Sevchenko's GPL Signal
Using the door will begin a cutscene, in which Jensen breaks in during the middle of a surgery. The guards slowly stand aside one by one to reveal... Tong? Seems that our old "friend" is in fact the leader of the Harvesters, and the GPL signal is coming from Sevchenko's arm, now mounted on Tong. Turns out that Tong has no connection to Sevchenko, but he confirms he's dead, as Belltower brought him the corpse.
Two things will happen now depending on which version of the game you have. If you've got the Explosive Mission Pack preorder DLC from GameStop, the Augmented Edition in Europe, or one of many other special offers worldwide, Tong will tell you that he'll help you out in finding Sevchenko's killers, but his son is being held hostage by Belltower and needs to be rescued. You'll then receive +1000 XP and orders to go meet a Harvester contact in the
Daigong District Sewers. Upon completion of the quest and returning to him, Tong will offer a weapon as payment - the
Grenade Launcher, which you can turn down if you so choose.
With the DLC stuff out of the way, Tong will mention that Belltower has seized control of a port in Lower Hengsha, which seems to have a steady stream of traffic in and out of it. While it's a bit of a stretch that this port is related to the scientists' kidnappings, if Belltower is involved with the death of Sevchenko, then it's a good place to start. Head over to the sewer entrance at (D) and you'll shortly find yourself at the
Hengsha Seaport. Note that, while you'll be able to return back to Hengsha from the Seaport, once you've completed your mission there, you won't be coming back. Now's a good time to finish up any business you may still have in Hengsha.
When you're finished talking, look around Tong's office for a Credit Chip, Spirits,
Automatic Unlocking Device (DLC only), an eBook by Sarif, and, last but not least, a
Laser Rifle. The Laser Rifle is a powerful heavy weapon capable of firing a continuous, concentrated energy beam that won't just do major damage to humans and bots alike, it will also penetrate cover. The downside? It takes up a huge amount of inventory space, and its ammo is rare. Still, for those who don't mind killing, it's a fantastic weapon that will serve you well during these later stages of the game. And no, Tong doesn't mind you taking his extremely rare, powerful and expensive technology. For some reason.
A - Exit to Youzhao District (Return)
B - Exit to Youzhao District Sewers (Return)
C - Exit to Youzhao District (Return) (Rooftop)
D - Exit to Hengsha Seaport


