 Did we miss anything? Is there something we didn't discover? Let us know!
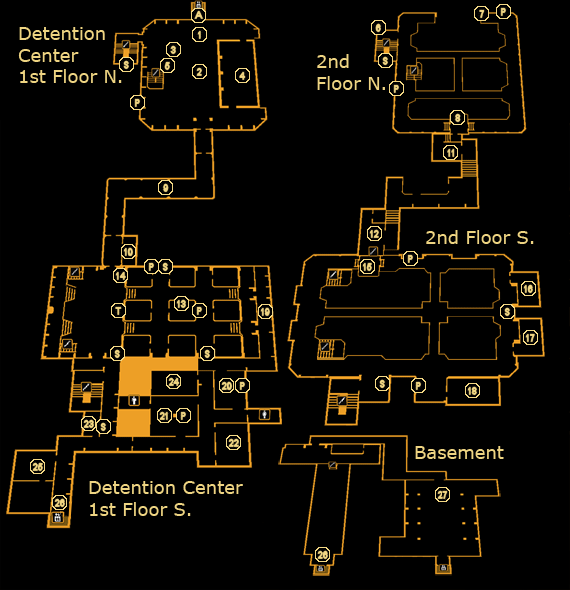
It seems that Highland Park is home to a closely-guarded government secret - a massive detention facility operated by FEMA, REX-84. What's not clear is exactly who those soldiers you've been running into are affilated with, and whether the augmented soldiers who attacked Sarif are still around. Time to investigate!
A quick note: if you have Zeke Sanders' passwords, you'll find almost no terminal or keypad you can't get beyond. In particular, the password "neuralhub" works for all the security terminals, and every keypad seems to use the code "7984". If you want to avoid hacking or don't have the skill to do so, these codes will be your best friend during this mission.
1 - Crates & "Boxguard" Bot
You'll want to duck behind the crates immediately upon stepping out of the elevator, as there's two soldiers and a massive "Boxguard" bot on patrol, a heavily-armored robot equipped with rocket launchers and miniguns. Although the Boxguard is imposing, it's also quite slow, and a single EMP Grenade can fully disable one. Conveniently, you'll find an
EMP Grenade and a couple of
Tranquilizer Darts on the crate you're hiding behind.
2 - Detection Center North
The FEMA Detention Center is heavily guarded overall, with two on the first floor here and three on the upper level, but you should be able to evade them more easily than you think. Stealthy players can opt to take the high ground by heading for the stairs on the west side of the room, while combat-oriented players can make use of the ample cover and multiple angles of attack quite effectively. The biggest problem will be the Boxguard as mentioned above, but a single
EMP Grenade (1), the
Rocket Launcher (4), or simple stealth will solve that problem for you.
3 - Crawlspace & Vent
Duck into the crawlspace in the floor here for some cover, and then move the heavy crate inside to reveal a vent. The duct will take you into the detention cell at (4), and to the second crawlspace (6). Climbing inside will earn you +100 XP.
4 - Detention Cell
You'll be able to reach this area by crawling through the vent at (3), by using the Jump Enhancement, by taking the door on the south side, or by stacking boxes up. Your reward for breaking in is a
Rocket Launcher and a pack of
Rockets, plus some
Sniper Rifle Ammo and
Revolver Ammo. A crate just outside the north door has some
Combat Rifle Ammo on it as well. The vent inside the detention cell will take you to (3) and (6), and reward you +100 XP for finding it.
5 - Ammunition Case
Search the black box on top of the crate here for some
10mm Pistol Ammo and
Combat Rifle Ammo.
6 - Crates
You'll find an oddly-stacked crate at the top of the stairs. Pick it up to reveal a
Stun Gun and some
Stun Gun Darts underneath.
7 - Crate
More ammo, this time of the
Combat Rifle and
Sniper Rifle varieties. Tasty.
8 - Observation Room
The room here doesn't have any usable computers, but you will find some
Nuke Virus Software on one of the control consoles, and some
Stun Gun Darts on a crate nearby. The door at the rear of the room provides a route towards the interrogation area (13).
9 - Hallway
This hallway connects the detention center with the interrogation area (13) up ahead. Two guards on the main floor will speak to each other a bit about the Dutchman, then split up. Grab some
10mm Pistol Ammo from a crate on the way in, if you need it. The ladder nearby heads up to the second floor.
10 - Security Room
You'll find a security room with the usual security computer to hack into (level 3); you can also use the password "neuralhub" to get in. The computer has authority over the Security Cameras in the interrogation area (13), along with a Turret. The nearby level 2 computer (password "usprotkt") has some background on the facility, referred to here as REX-84 (conspiracy nuts and Deus Ex fans might get the reference). You'll also find a Credit Chip in the corner of the room on top of some boxes, so grab it before moving on.
11 - Maintenance Room
Passing through, you'll find a Credit Chip on the trolley and some
Combat Rifle Ammo on a crate nearby. The path ahead will bring you to the interrogation area (13). A box immediately beyond the door holds a
PEPS Energy Pack if you need it, as well.
12 - Weapons Cache
This second maintenance room holds a few goodies behind a locked door - you'll need to use the security computer nearby. Like the others, it's level 3 and takes the password "neuralhub". Be sure to both open the door and disable the Security Camera inside to avoid tripping the alarm, and a
Shotgun, some
Shotgun Cartridges,
Typhoon Ammo, a pack of
Rockets and a
Concussion Grenade will be yours, along with a +300 XP bonus.
13 - Interrogation Area
This next room is another large chamber, and a bit of a challenge to get through. Not only is there a Turret on the right-hand side, you'll also find a large number of Spec-Ops Soldiers (6+) and a handful of snipers on the upper catwalks, who will make your life miserable. Stealthy characters have a few options, either sneaking up the stairs and to the upper levels (or entering from the second floor), or braving the interrogation rooms. Another option is to hack the Turret at the security room (10) and turn it hostile on your enemies. Last but not least, there's a vent behind some boxes at (14) that will give you access to most sides of the room. Thankfully for those invested in the non-subtle approach, the large number of choke points also make a straight-up fight easier - lure enemies away from their posts to avoid fighting on their terms.
Of note are the nine small rooms on the right-hand side of the area. Most of them have something of value in them, as listed below:
- Northwest: a Pocket Secretary with a list of people to be arrested during martial law.
- North: two packs of Revolver Ammo.
- Northeast: some Combat Rifle Ammo.
- West: more Combat Rifle Ammo.
- Center: Pocket Secretary with the password "bullskull", for an L. Barrett's computer.
- East: an eBook about developing a UN anti-terrorism force (UNATCO, anyone?).
- Southwest: a CyberBoost ProEnergy Bar.
- South: an eBook with information on the REX-84 installation.
- Southeast: a Credit Chip, on one of the chairs.
Last, you'll find a single box of
10mm Pistol Ammo on a crate near the room's entrance, and some
Combat Rifle Ammo in the very southeast corner... but don't worry, you'll find more shiny trinkets to collect on the upper level.
14 - Vent
This vent, which grants +100 XP upon entry, gives you underground access to most corners of the east side of the room.
15 - Observation Room
Another observation room on the second level. You'll find an ammunition box under the computer console that holds some
Tranquilizer and
Stun Gun Darts, and the computer (level 2, password "crrctions") has some background on the facility's usage. The large boxes on the right-hand door can be moved to gain a good vantage point over the area, away from the Security Cameras.
16 - Office
Finally, something that doesn't quite resemble a prison so much. The level 3 computer here can be accessed using the password "hmldsec1" (found on a Pocket Secretary on a nearby desk), and provides background on the FEMA facility's "renting out" to the Spec-Ops forces. Under the computer desk you'll find two boxes of
Combat Rifle Ammo,
Stun Gun Darts and a Credit Chip near a shelf in the corner, plus another Credit Chip in a shelf on the other side of the room. The vent here goes to the office at (17) and helps bypass the Security Camera outside... plus, there's yet another Credit Chip inside it.
17 - Office
This second office houses
Stop! Worm Software, a Credit Chip and some
Tranquilizer Darts in its various shelves. The level 3 computer can be hacked or logged into (password "hmldsec2") for more background information. The vent on the wall will take you to the office at (16), and contains a Credit Chip if you haven't yet snagged it.
18 - Security Room
The security computer here (password "neuralhub") will let you disable the Security Cameras on the upper floor. You'll also find a Credit Chip,
Stun Gun Darts,
Nuke Virus Software, and an
EMP Grenade if you search the computer consoles and the crate at the back of the room.
19 - Laser Grid & Vent
The Laser Grid here can be hacked using the keypad nearby (level 2), or bypassed with the code "7984", though you can also move the large crate against the wall to reveal a vent that lets you bypass the lasers (+200 XP). Grab the
Sniper Rifle Ammo from a nearby crate, then proceed forward into the next room.
20 - FEMA Guards & Locked Door
If you come into this room via the hallway at (19), and haven't yet been detected as an intruder, the two FEMA guards here will question you and ask for the security codes to verify your identity. If you received the security codes from Zeke Sanders, you can answer correctly and move on. Alternately, you can attack them, try to bluff your way past, or intimidate them. Bluffing will get you the code "7984", but if you continue the bluff, your ruse will be seen through and they'll attack you. Intimidate them instead to be let past without a fuss.
Hacking the keypad will cause them to attack, so you might want to use the code instead and pass up on your "script kiddie" bonus.
21 - Cafeteria
No food for you, but you will find a delicious artificial substitute in the form of a
CyberBoost ProEnergy Jar near the drink machines. You'll also find a Credit Chip left behind on one of the tables.
22 - Locker Room
Break into the lockers in this room for a Credit Chip,
Painkillers,
Stop! Worm Software, two
Sniper Rifle Ammo packs, and two
Combat Rifle Ammo packs.
23 - Security Room
You'll find a level 3 security computer in here, password "neuralhub", which controls the nearby Security Camera. Before leaving, grab some
Combat Rifle Ammo from the shelf, then move the boxes to find a
Reload Speed Upgrade.
24 - Locked Office
This door is keypad-locked, but you can either hack its level 2 systems or use the good-ol' "7894" code, though hacking isn't recommended if you want to avoid turning the FEMA guards at (20) hostile. You'll gain +200 XP for getting inside. Immediately in front of you you'll spot a Scholar eBook for another +200 XP, as well as a
CyberBoost ProEnergy Pack,
Revolver Ammo, and a Credit Chip on the shelves. The level 3 computer's password is "bullskull", and the e-mails within suggest that the Dutchman decided to abandon the mercenaries, making him a new target of theirs.
25 - Medical Bay
Well, this is a little different. Check in these two rooms for a
Hypostim, some
Painkillers, a Credit Chip on one of the bedside shelves, and a cryptic Pocket Secretary with a message between a "WT" and "IS". Hmm...
26 - Elevator
This elevator will bring you down to the basement level. You'll be fighting an unavoidable boss battle there, so you might want to save your game and make sure you're well stocked on supplies and weapons before heading down. Unfortunately, no, stealth and non-lethal takedowns aren't an option.
27 - Barrett
Opening the door will trigger a cutscene, after which you'll be thrust into a confrontation with Barrett, a walking tank with an arm-mounted minigun and an infinite supply of grenades. His slow speed is his biggest failing, but even so he can be quite dangerous, so avoid engaging him on his own terms. Reaching him will give you +1750 XP... but before you do anything else, duck behind the nearby concrete barrier to avoid being cut to ribbons by his minigun.
There are a few strategies you can use against the big guy. Throwing the barrels around the arena at him is a good solution for non-combat characters, and the
Stun Gun, despite its non-lethal properties, will still injure him and temporarily disable him.
EMP Grenades will also cause him some grief, allowing you to fill his head full of holes with impunity. Explosives of any sort will do a large amount of damage, and if you've got the Typhoon augment available, a good three or so attacks should be enough to kill him. Remember that if you run out of ammunition, there are several guns and explosives lying around the arena for you.
When Barrett is down for the count, you'll get some information from him in a cutscene, before he tries to take you down with him. Apparently, FEMA aren't directly involved with your affairs, and your next destination is halfway across the world, in Shanghai. When the smoke clears, you'll be +2500 XP richer, and Malik will contact you for extraction. Before you go, take the time to stock back up on ammo (there's some for virtually every gun you've found so far, as well as some
Typhoon Ammo, and
EMP and
Frag Grenades), then head to the elevator at the end of the room to find yourself... back at the area you started the mission from. Jeez, if only you'd known in advance where you'd end up, you could have just the other door! Next stop,
Sarif Industries...
P - Alarm Panels
S - Security Cameras


