 Did we miss anything in this section? Is there something we didn't discover?
Let us know!
Walkthrough
Did we miss anything in this section? Is there something we didn't discover?
Let us know!
Walkthrough
Inside the Ruined Temple, you'll encounter a lot more cultists, and they'll put up a better fight there than they did in
Haven. Eventually, after you've ground your way through the Ruined Temple and its attached Caverns, you'll meet up with Kolgrim, the leader of the cultists. He'll offer you a way to "make up for your recent transgressions." He'll tell you that Andraste has arisen in the form of a dragon, but that she is shackled by the ashes of her former remains. He'll then ask you to taint the Urn of Sacred Ashes by spilling some of the dragon's blood into it. In return, he'll offer to teach you the Reaver specialization.
You'll have two ways to proceed:
- You can agree to Kolgrim's request, which will cause Kolgrim to give you a
Vial of Dragons Blood. Morrigan and Zevran will approve of this option. Sten will disapprove. Alistair, Leliana and Wynne will voice their concerns, but they won't approve or disapprove (yet).
- You can disagree with Kolgrim's request, which will cause Kolgrim and the cultists in the room to attack you. This battle can be tough, but if you kill the cultists quickly (starting with the two cultist mages), then Kolgrim shouldn't last long with four against one. Kolgrim will drop
Faith's Edge,
Kolgrim's Horn (if you're playing the PC version), and more when he dies. None of your companions will approve or disapprove of this option.
Regardless of what you decide, you'll be able to change your mind later when you get to the ashes.
After your encounter with Folgrim, when you exit the Caverns (via Exit B), you'll find yourself on the Mountain Top. From there it'll just be a short trip to the north to reach the
Gauntlet (Exit D), where you'll finally come into contact with the Urn of Sacred Ashes. Along the way, depending on your circumstances, you might want to kill the cultists' dragon (see #19).
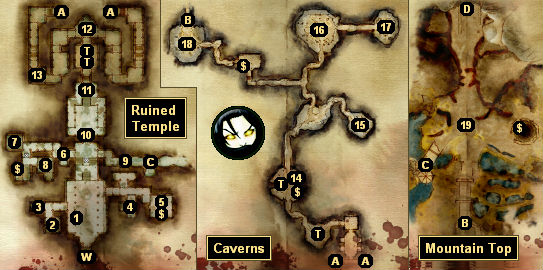
1 - Book
On the ground here you'll find a book that will give you the Magic and Religion codex entry for
Andraste: Bride of the Maker.
2 - Southwestern Room
In a cabinet in this room you'll find a
Taper, which will allow you to light the brazier to the north (#11). In the bookshelf next to the cabinet, you'll find the book
Discovering Dragon's Blood: Potions, Tinctures, and Spicy Sauces (a good gift for Wynne).
3 - Dead Adventurer
On the corpse here you'll find a sealed letter that will give you or update the Quest-Related codex entry for
Unbound. You'll need to find three such codex entries to trigger the quest
Unbound.
4 - Southeastern Room
This room will start out locked. To get inside, you'll need to pick up the
South-East Chamber Key (#8). Inside the room, you'll find three chests containing the
Main Hall Key and more. You'll need the
Main Hall Key to unlock the door to the main hall (#10).
5 - Library
You'll find some useful things in the library:
6 - Bronto
You'll face a creature called a bronto here. It won't drop anything when it dies, but killing it will give you the Creatures codex entry for
Bronto.
7 - Sleeping Quarters
Inside this room you'll find a pile of ancient texts containing a
Scroll of Banastor. Picking up the scroll will give you (or update) the Quest-Related codex entry for
The Scrolls of Banastor. You'll need to find five
Scrolls of Banastor for the quest
The Scrolls of Banastor.
8 - Barracks
You'll face a whole bunch of cultists in here, including a pair of mages in their own rooms. The safest way to deal with the cultists is to open the door to the barracks and then immediately run away. Only about half of the cultists will chase you, allowing you to break up the big battle into two smaller ones.
After defeating the cultists, you'll find a few things of interest inside the barracks (and the small room attached to it):
9 - Fallen Knight
On the corpse of the knight you'll find
Armor of Diligence.
10 - Locked Door
You'll need the
Main Hall Key (#4) to unlock this door.
11 - Brazier
If you light the brazier (using the
Taper from #2), then you'll receive the Books and Songs codex entry for
The Holy Brazier.
12 - Ash Wraith Room
When you enter the room, a "yellow" ash wraith will materialize in the center of it, and a few cultists will attempt to flank you from the east and west. But if you immediately leave the room after triggering the wraith, then you can draw the wraith to you and fight the cultists in a separate battle. After the battle, when you loot the iron chest in the room, you'll find
Ancient Elven Gloves and more.
13 - Chest Room
You'll find four chests in this room, one locked and three unlocked. Opening the unlocked chests will cause ash wraiths to appear. Inside the locked chest you'll find some random loot.
14 - Book
On the table here you'll find a book that will give you the Culture and History codex entry for
The Frostback Mountains.
15 - Feeding Chamber
When you get far enough into the chamber, three "yellow" drakes will ambush you from behind. Each one will drop a
Drake Scale when it dies. You'll also find a
Stone Warrior Statuette (a good gift for Alistair) in the pile of dragon filth in the room.
Note: The first time you pick up a
Drake Scale, you'll trigger the quest
Drake Scale Armor.
16 - Ambush Room
When you first enter the room, you'll only encounter an overseer and a handful of cultists. But as you explore the room, several dragonlings and two drakes will appear and attack you. So you should move around carefully and try to draw enemies to you, to prevent everything from appearing at once. After the battle, when you loot the remains, you'll find the longsword
Spellweaver on the corpse of the overseer, and you'll find
Drake Scales on the corpses of the drakes.
17 - Egg Chamber
In this chamber you'll have to battle a couple of cultists and a drake. The drake will drop a
Drake Scale when it dies. Also in the room you'll find a dragon egg with the amulet
Lifedrinker inside of it, and a book that will give you the Books and Songs codex entry for
The First Blight: Chapter 3. Picking up
Lifedrinker will also give you the Items codex entry for
The Life Drinker.
18 - Kolgrim
19 - Gong / High Dragon
If you're playing a console version of the game, then you'll find a gong here, and if you ring it then you'll call down a high dragon (the dragon the cultists in the area think is Andraste). If you're playing the PC version of the game, then when you kill Kolgrim (either at #18 or elsewhere), he'll drop
Kolgrim's Horn, and you'll need to use the horn to call down the dragon.
As you might expect, the high dragon can be tough to kill. It has lots of hit points, it does lots of melee damage, and it can breathe fire. It's a good idea if one of your melee characters is using
Yusaris (from the
Circle Tower), and you might also want to return to the
Denerim Market District so you can turn in your
Drake Scales for some quality armor (see the quest entry for
Drake Scale Armor for details). Otherwise, you'll just have to figure out a way to keep your characters alive while they whittle away the dragon's health. Just having a bunch of health poultices or Wynne in your party probably won't be enough.
Here are some things to think about for the battle:
- Examine your spells and try to determine if any might be useful against the dragon. Cone of Cold can keep the dragon frozen, Force Field can protect the character being attacked (or shaken) by the dragon, Misdirection Hex will prevent the dragon from hitting your characters with melee attacks.
- Be careful with how your characters are positioned. Try to get your tank character to point the dragon away from the rest of your party, so the dragon's fire attacks hit as few people as possible. Keep any other melee characters away from the front of the dragon, so they avoid the special "shake" attack. Keep your ranged characters as far away from the dragon as possible, so they don't get hit or stunned by the dragon. Also pay attention to when the dragon leaps into the air, and have the character at its intended destination vacate the spot.
- Look at the tactics pages for your characters. You might want to set them up so they automatically use health poultices when they're injured. You might also want to disable any spells or attacks (like shield bash) that won't work on the dragon.
If nothing you try works, then you might just need to come back later. The high dragon is an optional enemy, and it will wait for you patiently until you're ready to attack it.
But assuming you can kill the dragon, you'll gain all sorts of good loot: a
Maetashear War Axe, a
Pure Bitch Braid,
Qunari Siege Gauntlets,
Storm Talons,
The Long Sight, and more. The dragon will also drop a
Dragon Scale, which you can take to Wade's Emporium in the
Denerim Market District to receive a special set of armor. See the quest entry for
Dragon Scale Armor for more information.
Exits:
- Exit between the Ruined Temple and the Caverns.
- Exit between the Caverns and the Mountain Top.
- Exit between the Ruined Temple and the Mountain Top. This exit will start out blocked, and you'll only be able to use it after you've made your way to the Mountain Top (via Exit A and the Caverns).
- Entrance to the
Gauntlet.
- World exit.


