 Did we miss anything in this section? Is there something we didn't discover?
Let us know!
Walkthrough
Did we miss anything in this section? Is there something we didn't discover?
Let us know!
Walkthrough
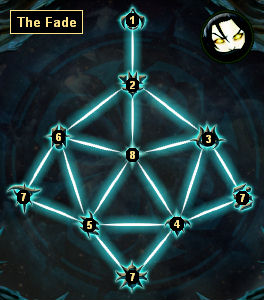
When you arrive at the Fade, you'll find yourself in the ancient Warden stronghold of Weisshaupt (#1). This is your nightmare in the Fade. When you move east onto a platform, you'll meet a demon version of Duncan, who will try to convince you that everything is all right in the world, and that maybe you'd just like to take a nap. This encounter will eventually lead to a battle. Afterwards, a fade pedestal will appear on the platform. Clicking on fade pedestals will allow you to move through the Fade.
Before leaving, you should notice two other things of interest in Weisshaupt:
- A lyrium vein. You'll find lyrium veins all throughout the Fade, and they'll heal you when you click on them -- unless you're a dwarf, and then they won't do anything for you.
- A glowing, twirling object (near the ramp to the platform). You won't be able to interact with this object yet, but later you'll recognize it as an essence of willpower, and clicking on it will permanently add +1 to your willpower attribute. You'll find no less than 21 of these attribute essences in the Fade, but for some of them, like this one, you'll need to be in spirit form to use them (see below).
As you travel through the Fade, you'll learn that the sloth demon is hiding in the Inner Sanctum (#8), and that to get to him you'll need to defeat the five demons who are protecting him (#2-6). Defeating these demons will also allow you to visit the nightmares of your companions (#7) and free them so that they'll be able to help you against the sloth demon.
To help you in your battles in the Fade, you'll learn four forms that you'll be able to switch to:
- Burning Man. You'll learn this form in
The Burning Tower (#3). In burning man form you'll be able to cast fire spells, and you'll be immune to fire damage.
- Golem. You'll learn this form in
The Mage Asunder (#4). In golem form you'll be resistant to melee attacks, and you'll be able to break open massive doors. You'll also be able to disarm traps.
- Mouse. You'll learn this form in
The Raw Fade (#2). In mouse form you'll be able to sneak and move through mouse holes.
- Spirit. You'll learn this form in
The Darkspawn Invasion (#6). In spirit form you'll be able to heal yourself and move through spirit doors.
The golem form is usually the best form for fighting bosses, but since switching between forms is so easy, you can also combine their powers. For example, you might start with the burning man form to throw a fireball, then switch to the golem form to do some melee damage, and then switch to the spirit form to heal yourself. Don't be afraid to experiment.
After defeating the demons (#2-6) and rescuing your companions (#7), you'll need to enter the Inner Sanctum (#8) and confront the sloth demon. Your companions will join you for the fight (assuming you rescued them), but you'll have to kill the sloth demon in five different forms before he'll finally die. With some quick form switching on your part, plus the help of your companions, the battle shouldn't be too bad. If you have Wynne with you, then you can probably just stay in golem form and let her heal you, but you might need to send Wynne to the two nearby lyrium veins to refill her mana.
When the sloth demon finally goes down, you'll exit the Fade and return to the
Circle Tower. You won't be able to return to the Fade, so be sure you've explored it thoroughly and found all of the attribute essences before you continue on.
1 - Your Nightmare
2 - The Raw Fade
In this part of the Fade, you'll gain the mouse form, you'll find two attribute essences, and you'll need to defeat the demon Yevena.
3 - The Burning Tower
In this part of the Fade, you'll gain the burning man form, you'll find five attribute essences, and you'll need to defeat the demon Rhagos.
4 - The Mage Asunder
In this part of the Fade, you'll gain the golem form, you'll find eight attribute essences, and you'll need to defeat the demon Slavren.
5 - The Templar's Nightmare
In this part of the Fade, you'll find two attribute essences, and you'll need to defeat the demon Vereveel.
6 - The Darkspawn Invasion
In this part of the Fade, you'll gain the spirit form, you'll find three attribute essences, and you'll need to defeat the demon Uthkiel the Crusher.
7 - Companion Nightmares
In each of these three nightmares, you'll be able to rescue one of your companions, but you'll have to defeat the two demons (#2-6) adjacent to the nightmares in order to enter them. The nightmares will follow the same format as your nightmare with Duncan (#1). You'll talk for a bit, and then you'll fight the demon(s) maintaining the nightmare. After rescuing your companions, they'll disappear, but then they'll re-appear again when you reach the Inner Sanctum (#8).
8 - Inner Sanctum


