 Did we miss anything in this section? Is there something we didn't discover?
Let us know!
Walkthrough
Did we miss anything in this section? Is there something we didn't discover?
Let us know!
Walkthrough
Between Orzammar and the
Frostback Mountain Pass, you'll learn that King Endrin recently died, and that the dwarves are scrambling to decide who to replace him with. There are two candidates:
- Bhelen Aeducan, King Endrin's only remaining son. Bhelen is a schemer, and he assisted in the death of one of Endrin's other sons (you'll learn about this if you play the
Dwarf Noble origins sequence), and so he did not gain Endrin's support.
- Lord Pyral Harrowmont, King Endrin's favored advisor. On his deathbed, Endrin supposedly named Harrowmont his successor, but nobody was around to hear this endorsement other than Harrowmont himself.
To gain an alliance with the dwarves, you'll need to help one of the two candidates to take the throne.
To start out, you'll need to gain the trust of one of the candidates. You won't be able to meet with the candidates themselves, but you will be able to talk to their top lieutenants: Vartag Gavorn (for Bhelen) and Dulin Forender (for Harrowmont). Both lieutenants will give you a task to prove your loyalty, but you'll only be able to complete one of the two. The quest you pursue will decide which candidate you're going to support.
Helping Bhelen
You'll find Vartag in the Chamber of the Assembly in the
Orzammar Diamond Quarter. He'll tell you that Harrowmont promised the same tract of land to two of his supporters, and he'll give you the promissory notes to prove it. All you'll need to do is show the notes to the two wronged nobles and encourage them to switch their allegiance to Bhelen. If you agree to this request, then you'll receive the quest "A Prince's Trust: The First Task."
Note: Vartag won't exactly be forthcoming about how he acquired the promissory notes. If you take them to the Shaper in the Shaperate (located in the
Orzammar Diamond Quarter), then he'll denounce them as forgeries. If you confront Vartag with this information, then he won't really care, and he'll still expect you to prove your loyalty.
The two "cheated" nobles are Lord Helmi and Lady Dace:
- You'll find Lord Helmi in Tapster's Tavern (#7). When you show him the promissory note, he'll announce that Lord Harrowmont is just as bad as everybody else, and he'll return to his House to re-think who he might vote for.
- You'll find Lady Dace in the
Orzammar Diamond Quarter (near Harrowmont's Estate). When you show her the promissory note, she'll be disturbed by what it implies, but she won't be able to do anything about it since the deal was struck with her father, and only he can change the vote of her House. However, Lady Dace will mention that her father is leading an expedition in the
Aeducan Thaig in the
Deep Roads, and she'll suggest that you speak with him there. She'll even lend you a
Dace Signet Ring, which will allow you to enter the
Deep Roads.
You'll find Lord Dace on the western side of the thaig. After helping him defeat some deep stalkers, you'll be able to show him the promissory note. He'll be outraged, and he'll immediately take his men and return to Orzammar. If you decide to return with him, then you'll be transported to the
Orzammar Diamond Quarter.
Note: If you ask Lord Dace for a favor in return for showing him the promissory note, then he might promise you a discount in Orzammar's shops. However, as far as we can tell, the prices won't actually change.
When you return to Orzammar yourself, you'll find Vartag still in the Chamber of the Assembly (located in the
Orzammar Diamond Quarter). He'll be pleased with your work, and you'll earn 1250 xp. Vartag will then take you to Bhelen (in the
Royal Palace), where you'll receive your next task.
Helping Harrowmont
You'll find Dulin in Harrowmont's Estate in the
Orzammar Diamond Quarter (he'll also show up right outside the Chamber of the Assembly, if you go there first). He'll tell you that Bhelen has scheduled a proving for today, but that he's "blackmailed or intimidated" two of Harrowmont's best fighters into withdrawing from the competition. If you agree to look into the matter and enter the proving as Harrowmont's champion, then you'll gain the quest "A Lord's Trust: The First Task."
The two fighters that you'll need to investigate are Baizyl (#18) and Gwiddon (#22):
- If you're persuasive enough, then Baizyl will tell you that he's having an affair with a nobleman's wife, and that Bhelen somehow acquired a few of his love letters, and is blackmailing him with them. However, he'll make you a deal. If you can steal the love letters back, then he'll agree to fight for Harrowmont again.
Myaja (#24) has the love letters in a locked chest in a locked room (#25). There are two ways to get them. You can steal the key to the room from Myaja and then pick the lock on the chest, or you can simply pick both locks. When you return
Baizyl's Love Letters to him, you won't receive any xp, but you will be able to ask him for a finder's fee of 10-15 sovereigns.
- To convince Gwiddon to re-join the proving, you'll just need to talk to him. If you're a Dwarf Noble, then you won't need to pass any dialogue checks. Otherwise you'll need to persuade him or intimidate him.
To start the proving, you'll need to talk to the Proving Master in the main hall of the Proving Grounds (#19). The proving will consist of five bouts. For the first three you'll be on your own, but in the last two you'll receive help. If you convinced Baizyl and Gwiddon to fight for Harrowmont, then they'll be able to help you. Otherwise you'll be restricted to your companions.
Note: You'll probably be much better off using your companions than Baizyl and Gwiddon.
The battles in the proving should be pretty easy. Once you've defeated your opponents, you'll just need to talk to Dulin in Tapster's Tavern (#7) to complete the quest and earn 1250 xp. Dulin will then decide that you're trustworthy, and he'll take you to meet Lord Harrowmont (in the
Orzammar Diamond Quarter), where you'll receive your next task.
The Second Task
Regardless of the candidate you decided to support, your next task will be the same, and it will take you to
Dust Town. See the
Dust Town location entry for more information.
Note: If you want to, you can also change your mind at this point, and support the other candidate. To switch allegiances, you'll need to visit the lieutenant you didn't work with before (either Dulin or Vartag), and accept a quest from him. His quest will be roughly the same as the regular second task.
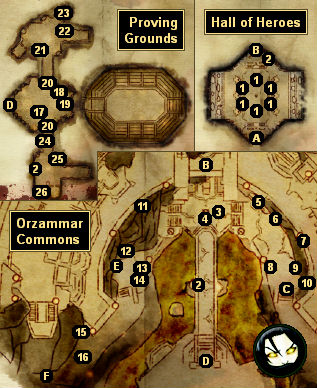
1 - Paragon Statues
If you click on any of the statues, then you'll receive the Culture and History codex entry for
The Paragons.
2 - Key Documents
You'll find three of these documents inside the Orzammar Commons. Each time you click on one, you'll gain or update the Quest-Related codex entry for
The Key to the City. Once you've updated the codex entry five times, you'll receive the quest "The Key to the City," which will allow you to loot a cache in the Chamber of the Assembly (in the
Orzammar Diamond Quarter). Inside the cache you'll find the
Key to the City. Completing the quest will also earn you 100 xp.
3 - Captain of the Guard
If you talk to the captain, then he'll give you the quests "Vartag Gavorn" and "Dulin Forender." You can also get these quests from other people, such as Steward Bandelor (located in the Chamber of the Assembly in the
Orzammar Diamond Quarter). You'll find Vartag and Dulin in the
Orzammar Diamond Quarter. Talking to them will complete the quests.
4 - Floor Carving
Clicking on the floor carving will give you the Culture and History codex entry for
The City of Orzammar.
5 - Janar Armorers
Janar will sell you a variety of dwarven arms and armor. Inside the shop, you'll also find a wall carving that will give you the Culture and History codex entry for
Life in Orzammar when you click on it.
6 - Filda
Filda will give you the quest
A Mother's Hope.
7 - Tapster's Tavern
You'll meet a few people of interest inside the tavern:
- Corra. She'll give you a "mole's-eye view" of the city. You can also buy drinks from her (including a round of drinks for everybody in the tavern), but nothing will come of it. Corra won't deal with you if you're playing a
Dwarf Noble.
- Lord Helmi. He's involved in the quest "A Prince's Favor: The First Task" (covered above).
- Nervous Adventurer. He's involved in the quest
Unbound.
- Nevin. He'll tell you that both Bhelen and Harrowmont are looking for Paragon Branka in the
Deep Roads.
- Oghren. He'll show up in the tavern once you've progressed far enough into the main questline, but he won't say much to you. Later he'll offer to join your party and help you look for Branka.
8 - Legnar
Legnar will sell you a variety of items, including a
Tome of the Mortal Vessel, a
Remarkable Sapphire, a
Golden Symbol of Andraste, the
Alley King's Flagon, a
Silver Demon Head Ring, and
Gold Earrings.
9 - Brother Burkel / Chantry
You'll meet the dwarven chanter Brother Burkel here. He'll tell you that he's trying to get a chantry built in Orzammar, but that he needs permission from the Shaper of Memories (located in the Shaperate in the
Orzammar Diamond Quarter). If you agree to help him, then you'll trigger the quest "The Chant in the Deeps."
When you reach the Shaper, you'll have to pass a persuasion, intimidation, or cunning check to convince him to grant Brother Burkel's request. If you're successful, then when you return to Burkel, you'll receive 100 xp, and Burkel will open a chantry right next to where he's standing. However, the chantry won't appear until you've exited and then re-entered the Commons map. If you enter the chantry, then you'll find Brother Burkel inside with a pair of worshippers, but nothing much will happen.
10 - Wall Carving
If you click on the carving then you'll gain the Culture and History codex entry for
The Castes.
11 - Figor's Imports
This shop will remain locked and closed until you've accepted a quest from Dulin or Vartag (both located in the
Orzammar Diamond Quarter). At that point, when you approach the shop, you'll witness a thug named Roggar trying to extort money from Figor. When they notice you, they'll head inside.
If you follow them inside, then Roggar will suggest that you might want to donate 10 sovereigns to the "Stranger-Safety Fund." You'll have two ways to proceed: you can intimidate Roggar and his men into leaving, or you can kill them. If you choose the former, then Figor will offer to sell you some useful items, including herbalism supplies and a
Remarkable Emerald. If you choose the latter, then Figor will fear reprisals from Jarvia, and he'll flee the city.
12 - Nug Wrangler Boermor
When you talk to Boermor, he'll give you the quest "A Lost Nug." He'll tell you that he lost his inventory of nugs (think rabbits), and he'll ask you to look for them. After completing the conversation, five nugs will spawn in the Commons:
- One next to the Mines Commander (#16),
- One next to Figor's Imports (#10),
- One on the bridge leading to the Proving Grounds (Exit D),
- One next to Filda (#6), and
- One next to Brother Burkel (#9).
Each nug that you bring back to Boermor will earn you 12 silvers and 25 xp. You'll only need to bring back one nug to complete the quest.
13 - Garin
Garin will sell you a variety of objects, including a
Tome of Physical Technique,
The Rose's Thorn,
Lifegiver, a
Golden Mirror, a
Gold Amulet, and a
Gemmed Bracelet.
14 - Dagna
Dagna will give you the quest "An Unlikely Scholar." She'll tell you that although she can't practice magic herself, she'd still like to learn more about it, and she'll ask you to visit the
Circle Tower and request permission for her to study there.
At the end of your conversation with Dagna, she'll mention that she's the daughter of Janar. If you head over to Janar's shop (#5) and mention what you just learned, then he'll tell you that he disapproves of Dagna's dream and wishes she would stay in Orzammar. That will give you two ways to complete the quest:
- If you tell Dagna that she should follow her father's advice (or if you otherwise refuse to help her), then the quest will end, but you won't receive a reward, and Janar will simply ask you not to encourage Dagna.
- If you travel to the
Circle Tower, then you'll simply need to talk to whoever is in charge (either First Enchanter Irving or Knight-Commander Greagoir), provided that you've already completed the main quest there. The person in charge will be intrigued by your request, and he'll give his permission.
When you relay this bit of news to Dagna (now in front of her father's shop), she'll be thrilled. If you press her for a reward, then she'll give you a
Dweomer Rune or a
Lyrium Potion (the quality of this item depending on your level), plus 100 xp. If you don't ask for a reward, then you won't receive anything. Dagna will then leave for the
Circle Tower, and she'll move into the Apprentice Quarters.
15 - Runestone
Clicking on runestones like this one will give you or update the Quest-Related codex entry for
The Shaper's Life. Once you've updated the codex entry four times, if you visit the Wall of Memories in the Shaperate (located in the
Orzammar Diamond Quarter), then you'll gain the fifth and final update for the codex entry, plus 100 xp.
16 - Mines Commander
The commander will block you front entering the
Deep Roads (Exit F) until the main questline requires you to go there.
17 - Varick
Varick will tell you a little bit about provings.
18 - Baizyl
Baizyl is involved in the quest "A Lord's Trust: The First Task" (covered above).
19 - Proving Master
If you're working on the quest "A Lord's Trust: The First Task" (covered above), then talking to the Proving Master will allow you to enter the proving. Otherwise, the Proving Master will keep telling you that the proving is going to start "in a few hours."
20 - Locked Doors
These doors will remain locked until you've accepted a quest from Dulin or Vartag (both located in the
Orzammar Diamond Quarter).
21 - Fixer Gredin / Jertrin
Gredin and Jertrin are involved in the quest
Thief in the House of Learning. They'll only appear here when you're on their part of the quest.
22 - Gwiddon
Gwiddon is involved in the quest "A Lord's Trust: The First Task" (covered above).
23 - Proving Armsman
The armsman will try to convince you to take part in some "unofficial training opportunities," which will involve you fighting four groups of tough enemies. If you win a bout then you'll receive 12 silvers and roughly 250 xp. If you win all four bouts, then the armsman will reward you with a
Blood Ring, which will also give you the Items codex entry for
Blood Ring.
24 - Wall Carving
Clicking on the wall carving will give you Culture and History codex entry for
The Proving.
25 - Myaja
Myaja is involved in the quest "A Lord's Trust: The First Task" (covered above).
26 - Myaja's Chest
You won't be able to access Myaja's chest unless you're working on the quest "A Lord's Trust: The First Task" (covered above).
Exits:
- Exit to the
Frostback Mountain Pass.
- Entrance to the Hall of Heroes.
- Exit to
Dust Town.
- Entrance to the Proving Grounds.
- Exit to the
Orzammar Diamond Quarter.
- Exit to the
Deep Roads.


