 Did we miss anything in this section? Is there something we didn't discover?
Let us know!
Background
Did we miss anything in this section? Is there something we didn't discover?
Let us know!
Background
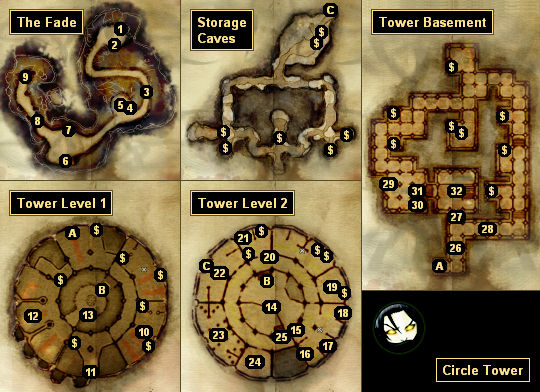
Your character is an apprentice to the Circle of Magi. As the campaign opens up, you're about to embark on the Harrowing, a trial by fire where you must confront a demon in the dream world known as the Fade.
Walkthrough
You'll start out in the Fade (#1). You'll only have one way to go, but as you progress you'll be attacked by wisp wraiths. The wisps shouldn't pose much of a problem for you, since a single Arcane Blast will almost be enough to kill them. Then you'll run into a friendly spirit -- a former mage named Mouse (#3). Mouse will warn you about the dangers of the Fade, and then he'll begin following you.
Shortly you'll come to a warrior spirit named Valor (#6). Valor will challenge you to a duel. If you win, then he'll give you
Valor's Staff. If you have enough willpower, then you'll be able to taunt him into giving you the staff without a fight. If you fight Valor, then after receiving the staff you'll be able to attack him for real, and if you win, then you'll gain some extra xp, but nothing else will happen. Regardless of how you handle Valor, be sure to equip the staff at the end of the encounter.
At the end of the Fade you'll meet a sloth demon (#9). He'll offer to teach Mouse how to become a bear, but you'll either need to solve his riddles or fight him to receive the lesson. If you choose the riddles, then you should answer "map," "tongue," and "dream." With Mouse in bear form, he'll be able to help you in combat.
After visiting with Valor (#6) and the sloth demon (#9), when you return to the testing grounds (#5), you'll encounter a rage demon. The demon will recognize Mouse, and it will mention that the two of them have an "arrangement" -- and that they've shared some "wonderful meals" together -- but Mouse will be much braver now that he has his bear form, and the encounter will turn into a fight.
When the fight starts up, the rage demon will summon some wisp wraiths to help it out. The easiest way to complete the fight is to let Mouse battle the rage demon while you take out the wisps, and then the two of you can gang up on the demon together. You can also just concentrate on the demon right away. When you defeat it, any surviving wisps will disappear.
After the battle, you'll either quickly or slowly realize that the rage demon was too easy to defeat, and that Mouse must be the real demon. However, when Mouse reveals himself, you won't have to fight him. The Fade will simply disappear, and you'll wake up in the Circle Tower (#10).
When you wake up, you'll be greeted by your friend Jowan. He'll ask you about the Harrowing, and complain that he hasn't been allowed to take the test yet himself, but then he'll finally remember that he's supposed to tell you that First Enchanter Irving (#24) would like to see you.
When you reach Irving, he'll congratulate you for completing the Harrowing, and he'll reward you with a
Magic Staff,
Mage Robes, and a
Ring of Study. He'll also introduce you to a Gray Warden named Duncan, and he'll ask you to escort Duncan to the guest quarters (#19). Along the way you'll be able to quiz Duncan about the Grey Wardens and the darkspawn, which will give you the Culture and History codex entries for
The Grey Wardens and
Darkspawn.
After delivering Duncan to his room, you'll be met again by Jowan. He'll tell you that he has something private to discuss with you, and he'll lead you to the chapel (#23). Inside the chapel, Jowan will introduce you to his girlfriend Lily, an Initiate of the Chantry -- and someone who he's definitely not supposed to have relations with. Jowan will then disclose that the Chantry suspects him of being a blood mage, and that they're going to force him to undergo the Rite of Tranquility, and he'll ask you for your assistance in escaping the tower.
Regardless of what you think about the matter, you'll have to tell Jowan that you'll help him. Jowan will then reveal his plan. He'll tell you that in order to disappear from the Circle, he'll need to destroy his phylactery, which can be found in the basement (#32) behind a specially locked door (#27). You won't be able to steal the keys to the door, but Jowan will comment that he once saw a
Rod of Fire burn through a lock, and he'll suggest that you pick up one from Owain in the stockroom (#14).
Note: If you don't believe Jowan, or if you want to side with the Circle, then you can go to Irving (#24) and tell him about Jowan's plan. Irving will ask you to go undercover and pretend to help Jowan, and so the quest will proceed about the same either way.
When you reach Owain, he won't simply give you the
Rod of Fire. He'll insist that you first fill out some paperwork, which will require you to get a signature from a senior enchanter.
There are three enchanters that you can go to:
- First Enchanter Irving (#24). He'll only sign the form if you've informed him about Jowan's plan, and then he'll do it to aid you in your mission. He'll also tell you about the Tevinter artifact (#31), and how you can use it to enter the phylactery storage room (#32).
- Senior Enchanter Sweeney (#15). When you talk to Sweeney, if you're persuasive, then he'll think you're going to use the
Rod of Fire to play tricks on your classmates, and he'll sign the form without you having to do anything for him in return. If you choose this path, then you'll still be able to complete Leorah's task.
- Senior Enchanter Leorah (#22). When you talk to Leorah, after some probing, she'll admit that there is an infestation of spiders in the Storage Caves (accessed via Exit C), and she'll ask you to exterminate them. You'll encounter over half a dozen spiders in the caves (plus find some decent loot, including an
Apprentice Cowl, a
Spirit Charm, and
Fade Striders), but you'll usually only face the spiders one at a time, and so they shouldn't prove too difficult to kill.
Once you've cleared out the caves, when you return to Leorah, she'll agree to owe you a favor, and you'll be able to use this favor to have her sign your form. If you go to Sweeney (#15) for the form, then Leorah will give you a few potions (including a
Health Poultice) instead.
When you show the form to Owain, he'll give you a
Rod of Fire. Then when you return to Jowan (#23), he and Lily will start following you. Neither will have a weapon equipped, so be sure to give them something useful from your inventory. However, when the three of you reach the phylactery storage room door (#27), you'll discover that it has been warded against magic, including the magic from the
Rod of Fire, and so you'll decide to explore the rest of the basement to see if there's another way in.
As you make your way through the basement, you'll be attacked by sentinels and other guardians, and you'll find some nice loot, including an
Apprentice's Amulet, a
Charm of Flame, an
Ephemeralist's Belt, and a
Blackened Heartwood Staff (#29). Eventually, you'll also come to a Tevinter artifact (#30), and Jowan will recognize it as an amplifier of magic. If you then move the nearby bookcase out of the way and use the
Rod of Fire on the artifact, you'll blow a hole through the wall and create an alternate entrance into the phylactery storage room (#32).
Inside the phylactery storage room, you'll find a chest containing an
Earthen Cinch, and you'll also find Jowan's phylactery. Jowan will immediately destroy the phylactery, and then you'll decide to leave. The main door to the room (#27) will open now, giving you an easy route to escape.
However, when you exit the basement, you'll be confronted by First Enchanter Irving, Knight-Commander Greagoir, and several templars (regardless of whether you were working for Irving). Geragoir will pronounce a death sentence for Jowan, but then Jowan will reveal himself to be a blood mage, and he'll escape. Afterwards, either as an accomplice to the escape or as something of an embarrassment to the Circle, you'll be forced to join the Grey Wardens, and you'll then leave the tower with Duncan.
Note: During the confrontation with Irving, he'll ask you if you took anything from the tower basement. If you're persuasive, then you'll be able to keep the
Blackened Heartwood Staff (#29). Otherwise, Irving will take it back from you.
1 - Starting Point
2 - Disturbing Statue
If you click on the statue, then you'll learn the Magic and Religion codex entry for
Beyond the Veil: Spirits and Demons.
3 - Mouse
4 - Lyrium Vein
If you click on the vein, then you'll gain the Magic and Religion codex entry for
Lyrium.
5 - Rage Demon
The demon will only appear here after you've visited Valor (#6) and the sloth demon (#9).
6 - Valor
7 - Twisted Structure
If you click on the structure, then you'll gain the Magic and Religion codex entry for
The Black City.
8 - Spirit Wolves
You'll be attacked by three spirit wolves here.
9 - Sloth Demon
10 - Apprentice Dorm
11 - Tower Entrance
You won't be allowed to leave the tower.
12 - Classroom
Inside the classroom you'll find a book containing the Magic and Religion codex entry for
The Fade.
13 - Book
In the shelf here you'll find a book containing the Magic and Religion codex entry for
Mana and the Use of Magic.
14 - Owain
Owain is in charge of the stockroom. He'll tell you a little about being a Tranquil mage.
15 - Senior Enchanter Sweeney
Sweeney is an old mage who will complain about his failing eyesight. You'll be able to take advantage of this defect during the course of the quest.
16 - Bookcases
You'll find four bookcases here. In three of the bookcases you'll find books that will give you the Magic and Religion codex entries for
Hierarchy of the Circle,
The Four Schools of Magic: Creation, and
The Four Schools of Magic: Primal.
The fourth bookcase will be empty, but you'll be able to look at the books (about blood magic) in First Enchanter Irving's office (#24).
17 - Eadric
Eadric will give you a sense of what it's like to be an elf.
18 - Niall and Torrin
You'll find Niall and Senior Enchanter Torrin standing here. If you talk to Torrin, then he'll tell you about the Fraternities, and you'll receive the Magic and Religion codex entry for
The Fraternity of Enchanters. You'll also find three books in the shelves nearby. If you read them then you'll learn the Magic and Religion codex entries for
History of the Circle,
The Four Schools of Magic: Entropy, and
The Four Schools of Magic: Spirit.
19 - Guest Quarters
20 - Cullen
Cullen will give you a sense of what it's like to be a templar.
21 - Book
On the table here you'll find a book that will give you the Magic and Religion codex entry for
The Cardinal Rules of Magic.
22 - Mage Laboratory
You'll meet Senior Enchanter Leorah inside the laboratory. She'll give you a quest once you've spoken to First Enchanter Irving (#24). On the table next to Leorah you'll find some books that will give you the Magic and Religion codex entry for
Maleficarum.
23 - Chapel
Inside the chapel you'll find several books that will give you the Magic and Religion codex entries for
Andraste: Bride of the Maker,
The Rite of Annulment,
The Chant of Light: The Blight,
The Maker, and
The Founding of the Chantry. You'll also meet Keili and Lily here.
24 - Irving's Office
This is where you'll meet First Enchanter Irving. Also in the office you'll find a pile of books that will give you the Religion and Magic codex entry for
Blood Magic: The Forbidden School.
25 - Stairs to Level 3
You won't be allowed to take these stairs.
26 - First Door
You'll only be able to go through this door if you have Lily with you.
27 - Second Door
You'll only be able to use this door to exit the phylactery storage room (#32).
28 - Locked Door
You'll be able to use the
Rod of Fire on this door to get through it. But when you do, the sentinels in the basement will turn hostile towards you.
29 - Chest
Inside the chest you'll find a
Blackened Heartwood Staff.
30 - Tevinter Statue
When you click on the statue, it will begin talking to you, and it will introduce itself as Eleni Zinovia, "once consort and advisor to Archon Valerius." You won't be able to do anything to help the statue, but by talking to it you'll receive the Culture and History codex entry for
The Tevinter Imperium.
31 - Tevinter Artifact
32 - Phylactery Storage Room
Exits:
- Stairs between Level 1 and the Basement.
- Stairs between Level 1 and Level 2.
- Door between Level 2 and the Storage Caves.


