 Did we miss anything in this section? Is there something we didn't discover?
Let us know!
Walkthrough
Did we miss anything in this section? Is there something we didn't discover?
Let us know!
Walkthrough
To gain the support of the dwarves, you'll need to help them elect their next king, which will involve you choosing one of their candidates and then completing three tasks for him. The first task is covered in the location entry for the
Orzammar Commons, the second task is covered in the location entry for
Dust Town, and the third task is covered here.
Regardless of your candidate, when you return to him after completing the second task, you'll learn that the Assembly is still deadlocked, and so one last task is required. The candidate will tell you that the dwarves only have one living Paragon, a smith named Branka, and that she left for the Deep Roads two years ago. However, if she could be found and swayed towards one of the candidates, then "anyone with her support could take the throne unchallenged." Your candidate will then ask you to search for Branka, which will allow you to enter the Deep Roads (if you hadn't gotten permission already).
When you approach the entrance to the Deep Roads, you'll be stopped by Oghren, Branka's husband. He'll insist upon joining you for the trip, and he'll become available as a companion. You'll have to add Oghren to your party when you enter the Anvil of the Void, so you might want to go ahead and include him now so you can get him some gear first.
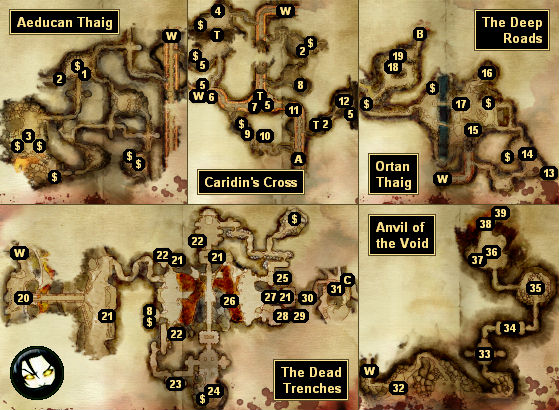
Inside the Deep Roads, you'll need to make your way through Caridin's Cross, the Ortan Thaig, and then the Dead Trenches. The Aeducan Thaig is optional. At the end of the Dead Trenches, you'll meet up with Hespith (#25) and the broodmother (#31), and you'll learn that Branka somehow encouraged or forced their transformations, but they won't tell you why.
When you arrive at the Anvil of the Void, you'll meet up with Branka (#32), and you'll learn that she's obsessed with the anvil -- only it's hidden away behind a gauntlet of traps created by Caridin himself, and so Branka can't get to it. Branka will then block the exit behind you, and so you'll only have one direction you can go -- forward, towards the traps and the anvil.
Note: If Oghren isn't in your party when you enter the Anvil of the Void, then you'll be forced to include him when you meet Branka.
As you fight your way to the traps, Branka will follow along beside you using a parallel path, and she'll try to justify herself. She'll explain that she grew frustrated with the traps and the lack of support from her House, and so she allowed some of the women with her to become tainted, so they would produce darkspawn "to test the traps." Thus, the broodmother (#31) was created.
The traps themselves (#33, #34, #35) should not cause you too many problems. They're all about combat rather than solving puzzles, and so you should be able to grind your way through them even if you don't understand them.
Past the traps you'll come to the golem version of Caridin (#36). He'll inform you that souls are required to create golems, and that while he started out with volunteers, soon "a river of blood" flowed from the anvil. Caridin will then ask you to help him destroy the anvil. Branka, meanwhile, will storm into the room and demand the opposite. This will give you two ways to proceed:
- If you support Branka, then you'll have to battle Caridin and four of his golems, but two other golems will fight with you (Branka will merely watch). Because of the assistance of the golems, the fight should not be too tough, and when Caridin dies he'll drop
Caridin's Shield,
Caridin's Cage, and more. Morrigan, Oghren and Zevran will approve of this choice, but Alistair, Leliana and Wynne will disapprove, and Shale will leave your party and side with Caridin.
Note: If you don't have Shale with you when you meet Caridin, then you'll later lose approval with him when you tell him what you did, but he won't leave your party.
After the battle, Branka will use the anvil to create a
Paragon-Forged Crown, which you'll be able to use to sway the Assembly. If you want to, you can then try to convince Branka that the anvil is evil. If you succeed, then she'll destroy the anvil and throw herself into the lava. Oghren will disapprove of this.
- If you support Caridin, then Branka will pull out a control rod, and you'll have to battle her and four golems, but two golems will assist you (Caridin will merely watch). Branka will probably give you a tougher fight than Caridin, so try to quickly take out her golems, and then concentrate on her. When Branka dies, she'll drop
Branka's Shield, the mace
Vanguard, and more. Morrigan, Oghren and Zevran will disapprove of this option, but Alistair, Leliana, Wynne, and Shale will approve.
After the battle, Caridin will use the anvil to create a
Paragon-Forged Crown, which you'll be able to use to sway the Assembly. You'll then automatically destroy the anvil for Caridin, and Caridin will throw himself into the lava.
Regardless of your choice, when you return to the Chamber of the Assembly (in the Orzammar Diamond Quarter), you'll be allowed to choose the next king (even if it's not the candidate you had been working for):
- If you choose Harrowmont, then Bhelen and his followers will attack, but you'll have Harrowmont and his followers on your side, and so the fight should not be difficult. None of the insurgents will drop anything noteworthy when they die, but after the battle Harrowmont will give you
Harrowmont's Staff, and he'll promise to uphold his end of the treaty.
- If you choose Bhelen, then he'll immediately call for Harrowmont's execution, and he'll summon you to the Royal Palace. When you talk to him there, he'll give you
Trian's Maul, and he'll promise to uphold his end of the treaty.
Once a new king has been named, when you enter the
Orzammar Diamond Quarter, you might run into Kardol, and you might be able to convince him to add the Legion of the Dead to your list of allies. If you don't see Kardol in the
Orzammar Diamond Quarter, then you should still be able to talk to him in the Dead Trenches (#20).
That means you can gain up to three allies by the end of Orzammar's main questline. The dwarves will always join you, the Legion of the Dead will join you if you can persuade Kardol, and the golems will join you if you side with Branka at the Anvil of the Void.
1 - Chest
Inside the chest you'll find a
Black Runestone (a good gift for Alistair).
2 - Small Bloody Sacks
You'll find three small bloody sacks in the Deep Roads (one in the Aeducan Thaig and two in Caridin's Cross). If you loot the sacks then you'll receive a
Bag of Limbs, a
Head in a Bag, and a
Torso in a Bag. Looting the bags will also give you or update the Quest-Related codex entry for
Asunder.
Once you've looted all three bags, you'll trigger the quest "Asunder." This will allow you to place the body parts from the bags on the Altar of Sundering (#15), causing a giant Fade Beast to appear. The Fade Beast will ask you if you want a reward or vengeance. If you choose reward, then you'll receive 25 sovereigns and 50 silvers, and the Fade Beast will disappear. If you choose vengeance, then you'll have to fight the Fade Beast, and you'll get about 100 xp for killing it, plus find some random loot on its corpse.
3 - Lord Dace
Lord Dace will only appear here if you're working on the quest "A Prince's Favor: The First Task" (described in the
Orzammar Commons location entry).
Note: If you rob Lord Dace, then you'll receive a
Thorn of the Dead Gods.
4 - Firepit
If you click on the firepit then you'll receive the Culture and History codex entry for
The Blights.
5 - Piles of Rubble
When you click on these piles of rubble, you'll receive or update the Quest-Related codex entry for
The Crosscut Drifters. Once you've updated the codex entry four times, you'll trigger the quest "The Drifters' Cache," which will cause a cache to appear in Caridin's Cross (#10). Inside the cache, you'll find a
Thorn of the Dead Gods,
Effort's Gloves, a
Ring of the Warrior, and more.
6 - Statue
If you click on this statue then you'll receive the Culture and History codex entry for
Orzammar History: Chapter One.
7 - Chest
Inside the chest you'll find a
Totem (a good gift for Sten).
8 - Runestones
These two runestones in the Deep Roads will give you or update the Quest-Related codex entry for
The Shaper's Life. Once you've updated the codex entry four times, if you visit the Wall of Memories in the Shaperate (located in the
Orzammar Diamond Quarter), then you'll gain the fifth and final update for the codex entry, plus 100 xp.
9 - Genlock Emissary
When the emissary dies, it will drop the
Topsider's Hilt, and picking it up will give you or update the Quest-Related codex entry for
Topsider's Honor. The hilt is also involved in the quest "An Admirable Topsider" (see #13 for details).
10 - Ogre Alpha
You'll encounter a "red" ogre alpha here. It will drop around 3 sovereigns when it dies. This is also where you'll find the drifters' cache (see #5).
11 - Glass Phylactery
If you attempt to take the phylactery, then it will break, releasing a "red" revenant. When you kill the revenant, it will drop a scrap of paper. Looting the paper will give you or update the Notes codex entry for
The Black Vials.
12 - Deep Stalker Breeding Grounds
You'll encounter three waves of deep stalkers here, culminating with a "red" deep stalker matriarch. None of the creatures will drop anything interesting when they die.
13 - Warrior's Grave
Examining this grave will give you or update the Quest-Related codex entry for
Topsider's Honor. There are four parts to the codex entry. Once you've found the first three parts (this one plus the ones at #9 and #16), you'll receive the quest "An Admirable Topsider," which will cause an ancient darkspawn to appear (#23).
While collecting the codex entries and killing the ancient darkspawn, you should also have picked up three items: the
Topsider's Blade (#23), the
Topsider's Hilt (#9), and the
Topsider's Pommel (#16). If you bring these items back to the warrior's grave, then you'll complete the quest, and you'll receive
Topsider's Honor plus 100 xp.
14 - Battle
You'll encounter lots of darkspawn fighting lots of giant spiders here. If you're careful, then you can keep the two sides balanced and take very little damage yourself. Nobody involved in the battle will drop anything interesting.
15 - Altar of Sundering
This altar is involved in two quests: "Asunder" (see #2) and
Places of Power. Near the altar on a doorstep you'll also find a book that will give you the Books and Songs codex entry for
Caridin's Journal.
16 - Ruck's Camp
You'll first encounter Ruck slightly south of his camp, but he'll run away when he sees you, and you won't be able to talk to him until you catch up to him at the camp. When reach Ruck, you'll discover that he has spent a little too much time around lyrium, and that he has lost his sanity. If you allow Ruck to live, then he'll function as a shopkeeper, and he'll sell you a variety of items including a
Destructionist's Belt, an
Etched Silver Symbol, and an unlimited supply of
Deep Mushrooms. If you put Ruck out of his misery, then you won't find anything noteworthy on his corpse.
Note: Ruck is involved in the quest
A Mother's Hope, but it won't make any difference whether you kill him or not.
In a vase in the camp you'll find the
Topsider's Pommel. Picking it up will give you or update the Quest-Related codex entry for
Topsider's Honor (see #13 for more information).
17 - Ortan Thaig Chest
Inside the chest you'll find some
Ortan Records, which you'll need for the quest
Lost to the Memories.
18 - Corrupted Spider Queen
When you battle the queen, it will disappear and re-appear, it'll web you, and it'll summon corrupted spiders to attack you, but none of the spiders will hit you all that hard, and so you shouldn't have too much trouble defeating them. When you loot the queen's corpse, you'll find
Silk Weave Gloves, the axe
Bloodline, and more.
19 - Branka's Camp
Inside the camp, you'll find two locked chests containing random loot, plus Branka's journal. When you read the journal, you'll learn that Branka left the Ortan Thaig for the Dead Trenches, where she hoped to find the Anvil of the Void.
20 - Legion of the Dead
When you reach this spot, you'll find Kardol and several dwarven legionnaires battling darkspawn. Over time, more darkspawn will arrive from across the bridge. For the easiest battle, you should stay with Kardol and let him help you. For the most xp, you should head across the bridge and fight the darkspawn on your own.
After the battle, if you talk to Kardol, then he'll tell you about the Legion of the Dead. "It offers redemption for the promise of the greatest sacrifice." Then when you clear the darkspawn from the eastern side of the bridge, Kardol and his legionnaires will follow you across, but they won't go any further than that.
Finally, after eventually helping the dwarves to choose a new king, Kardol might show up in the
Orzammar Diamond Quarter, and when you talk to him there, you might be able to convince him to send troops to help you against the Blight.
21 - Runestones
Examining these runestones will give you or update the Culture and History codex entry for
Stalata Negat.
22 - Legion Sarcophagi
In each of these three sarcophagi, you'll find a piece of the Legion armor set:
Armor of the Legion,
Boots of the Legion, and
Gloves of the Legion. Each piece you pick up will give you or update the Quest-Related codex entry for
The Dead Caste. You'll need to wear the full set of Legion armor (including the helm at #29) to summon the Gangue Shade at the Legion of the Dead Relic (#28).
Note: Updating the codex entry for
The Dead Caste four times will trigger the quest "The Dead Caste" (see #30).
23 - Ancient Darkspawn
If you're working on the quest "An Admirable Topsider" (see #13), then somewhere around here you'll encounter a "red" ancient darkspawn. It will drop the
Topsider's Blade and more when it dies.
24 - Genlock Forge Master
Inside this chamber you'll encounter a large group of darkspawn, including a "red" genlock forge master. The forge master will drop the
Forge Master's Hammer, a
Spear-Thrower, and more when it dies.
25 - Hespith
As you approach Hespith, you'll hear her reciting a poem:
First day, they come and catch everyone.
Second day, they beat us and eat some for meat.
Third day, the men are all gnawed on again.
Fourth day, we wait and fear for our fate.
Fifth day, they return and it's another girl's turn.
Sixth day, her screams we hear in our dreams.
Seventh day, she grew as in her mouth they spew.
Eighth day, we hated as she is violated.
Ninth day, she grins and devours her kin.
Now she does feast, and she's become the beast.
When you get close enough to talk to Hespith, she might mention that she was Branka's captain and lover, but most of her words will be incoherent and disturbing. You'll only get the sense that Branka did something terrible, and that as a result Hespith is turning into something that eats human flesh. Hespith will then run away towards the Dead Trenches (Exit C), and as you follow her you'll hear more of her words, and get ever closer to figuring out what she's talking about.
26 - Rubble
If you examine the rubble here then you'll receive the Notes codex entry for
Load Limit Reached.
27 - Ominous Door
You'll need the
Legionnaire Key from the Legionnaire Altar (#29) to open this door.
28 - Legion of the Dead Relic
If you click on the relic, then you'll gain the Quest-Related codex entry for
The Gangue Shade, which will mention that "only the fully adorned of the Legion can face the gangue." If you then put on
Armor of the Legion,
Boots of the Legion,
Gloves of the Legion, and the
Helm of the Legion (located at #22 and #29), and click on the relic, then a "red" gangue shade will appear and attack you. The shade probably won't drop anything interesting when it dies.
29 - Legionnaire Altar
Inside the altar you'll find a
Helm of the Legion and a
Legionnaire Key. Picking up the helm will give you or update the Quest-Related codex entry for
The Dead Caste. You'll need the key to open the Ominous Door (#27). Looting either item will also cause the nearby legion spirits to awaken and attack you.
Note: Updating the codex entry for
The Dead Caste four times will trigger the quest "The Dead Caste" (see #30).
30 - Sarcophagus
Updating the Quest-Related codex entry for
The Dead Caste four times will trigger the quest "The Dead Caste" and cause a sarcophagus to appear here. Inside the sarcophagus you'll find a
Dead Caste Insignia. If you take the insignia to the Book of Memories in the Shaperate (located in the
Orzammar Diamond Quarter) then you'll receive one last update for the codex entry, plus earn 100 xp.
31 - Broodmother
The broodmother is a big flabby creature, and she will be assisted by four tentacles, plus assorted summoned darkspawn. There are a variety of ways to approach the fight, but the two best seem to be:
- Change all of your characters to ranged attacks, and move them onto the stone "islands" near to the broodmother. The stones will protect your characters from the tentacles, effectively removing the tentacles from the fight. Then your characters will just need to target the broodmother with their attacks and switch to the darkspawn as necessary.
- Simply rush the broodmother and ignore the tentacles and darkspawn as much as possible. As long as your party can do a lot of damage, you should be able to knock out the broodmother pretty quickly.
Note: If you get into melee range of the broodmother, then she can sometimes pick up characters and shake them around, damaging them. The easiest way to protect against this is to cast Force Field on the character being shaken.
When the broodmother dies, the tentacles will die with her, but you'll still have to finish off any remaining darkspawn. Then when you loot the broodmother's corpse, you'll find the helmet
Rock-Knocker, the armor
Effort, a
Ring of Selection, and more.
Note: The broodmother is the creature that Hespith (#25) is turning into, and that Branka helped create.
32 - Branka
33 - First Trap Room
You'll find this first trap room filled with poisonous gas and four "yellow" stone golems. The golems will animate one at a time and attack you. Meanwhile, the gas will do a little bit of damage to you every few seconds. To stop the gas, you'll need to turn off the four gas valves in the room (two on each side). Once you've killed all four golems, the door on the northern side of the room will open, allowing you to continue.
34 - Second Trap Room
In this trap room, you'll discover a pair of blade traps and some more golems. As you make your way through the room (hopefully disarming the traps as you go), four of the golems will animate and attack you. Once you've killed them, the door on the eastern side of the room will open, allowing you to continue.
35 - Third Trap Room
Inside the final trap room, you'll encounter a spirit apparatus. Every so often, the apparatus will create "yellow" spirits at the four anvils surrounding it. Each time you kill one of the spirits, you'll then be able to activate its anvil, damaging one of the "faces" of the apparatus. To kill the apparatus, you'll need to damage each face twice.
The first time you damage a face on the apparatus, you'll extinguish its "eyes," and the face will stop producing forgotten spirits and start producing enraged spirits. The second time you damage a face, it will "die" and stop producing spirits altogether. That means for the easiest battle you should concentrate on one or two faces and attack them twice, and then move on to the other faces. If you get into trouble, you can always retreat back to the entrance door and quaff potions or cast spells. The spirits won't chase you.
When you kill the apparatus, the door on the western side of the room will open, allowing you to continue.
36 - Caridin
37 - Golem Registry
On the registry, you'll find a list of all of the dwarves who became golems. If you take a tracing of the names, then you'll trigger the quest "The Golem Registry," but you won't receive any sort of reward when you take the tracing to the Shaper of Memories in the Shaperate (located in the
Orzammar Diamond Quarter).
38 - Chest
Inside the chest you'll find a
Medium Silver Bar (a good gift for Zevran) and more.
39 - Anvil of the Void
Exits:
- World exit (Deep Roads). Taking this exit will unlock the Ortan Thaig.
- World exit (Deep Roads). Taking this exit will unlock the Deep Trenches.
- World exit (Deep Roads). Taking this exit will unlock the Anvil of the Void.
- World exit (Deep Roads).


