 Did we miss anything in this section? Is there something we didn't discover?
Let us know!
Walkthrough
Did we miss anything in this section? Is there something we didn't discover?
Let us know!
Walkthrough
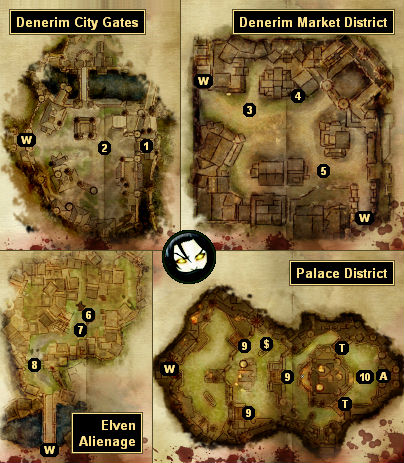
When you arrive at the Denerim City Gates (#1), you'll have all of your companions with you, but they won't be in your party, and so you won't be able to control them. However, the battle at the gates should not be in any way difficult. Almost all of the enemies will be "white," meaning you'll be able to kill them in one hit, and between your companions and a bunch of allied soldiers, you'll have plenty of help.
Eventually, the darkspawn will stop appearing in the area, and you'll be able to talk to Riordan (#2). Riordan will tell you his plan of attack -- to try and lure the archdemon to the roof of
Fort Drakon -- and he'll suggest that you kill the archdemon's two generals (#5 and #8) before heading there yourself (the game will make it sound like this is optional, but you'll have to kill at least one of the generals).
At the end of your conversation with Riordan, you'll have to pick your party for the final segment of the game. There are a few things you should consider when making this decision:
- You won't be able to adjust your party after this, so this will be your party for the remainder of the game, including your battle against the archdemon.
- If you don't include Alistair or Loghain in your party, then when it comes time to kill the archdemon, you'll have to strike the final blow yourself.
- The companions you leave behind will have to fight a small battle on their own (with help from some "white" soldiers and your allies). It won't really matter who you leave in charge.
We'd recommend that you take your best companions with you, and leave the others to fend for themselves.
Note: After exiting the Denerim City Gates, you'll be able to call on your allies -- the mages / templars, the humans, the elves / werewolves, and the dwarves / golems -- using an "army picker" under the minimap. Your allies will be limited, so you should only use them in battles where you're having trouble, but they're a little bit weak -- about as powerful as "white" darkspawn -- so you might not want to bother with them much at all.
Denerim Market District
You won't need to do anything complicated in the Market District, just complete two battles -- one against an emissary and some ogres (#3), and the second against a "red" hurlock general and some more ogres (#5). The hurlock general will hit pretty hard, so you might need to use some healing poultices as well as cast healing spells, but the ogres probably won't survive long enough to have much of an impact, and so the battle against the general should not be too difficult.
When the hurlock general dies, it will drop the
Axe of the Vashoth, the helmet
Corruption, a
Grandmaster Flame Rune, and more.
Elven Alienage
Inside the alienage you'll meet Shianni (#7), and if you're persuasive then you'll be able to convince her and some elves to help you defend the gate (#8). After the conversation, a "yellow" ogre will break down the gate, and then a large force of darkspawn, including a "yellow" genlock alpha and a "red" hurlock general, will start swarming inside.
Unlike the general from the Market District, this general will be a spellcaster, and so you should take him down as quickly as possible, using the elves (or perhaps your allies) to deal with the "white" darkspawn. After the battle, you'll find a
Malign Staff, a
Spiral Band, and more on the corpse of the general, and when you talk to Shianni, she'll reward you with a
Dawn Ring.
As you exit from the alienage, the archdemon will attack you. It will swoop down and breathe fire at you -- but only succeed in destroying the bridge that you were crossing. Then the archdemon will depart, and you won't have any choice but to move forward (since you'll be on the wrong side of the bridge to return to the alienage).
Denerim City Gates
On your way to the Palace District, you'll trigger a battle at the city gates, where you'll have to defend the area from darkspawn using your leftover companions, some "white" soldiers, and perhaps your allies. You'll be in control of four of your companions (including the companion you left in charge). The others will work on their own.
To start out, you should check your companions and advance them in level if you can. You'll also probably need to turn on some of their sustained talents and spells. Then when you're ready to start the battle, you should talk to the officer in charge. At the end of your conversation with him, the darkspawn, including a "yellow" hurlock emissary and a "red" ogre alpha, will break down the gates and start attacking you.
During the course of the battle, more darkspawn, including at least one more "yellow" hurlock emissary, will come charging through the gates. You should always take down the emissaries as quickly as possible and then mop up the rest. The melee enemies probably won't pose much of a challenge, simply because you'll have them so severely outnumbered.
Once you've killed the darkspawn and looted their remains, you can end the sequence by talking to the messenger in the center of the area. When you inform him that the gates are secure, you'll witness a cut scene where Riordan will attempt to kill the archdemon and fail (and fall to his death), and then you'll regain control of your party.
Note: This is the last time you'll use your leftover companions in the campaign. If you're planning on playing Awakening next, then you might want to strip down these companions before you return control to your main party. That way you'll be able to sell the excess equipment and make a little extra money for Awakening.
Palace District
As with the rest of the city, inside the Palace District you'll have to kill lots of darkspawn, including "yellow" ogres, emissaries and alphas (at #9 and #10). As long as you proceed slowly and carefully, and avoid alerting more enemies than necessary, these battles shouldn't be too difficult.
When you go through the gate at the eastern end of the district (Exit A), you'll unlock
Fort Drakon, which will allow you to proceed to the final area in the campaign.
1 - Front Gates
2 - Riordan
After the battle at the gates, this is where you'll find Riordan.
3 - Battle
At this spot you'll have to deal with several "white" and "yellow" ogres and a "yellow" genlock emissary.
4 - Landmark Wagon
5 - Hurlock General
At this spot you'll encounter a pair of "white" ogres and a "red" hurlock general. More ogres, including a "yellow" ogre, will show up during the course of the battle.
6 - Landmark Tree
7 - Shianni
8 - Alienage Gate / General
At this gate you'll be attacked by a "yellow" ogre, a "yellow" genlock alpha, and a "red" hurlock general.
9 - Ogres
You'll face "yellow" ogres plus assorted emissaries and alphas at these spots.
10 - Major Battle
At this spot you'll face some "yellow" emissaries and alphas, and groups of shrieks and "white" darkspawn will show up every so often from nearby doorways.
Exits:
- World exit (Denerim). Going through this exit will unlock
Fort Drakon on the Denerim map.
- World exit (Denerim).


