 Did we miss anything in this section? Is there something we didn't discover?
Let us know!
Walkthrough
Did we miss anything in this section? Is there something we didn't discover?
Let us know!
Walkthrough
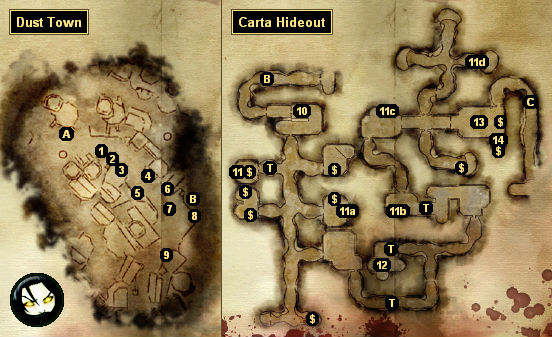
To gain the support of the dwarves, you'll need to help them choose their next king. This will involve you picking one of the two candidates, and then completing tasks for him. Making the choice and completing the first task is covered in the
Orzammar Commons location entry. This section covers the second task.
Regardless of the candidate you choose, your second task will be the same. The candidate will tell you that he needs to reduce the amount of crime in the city if he is to gather enough support to become king, and he'll ask you to track down and kill Jarvia, the leader of the criminal carta. The candidate won't know where Jarvia's hideout is located, but he'll suggest that Dust Town is a good place to start. Agreeing to the task will give you two quests: "A Lord's Trust / A Prince's Favor: The Second Task" and "Entering Jarvia's Hideout."
Getting inside the hideout is a two-part process. In the first part you'll need to discover the method by which thieves enter the hideout. Just about everybody in Dust Town will know something about this, and they'll all accept money to tell you about it, but only two (or three) will have the information that you need:
- Rogek (#2). You can pay him 15 sovereigns for the information, or you can agree to purchase his Smuggled Lyrium (which will trigger the quest
Precious Metals).
- Nadezda (#7). She'll tell you the information in exchange for 5-10 silvers, or you can not pay her at all.
- Leske (unverified). If you're a Dwarf Commoner, then Leske will show up near Nadezda (#7), and he'll give you the information.
Regardless, you'll learn that the thieves use
Finger Bone Tokens to enter the hideout.
After learning about the tokens, when you enter the Slums House (#9), you'll be attacked by several thugs, including a "yellow" thug leader. The thug leader will surrender once you've done enough damage to him, ending the fight. At that point the leader will give you a
Finger Bone Token and he'll tell you where the hideout is, and then you'll be given the option of finishing him off or letting him go. Your companions won't comment either way.
You'll find the hideout entrance nearby (Exit B). The
Finger Bone Token will allow you to go through the door. Inside you'll be stopped by a carta doorman (#10) who will ask you for the password. There isn't any way to know it, so whatever you say will cause everybody in the hideout to turn against you. However, talking to the doorman will complete the quest "Entering Jarvia's Hideout."
Beyond the doorman, you'll have to kill a whole host of carta thugs and assassins as you fight your way to Jarvia's chamber (#13). When you get there, you'll find Jarvia surrounded by a generous supply of minions and traps. For best results, you should take down the minions and traps first, and then concentrate on Jarvia. When she dies, she'll drop a
Longrunner's Cap,
Pushback Strikers, a
Carta Key, and more. You'll need the key to reach the secret exit from the hideout (Exit C).
When you return to your candidate, you'll receive 1750 xp, but you'll learn that the Assembly is still deadlocked, and so one more task is required. This final task will take you to the
Deep Roads.
1 - Rubble
Clicking on the rubble will give you the Culture and History codex entry for
The Casteless.
2 - Rogek
Rogek will give you the quest
Precious Metals. If you rob Rogek, then you'll gain 20 sovereigns.
3 - Alimar's Emporium
Alimar will sell you a variety of items, including a
Remarkable Amethyst.
4 - Shady Corebit
Shady Corebit is involved in the quest
Thief in the House of Learning.
5 - Assembly Directive
When you click on the directive, you'll gain or update the Quest-Related codex entry for
The Key to the City. Once you've updated the codex entry five times, you'll receive the quest "The Key to the City," which will allow you to loot a cache in the Chamber of the Assembly (in the
Orzammar Diamond Quarter). Inside the cache you'll find the
Key to the City. Completing the quest will also earn you 100 xp.
6 - Idle Dwarf
By default, the idle dwarf won't have much to say to you. However, if you have enough approval with Leliana, then when you talk to her in Orzammar, she'll mention that she'd like a nug for a pet. After learning this, when you talk to the idle dwarf, you'll be able to ask him to catch one for you. The dwarf will then disappear, but when you exit and re-enter the area he'll return, and he'll sell you a
Cute Nug for 5-40 silvers. You can also take the nug without paying.
Note: If you give the nug to Leliana, then she'll name it Schmooples, and you'll find it sitting next to her in the party camp.
7 - Nadezda
Nadezda is a beggar. If you hand her 5 silvers, then she'll give you some background information about Dust Town. Nadezda is also involved in the quest "Entering Jarvia's Hideout" (see above).
8 - Zerlinda
Zerlinda will give you the quest "Zerlinda's Woe." She'll tell you that she had a son with a casteless man, which makes her son casteless as well, and that her family has disowned her because of it. She'll then ask you for assistance. There are four ways you can complete the quest:
- You can tell Zerlinda that her family is right, and convince her to leave her baby in the Deep Roads. You won't receive a reward for this.
- You can convince Zerlinda to live on the surface. This will net you 200 xp.
- If you've completed the quest "The Chant in the Deeps" (covered in the location entry for the
Orzammar Commons), then you'll be able to suggest to Zerlinda that the Chantry might help her. You'll then need to talk to Brother Burkel (located in the chantry in the
Orzammar Commons), but you won't need to use coercion or anything; he'll be happy to help. When you relay this news to Zerlinda, you'll earn 200 xp.
- You can offer to talk to Zerlinda's father for her. You'll find him in Tapster's Tavern (in the
Orzammar Commons), and you'll be able to persuade him or intimidate him into allowing Zerlinda to come back home. When you return with this news to Zerlinda, you'll receive 200 xp.
9 - Slums House
Inside the house you'll find a pair of locked chests that will provide you with some random loot.
10 - Carta Doorman
No matter what you say to the doorman, you'll have to fight him.
11 - Jammer's Journal
When you click on Jammer's journal (#11), you'll trigger the quest "Jammer's Stash," and you'll receive the Quest-Related codex entry for "Jammer's Stash." Between the two, you'll learn that Jammer hid some loot in his stash box (#11d), but that to open it, you'll need to take the "cheapest looking piece" from a series of boxes. That is, you'll need to take the
Silver Costume Ring from Kanky's common box (#11a), the
Iron Letter Opener from Jammer's common box (#11b), and the
Garnet Trinket from Pique's common box (#11c). If you take the wrong piece from one of the boxes then you'll receive an injury.
When you reach Jammer's stash box (#11d), if you have the correct three items, then it will open, and inside you'll find a
Longrunner's Cap and over 7 sovereigns in cash.
12 - Jail
If you kill the "yellow" carta jailor, then you'll find a
Jail Key on his corpse, which will allow you to free Leske from his cell (if he's there). However, nothing will come of this.
13 - Jarvia's Chamber
14 - Locked Chest
Inside the chest you'll find a
Love Letter, which you'll need for the quest
Correspondence Interruptus.
Exits:
- Exit to the
Orzammar Commons.
- Entrance to the Carta Hideout.
- Exit to Janar's shop in the
Orzammar Commons.


