 Did we miss anything in this section? Is there something we didn't discover?
Let us know!
Background
Did we miss anything in this section? Is there something we didn't discover?
Let us know!
Background
Your character is the second child of King Endrin Aeducan of Orzammar. As the campaign opens up, you're about to be named to your first military commission, and a feast has been scheduled to celebrate the occasion.
Walkthrough
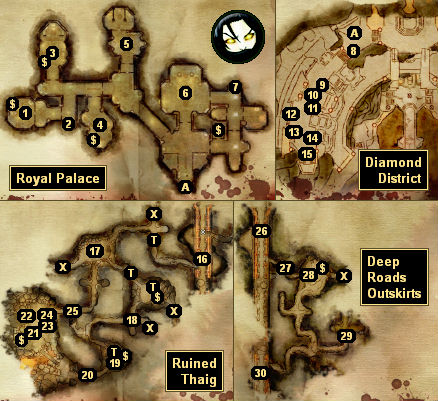
You'll start out in your room in the palace (#1). Your second, Gorim, will soon come in to see if you're ready for the feast. He'll offer you a shield, which you should take -- because it's a free shield if for no other reason. Gorim will then inform you that you have some time before the feast starts, and he'll suggest that you visit some merchants in the Diamond Quarter or watch the fights in the Proving Grounds (#15), which are being held in your honor. Gorim will then begin following you.
When you leave the palace you'll find yourself in the Diamond Quarter. You'll encounter some shopkeepers (#9, 11, 13, 14) as well as your brothers (#10) in the quarter, but nothing much will happen. Eventually in the origins sequence you'll lose your inventory but not your money, and so you might want to take advantage of the shopkeepers to sell your excess items.
When you arrive at the Proving Grounds (#15), you'll have to make a choice. If you decide to watch the Provings, then Ser Blackstone and Frandlin Ivo will start battling each other in the arena, but nothing else will happen. If you decide to participate in the Provings, then you'll have to battle four challengers, including Ser Blackstone and Frandlin Ivo, but if you can defeat them all then you'll gain over 300 xp, and you'll win a
Proving Helm. If you want, you can turn around and give the helm to Ivo, but this won't help you in any way.
If you're playing a warrior, then the arena battles shouldn't be too difficult, but if you're playing a rogue, or, worse, a rogue built for diplomacy and trap-springing, then the battles can be tough. For that case you might need to hit your opponents with your dirty fighting attack, then continue to hit them while they're stunned, and then run around in circles until you can use your dirty fighting attack again. This strategy will make the battles a little bit tedious, but it's guaranteed to work.
Eventually you'll need to return to the palace and enter the throne room (#6). When you get there, you'll find two people to talk to:
- Duncan. Duncan is a Grey Warden. If you talk to him, then you'll receive the Characters codex entry for "Duncan," and the Culture and History codex entries for "The Grey Wardens" and "The Blights."
- Lord Ronus Dace. Lord Dace will ask you for your support in an upcoming vote about surface-dwelling dwarves -- a vote that will impact his wife's cousin. If you agree, then right after the conversation, Lady Helmi will call you a fool and tell you that Lord Dace is only using you to advance his house at the expense of yours. You'll then have three options for how to proceed:
- You can side with Lord Dace anyway. If he promised you 100 sovereigns for your support, then he'll give you a
Note of Credit, which he'll ask you to redeem at his estate the next day. You won't actually be able to do this, but you can immediately return to the Diamond District and sell the note for 25 sovereigns.
- You can confront Lord Dace and challenge him to a duel. You'll end up fighting Lord Dace's son Mandar in the Proving Grounds. The battle against Mandar will be about as difficult as the other Proving Ground battles, and the strategies you used before should work again here.
- You can wait until Lord Dace asks you about his cause and then give him the opposite answer that he was hoping for. Nothing much will come of this option.
Regardless of how you handle Lord Dace, talking to him will also give you the Culture and History codex entry for
The Castes.
Finally, you'll need to complete the feast by talking to your father the king (#6). He'll introduce you to the assemblage as Orzammar's newest commander, and then he'll ask you to fetch your brother Trian. You'll find Trian and Bhelen in Trian's room (#3). After delivering the message, Bhelen will stay behind and try to convince you that Trian is worried about your popularity and that he plans to kill you. This might lead to you agreeing to kill Trian first, or not.
The next day you'll receive your first assignment from the king. He'll ask you to search the Ruined Thaig for the lost shield of the Paragon Aeducan. You'll start out with Gorim at your side (#16), and you'll gain a pair of allies as you go (#17, 18). As you explore you'll have to battle giant spiders and genlocks, including a genlock alpha (#19).
Eventually you'll come to the Aeducan thaig (#20), but you'll find that its door is already open, which is odd since the lock was supposed to require an
Aeducan Signet Ring. A little farther along and you'll find out the reason -- somehow half a dozen mercenaries managed to beat you inside (#21), and when you arrive they'll demand that you tell them where the shield is. It won't really matter how you respond; the encounter will always turn into a fight. After the battle, when you loot the corpses, you'll find an
Aeducan Signet Ring on the mercenary leader, and you'll recognize it as belonging to Trian.
To get the shield, you'll need to enter the thaig chamber (#22). Inside you'll find a sarcophagus, but when you try to open it, nothing will happen. To get the sarcophagus open, you should notice that three of the tiles in the room are different than the others; they'll depress slightly when you stand on them. So the trick is to put Gorim, Ivo, and the scout onto those tiles, and then click on the sarcophagus with your character. When you do, the sarcophagus will open, and you'll find the
Aeducan Shield inside.
When you leave the thaig chamber, you'll be attacked by a blighted wolf and several genlocks. After dispatching them, you'll need to return to the rendezvous point (#17) so that you can deliver the shield to the king. To get to the rendezvous point quickly, you can pick up a
Ballista Bolt (#23), load it into the northern ballista (#24), and then fire it at a pile of rubble (#25), which will allow you to use the passage that the rubble was blocking.
When you reach the rendezvous point (#17), one of two things will happen. If you disregarded Bhelen's warnings after the feast, and refused to listen to his accusations, then you'll find Trian already dead. If you listened to Bhelen and agreed to kill Trian, then you'll find Trian and his men waiting for you. Trian will accuse you of plotting against him, and then he and his men will attack.
That is, either way you'll end up standing over Trian's dead body when King Endrin shows up. With some help from Bhelen, Frandlin Ivo, and the scout, Endrin will decide that you must have ambushed and assassinated Trian, and he'll order you to be locked up.
Later, in a jail cell, you'll learn from Gorim that Bhelen has taken control of the Assembly, and that you've already been tried and convicted of fratricide. Gorim will then inform you that he's going to be exiled to the surface, but that you're going to be sent to the Deep Roads, to fight the darkspawn until you succumb to their numbers. However, there is some good news. Gorim will add that Duncan and the other Grey Wardens are still in the Deep Roads, and that if you can fight your way to them, then you might be able to escape.
Next up you'll find yourself in the Deep Roads (#26). All of your equipment will be gone, but Lord Harrowmont will give you a weapon and a shield, and so you'll be able to defend yourself, at least a little.
As you then make your way through the Deep Roads, you'll encounter giant spiders (#27), genlocks (#28), and deep stalkers (#29), but all of the required battles will be pretty easy, and you shouldn't have much trouble making your way to Duncan (#30). When you reach Duncan, he'll recruit you into the Grey Wardens, and then you'll leave for Ostagar.
1 - Your Room
Inside your room you'll find a crystal that will give you the Culture and History codex entry for
The City of Orzammar, and a bust of King Endrin that will give you the Characters codex entry for
King Endrin Aeducan.
2 - Bookcase
Inside the bookcase you'll find a book that will give you the Culture and History codex entry for
Orzammar History: Chapter One.
3 - Trian's Room
You won't be able to enter Trian's room until after the feast. At that pint you'll find Trian's journal inside, and if you read it then you'll gain the Books and Songs codex entry for
Trian's Journal.
4 - Bhelen's Room
When you approach Bhelen's room, you'll see his "companion" Rica poke her head out and then scurry back inside. If you follow her in, then you won't learn much from her before she leaves, but if you play the Dwarf Commoner origins sequence (where Rica is your sister), then you'll learn how lower caste women try to become impregnated by a noble so that they can improve their station.
Also in Bhelen's room, you'll find a
Dwarven Merchant's Belt in an armoire. You'll also find a letter that will give you the Notes codex entry for
A Letter from Rica, and a pile of books that will give you the Culture and History codex entry for
House Aeducan, Shield of Orzammar.
5 - King's Room
You won't be able to enter the king's room.
6 - Throne Room
7 - Bookcase
Inside the bookcase you'll find a book that will give you the Culture and History codex entry for
Orzammar History: Chapter Two.
8 - Bruntin Vollney and Scholar Gertek
When you approach Bruntin Vollney and Scholar Gertek, you'll find them arguing. If you intervene, then you'll learn that Gertek plans to report some unsavory but true things about House Vollney in his next book. You'll then be able to diffuse the situation or allow Vollney to kill Gertek. Nothing will come of this encounter, so you can play it how you like, but if you side with Gertek, then you'll be able to request a reward from him afterwards, and you'll receive over three sovereigns.
9 - Silk Merchant
The silk merchant will sell you clothing and gems.
10 - Trian and Bhelen
You'll run into your older brother Trian and your younger brother Bhelen here. Trian will order you to return to the feast, but you can ignore him (or insult him) if you want.
11 - Armor Merchant
The armor merchant will offer you a selection of armor. If you can afford it, you might want to upgrade your shield or your helmet.
12 - Teli and Mardy
Teli and Mardy are "noble-hunters." If you're male, then you'll be able to invite one or both of them back to your bedroom after the feast. If you're female, then they won't be as interested in you, but you'll be able to offer to tell your brothers about them, or have Gorim run them off.
13 - Weapon Merchant
The weapon merchant will offer you a
Noble's Dagger, which is such a "princely gift" that it might offend your brother Trian. Nobody will ever comment on the dagger, so you might as well accept it. If you're feeling evil, then you can insist that the merchant kill the messenger who was supposed to have delivered the dagger to the palace, or kill the merchant and loot the dagger from his corpse.
14 - Magic Merchant
The magic merchant will faint dead away when you talk to him.
15 - Proving Grounds
16 - Starting Point in the Ruined Thaig
17 - Crossroads / Rendezvous Point
Frandlin Ivo will join your party here.
18 - Crossroads
A scout will join your party here.
19 - Genlock Alpha
At this spot you'll face a genlock alpha plus several other genlocks.
20 - Aeducan Thaig Door
21 - Mercenaries
22 - Thaig Chamber
23 - Barrel of Ballista Bolts
24 - Northern Ballista
25 - Rubble
26 - Deep Roads Starting Point
27 - Giant Spider / Corpse
A giant spider will attack you here, but near it you'll find a corpse containing some weapons and armor.
28 - Genlock / Corpse
A single genlock will attack you here, but near it you'll find a dwarf corpse containing a weapon and gloves.
29 - Deep Stalkers / Corpses
At this spot you'll encounter a handful of deep stalkers, including a deep stalker leader. If you can defeat them, then on the two corpses next to them, you'll find a full set of dwarven armor.
$ - Treasure Container
T - Trap
X - Blocked Passage
Exits:
- Entrance to the Royal Palace.


