 Did we miss anything in this section? Is there something we didn't discover?
Let us know!
Walkthrough
Did we miss anything in this section? Is there something we didn't discover?
Let us know!
Walkthrough
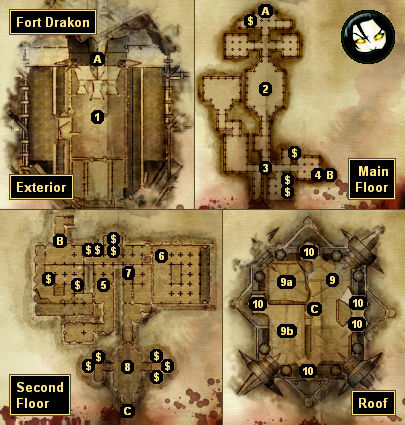
When you arrive at Fort Drakon, you'll come under fire right away. In the first battle (#1), you'll be attacked by groups of hurlock grunt archers, plus a "yellow" dragon thrall, a "yellow" genlock alphas, and a pair of "yellow" hurlock emissaries. Worse, when you approach the emissaries, a wave of "white" shrieks will descend upon you, and unlike other "white" darkspawn enemies, they'll have their regular number of hit points.
There are two ways to approach this battle. You can equip your party with ranged weapons, and then slowly and carefully move forward and kill everything, or you can call on your allies (melee allies are better here because of all the things that can block ranged attacks), and then try to rush the emissaries. Either way, you'll need to watch your party carefully, and you'll probably have to make use of a few health poultices to survive.
As you make your way through the fort, you'll have to fight many more battles (#2-3, #5-8), but none of them will be as tough as the first one -- until you reach the roof and face off against the archdemon (#9). There are a few useful things to know about this battle:
- The archdemon will do lots of damage to anything right next to it, and so melee characters and melee allies will be at a disadvantage. That means it's a good idea to have at least two ranged characters for the battle, and to choose elves or mages for your ally. If you need enchanted ammunition for your ranged characters, then you should return to Sandal (#4) to buy some.
- The archdemon is not considered a dragon or a darkspawn, so any weapons or runes with bonuses for those types of creatures (like the sword
Yusaris or
Silverite Runes) won't benefit you in the battle. If you need to, then run back to Sandal (#4) to re-enchant.
- The archdemon's breath attack will do spirit damage, so any resistances to that (like with the helmet
Corruption) will help you out.
- You'll get some help, even beyond your allies. Arl Eamon will always show up, and you might get help from other important campaign NPCs, like First Enchanter Irving or Knight-Commander Greagoir.
- You'll find some ballistae on the roof (#10), and when you click on them they'll auto-target the archdemon (and give you an easy way to convert a melee character into a ranged character). Each time you hit the archdemon with a ballista bolt, you'll do around 100 points of damage, and the archdemon will roar in pain, interrupting its current attack.
Note: Unseen by us, but apparently the ballistae can sometimes jam, requiring a rogue to fix them, and sometimes the archdemon can jump on them, breaking them for good.
The battle itself will proceed in three stages. In the first stage (#9), it'll be you and your allies against the archdemon, and you'll just need to survive its wind buffets and breath attacks while whittling away its health. In the second stage (#9a), the archdemon will fly to a part of the roof where you won't be able to reach it with melee attacks, and you'll have to deal with a bunch of darkspawn troops, including grunts, alphas, and shrieks. Then after a while you'll begin the third stage (#9b), where you'll once again have access to the archdemon, but you'll have to deal with it and other darkspawn at the same time.
Depending on a variety of things (your difficulty level, how well equipped you are, how well your allies fight for you, how much the ballistae help you), the battle with the archdemon can be difficult or not. The most important thing to do in the battle is to keep your characters alive, so pay attention to what they're doing, and make sure your mage has mana for healing. If you have a lot of health poultices, then you might also want to add a tactics line for all of your characters so they use a poultice automatically when they're injured.
Once you've done enough damage to the archdemon, you'll have to decide who is to kill it. If you completed the ritual with Morrigan, then you'll automatically kill it. If you're in a romance with Alistair, and if he's in your party, then he'll automatically kill it. Otherwise, you'll have to choose one of the Grey Wardens in your party.
If you survive the encounter, then you'll jump to Anora's or Alistair's coronation, and you'll get one last chance to talk to your companions and learn about their plans. Then when you exit the building, the epilogue and ending credits will start up. Congratulations for completing the campaign!
1 - Major Battle
In this room you'll face a "yellow" dragon thrall, a "yellow" genlock alpha, two "yellow" hurlock emissaries, and more. If you charge in with melee attacks then you'll have to fight everything at once, but if you use only ranged attacks, then you'll be able to take down the enemies one at a time.
2 - Conjurer Battle
When you enter this room, a "red" genlock conjurer will summon several lesser shades and a "yellow" greater shade to attack you, and then it will attack you itself.
3 - Battle
When you enter the hallway here, you'll encounter a "yellow" genlock shapechanger, a "yellow" hurlock emissary, and numerous enraged and devouring corpses.
4 - Sandal
You'll meet Sandal here, and he'll be available for enchanting as well as for buying and selling goods.
5 - Battle
In this room you'll encounter a "yellow" genlock alpha and two "yellow" hurlock alphas.
6 - Battle
When you enter this room you'll be attacked by a "yellow" genlock alpha plus a bunch of genlock archers. For best results, you should have your best ranged attacker stand just outside the room and kill about half of the archers before charging in.
7 - Assassin Battle
In this hallway you'll face a "red" genlock master assassin and several genlock assassin acolytes. You'll also have to deal with a few leghold traps.
8 - Battle
In this chamber you'll have to battle a "yellow" hurlock emissary and two "yellow" ogres. The ogres can be nasty and will probably keep knocking you down, but you should focus on the emissary first and then mop up the ogres afterwards.
In the chests and containers on the sides of the room, you'll find a bunch of health poultices, lyrium potions, and injury kits.
9 - Archdemon Battle
10 - Ballistae
Exits:
- Main entrance to Fort Drakon.
- Stairs between the main floor and the second floor.
- Stairs between the second floor and the roof.


