 Did we miss anything in this section? Is there something we didn't discover?
Let us know!
Walkthrough
Did we miss anything in this section? Is there something we didn't discover?
Let us know!
Walkthrough
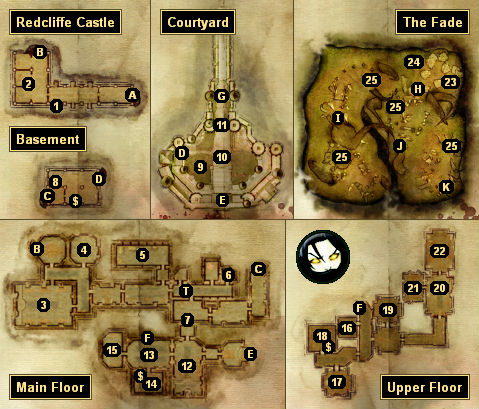
You'll have two goals in the castle: to remedy the problem with the undead, and to meet with Arl Eamon. Early on, you'll meet a mage named Jowan locked inside a cell (#1). Jowan will admit to poisoning Eamon, but he'll deny raising corpses to attack
Redcliffe. If you question him further, then you'll learn that Jowan was hired by Arlessa Isolde to tutor her son Connor, who had started showing signs of being a mage. Jowan will then speculate that Connor might have learned enough magic to inadvertently tear open the Veil and create a path for demons and the undead to pass through.
You'll then have to decide what to do with Jowan:
- If you keep Jowan locked up, then you'll eventually release him when you reach the great hall (#12), and he'll give you an extra way to deal with Connor. Morrigan will disapprove of this option.
- If you kill Jowan, then he'll disappear from the game. Alistair, Leliana and Morrigan will disapprove of this option. Sten will approve.
- If you allow Jowan to escape, then one of two things will happen:
- If you tell Jowan to disappear, then he'll leave the castle, and eventually you'll trigger a quest about him on the chanter's boards.
- If you leave it up to Jowan, then he'll stay in the castle to help out, and he'll show up after the battle in the great hall (#12). This option will then go about the same as keeping him locked up.
Either way, Alistair, Leliana and Sten will disapprove of this option. Morrigan will approve.
Past Jowan, you'll have to fight numerous undead creatures, and you'll eventually make your way to the great hall (#12), where you'll witness Bann Teagan dancing around like a jester. You'll then start a conversation with Arlessa Isolde and her son Connor, during which you'll learn that Connor made a deal with a demon to save his father's life, and became an abomination as a result. Connor will then decide to create some "excitement," and he'll force Teagan and the guards in the room to attack you. Teagan will survive the battle, but Connor will run away upstairs (#20).
After the battle, you'll start up a conversation with Teagan and Isolde, and you'll have to decide what to do about Connor. You'll have at most three options:
- If Jowan is still alive and in the castle, or if you have a spellcaster with you, then you'll work out that you might be able to venture into the Fade and there defeat the demon who is controlling Connor. However, to send someone into the Fade, you'll need lyrium and mages, which can only be found at the
Circle Tower. If you've already helped the mages there, then when you return to the tower, First Enchanter Irving and some other mages will agree to help you out, and they'll show up at the castle with the necessary components to send someone into the Fade. If you haven't yet helped the mages, then you'll have to do that first before they'll help you in return.
When you send someone into the Fade, it'll have to be a spellcaster. With a bit of persuasion, Irving will agree to go. If Jowan is still around, then he can go, too. You can also send your character if it's a mage, or any of your mage companions. Of the possibilities, your character will probably have the easiest time, and Jowan will have the toughest time, but it won't make much of a difference who you send. Your character will be able to make a deal with the demon to learn the blood magic specialization, all of the other characters will have to fight the demon, and nothing else will really change.
Note: When you enter the Fade, any remaining battles in the castle will disappear. So you should explore the castle thoroughly before continuing.
Inside the Fade, you'll have to move through four fade portals (Exits H-K) and fight the demon four times (#25). The first time you fight the demon, it will be alone. The next two times, it will have lesser rage demons with it. The last time, it will be alone again, but it will be in its true form, and so it'll be tougher to defeat. How to fight the demon depends entirely on the character you're using and what level he or she is. Wynne, for example, can get by using stonefist and arcane bolt, and healing herself when she takes damage.
Two times during the final battle, the demon will create mirror images of itself. Each time you damage a mirror image, it will disappear, but the remaining images (and the real demon) will regain some health. Then when you finally hit the real demon, any remaining mirror images will disappear. The easiest way to deal with this is to look closely at the demon images. The real demon likes to cast a fire spell that will leave it shrouded in flames, but as of version 1.02, only the real demon will have the shroud, making it easy to spot. When the real demon dies, you'll get kicked out of the Fade, and you'll return to the castle where you'll learn that Connor is no longer an abomination.
Note: If you run out of mana during the fight, be sure to click on the nearby lyrium vein.
Another Note: Each time the demon goes into mirror image mode, it will wait patiently for you to attack it. You can use this time to heal yourself or to let any debilitating effects wear off.
- If Jowan is still alive and in the castle, then you can allow him to use blood magic to send someone into the Fade. This option won't depend on the Circle mages, but it will require that you sacrifice Isolde to get enough blood. Otherwise, this option will go about the same as the previous option, except that you won't have First Enchanter Iriving or Jowan as candidates to enter the Fade.
- You can also skip the Fade entirely and just head upstairs to confront Connor (#20). After a bit of dialogue, the demon will appear and attack you. Despite the demon being rated as "red," the battle with it shouldn't be too tough, especially compared to the suits of armor downstairs (#13). Twice during the battle the demon will summon help (first five corpses and then three lesser rage demons), and you'll need to defeat these creatures before you can attack the demon again.
After the battle, Connor will be alive but unconscious. Isolde will then run into the room and beg you to spare Connor's life.
Possibly, at this point you'll be allowed to switch to one of the two other options, and confront the demon in the Fade, but otherwise
you'll either need to knock Isolde out so you can kill Connor, or leave the room so Isolde can kill Connor herself. Either way, with Connor dead the threat against the castle will be ended.
After dealing with the demon (one way or the other), you'll start up a conversation with Bann Teagan. If Jowan is still around, then Teagan will ask you your opinion about what to do with him. Regardless of what you say, Jowan will either be executed or sent to the Circle mages, and you'll never see him again. The only way for Jowan to escape the castle is if you tell him to disappear when you meet him in his cell (#1).
Then Teagan will move on to the status of Arl Eamon, and you'll decide that the only way to save him is to pursue the Urn of Sacred Ashes. This will trigger the quest "The Urn of Sacred Ashes," and you'll be directed to go to the
Denerim Market District to meet with a Chantry scholar named Brother Genitivi.
1 - Jowan
2 - Note
If you read the note then you'll gain the Quest-Related codex entry for
A Rolled-Up Note.
3 - Chapel
Inside the chapel you'll be attacked by a greater shade and three lesser shades. They won't drop anything when they die, but after the battle you'll find a book on the pulpit, and reading it will give you the Books and Songs codex entry for
The History of the Chantry: Chapter 2.
4 - Armory
You'll find a collection of weapons and armor inside the armory, including a
Redcliffe Shield.
5 - Kennel
When you enter the kennel you'll be attacked by a handful of mabari war hounds, including a "yellow" one. The yellow mabari will drop a
Black Leather Collar when it dies, and inside a chest in the room you'll also find
Kaddis of Hakkon Wintersbreath,
Warpaint of the Tempest, and a
Lamb Bone.
6 - Valena
You'll meet Valena, the smith's daughter, here. No matter what you say to her, she'll flee the castle and return to
Redcliffe.
7 - Locked Door
You won't be able to unlock this door, but it will open on its own after you've made it to the great hall (#12).
8 - Chest
Inside this chest you'll find
Steel Bracers and a
Love Letter. You'll need to collect
Love Letters for the quest
Correspondence Interruptus.
9 - Landmark Tree
10 - Courtyard
You'll face several corpses and a "yellow" revenant here. If you have trouble with the battle, then you can immediately head to the gate (#11) and open it up, which will allow Ser Perth and some knights to help you.
11 - Main Gate
When you open the gate, Ser Perth and some knights will storm into the courtyard (#10) and help you out against any undead creatures that might be about. If you enter the castle with the knights, then they'll help you out in the battle in the great hall (#12) as well.
12 - Great Hall
13 - Suits of Armor
When you enter this room, the six suits of armor lining the walls will come to life and attack you. This can be a very tough battle, so be sure to prepare before going in.
14 - Chamberlain's Room
When you enter the room, you'll be attacked by the (undead) chamberlain and four corpses. The chamberlain will drop the
Redcliffe Vault Key when he dies, which you can use to enter the vault upstairs (#19). Also in the room you'll find a
Small Silver Ring in a cabinet, and a book that will give you the Culture and History codex entry for
Geography of Ferelden.
15 - Desk
Inside the desk you'll find
Alistair's Mother's Amulet, which, obviously, is a good gift for Alistair. On top of the desk you'll also find a book that will give you the Culture and History codex entry for
The Olesian Empire.
16 - Bedroom
Inside this bedroom you'll find a bookshelf containing the book
The Guerrins of Ferelden: A Genealogical Study. This is a good gift for Wynne.
17 - Bedroom
Inside this bedroom you'll find a chest containing a
Stone Dragon Statuette. The statuette is a good gift for Alistair.
18 - Bedroom
Inside this bedroom you'll find a book that will give you the Books and Songs codex entry for
Journal of the Tranquil.
19 - Vault
The vault will start out locked. You can get the key to it from the chamberlain (#14), or you can attempt to pick the (tough) lock. Inside the vault you'll find a bunch of good loot, including
Eamon's Shield,
Chevalier's Mace,
The Fox's Bow, and a
Silver-Framed Still Life (a good gift for Sten).
20 - Connor
21 - Connor's Room
Inside this room you'll find a book that will give you the Books and Songs codex entry for
Aveline, Knight of Orlais.
22 - Arl Eamon's Room
This is where you'll find Arl Eamon, although he'll be unconscious when you first meet him. If you read the books in the room, then you can also gain the codex entries for
History of Ferelden: Chapter 1 and
The First Blight: Chapter 2.
23 - Starting Point (Fade)
24 - Arl Eamon (Fade)
Regardless of which character you send into the Fade, Eamon won't have much to say to you.
25 - Demon Encounters (Fade)
$ - Treasure Container
T - Trap
Exits:
- Exit to the windmill in Redcliffe.
- Stairs between the basement and the main floor.
- Stairs between the basement and the main floor.
- Stairs between the basement and the courtyard.
- Doorway between the courtyard and the main floor.
- Stairs between the main floor and the upper floor.
- Exit to
Redcliffe.
- Fade portal.
- Fade portal.
- Fade portal.
- Fade portal.


