 Did we miss anything in this section? Is there something we didn't discover?
Let us know!
Walkthrough
Did we miss anything in this section? Is there something we didn't discover?
Let us know!
Walkthrough
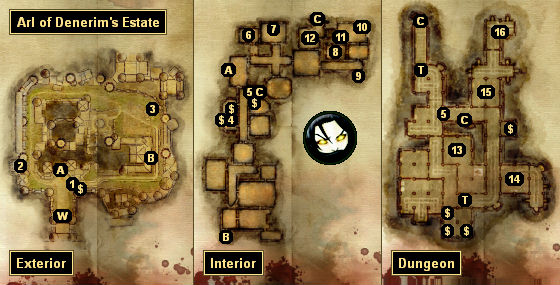
When you arrive at the estate, you'll find several workers shouting at the guards at the main entrance (Exit A). Their actions will distract the guards and allow you to explore freely. You'll meet up with Erlina near the entrance, but she won't disclose her plan to get inside until you've circled around to the back of the estate. At that point, she'll offer to distract the guards at the side entrance (Exit B), and give you disguises so you can get inside without anyone noticing.
Note: If you have Shale with you for this, then you'll be forced to swap him out (since he's disguise-proof).
You'll have two ways to proceed:
- If you want to follow Erlina's plan, then you'll need to move to a hidden spot in the back courtyard (#3), and wait for her to lure the guards away. You'll then be able to move freely around the estate, inside and outside, and even loot the chests and talk to the guards you encounter. Only one guard (at #8) will see through your disguise.
- If you don't want to deal with disguises, then you'll have to fight your way through the estate.
You won't receive an xp bonus for avoiding confrontations, and you'll get discovered in the dungeon either way, so it's pretty much just a matter of whether you'd like to move through the estate quickly (by wearing disguises) or pick up some extra xp and loot (by fighting everybody).
Regardless, when you eventually reach Queen Anora's room (#6), you'll discover that its door has been magically sealed, and you won't be able to get inside. Queen Anora will then suggest that you find the mage who created the seal, and convince him to undo it.
As you approach the dungeon (Exit C), you'll accidentally free a prisoner named Riordan (#12), and you'll learn that he's a Warden from Orlais. If you picked up the
Grey Warden Documents from the previous room (#11), then when you talk to Riordan you'll be able to give them to him, and he'll mention a special vault in the
Denerim Market District, but he won't tell you how to get inside until you talk to him in
Arl Eamon's Estate. Inside the vault you'll find several nice things -- a
Griffon's Helm, an
Axe of the Grey, a
High Constable's Mace, a
Map of the Anderfels -- and the gift version of
Duncan's Shield. If you give the gift shield to Alistair, then he'll turn it into the real version of
Duncan's Shield, and he'll automatically equip it.
Note: Depending on the version of the game you're playing, Riordan might only tell you about the vault if you give him the
Grey Warden Documents while you're in the Arl of Denerim's Estate. So be sure to ask him about the documents the first chance you get.
When you reach the dungeon level of the estate, the guards will automatically detect who you are, and so you'll have to fight your way through them to reach Arl Howe (#15). When you get to Howe, he'll trade barbs with you for a bit, and then he has his men will attack you.
Despite Howe being a "red" boss, the battle with him shouldn't be too bad. Just take out the mages right away, then finish off the other soldiers, and then concentrate on Howe. When Howe dies he'll drop a
Biteback Axe,
Arl Howe's Key (which will unlock the doors in the estate), and more. "Maker spit on you... I deserved... more."
With Howe and his mages dead, when you return to Anora, you'll be able to free her from her room (#6). However, when you attempt to exit the estate (at Exit A), you'll run into Ser Cauthrien and a dozen of Loghain's guards. You'll then have three ways to proceed:
- You can surrender. For this case you (and Alistair if he's with you) will get arrested and sent to
Fort Drakon, where you'll have to escape. See the
Fort Drakon location entry for more information.
- You can attack Cauthrien and the guards. This is one of the tougher non-dragon battles in the game, so you might want to try it out even if you plan to surrender. To start out, you should put your best tank on Cauthrien, and then put all of your other characters on the guards (starting with the mage). As long as you can keep your tank alive, you should be able to whittle down the guards and then just concentrate on Cauthrien herself. When Cauthrien dies, she'll drop
The Summer Sword, and picking it up will give you the Items codex entry for
The Summer Sword.
Note: If you have trouble fighting the battle as intended, you can immediately flee back to Anora's room (#6). This will allow you to lure the melee guards (including Cauthrien) back to you, making it much easier when you finally engage the crossbowmen and mage.
- You can try to convince Cauthrein that you were rescuing Anora, but Anora will deny it -- "This bringand tried to kidnap me!" -- and Cauthrien and her men will attack you.
Regardless, you'll eventually need to return to Arl Eamon at his estate, so you can decide what to do next. This part of the campaign is covered in the location entry for the
Elven Alienage.
1 - Carts
These carts will block the path here, so you'll only be able to reach the side entrance of the estate (Exit B) by circling around to the west.
2 - Gate
Soldiers will spawn here from time to time, and they'll attack you if they see you.
3 - Hiding Place
4 - Book
Clicking on the book will give you the Books and Songs codex entry for
The First Blight: Chapter 4.
5 - Locked Doors
You'll need
Arl Howe's Key (#15) to unlock these doors.
6 - Queen's Prison
7 - Book
Clicking on the book will give you the Culture and History codex entry for
Gwaren.
8 - Vaughan's Bedroom
When you enter this room, you'll interrupt a guard and a maid, and the guard will recognize that you don't belong in the estate. He'll then attack you. Since you won't encounter any other guards between this one and the dungeon (where you'll get recognized no matter what), it won't make any difference if he spots you.
9 - Treasure Room
If you can pick open the door to the treasure room, then inside you'll find a
Medium Gold Bar,
Howe's Shield, about 19 sovereigns, and more.
10 - Book
Clicking on the book will give you the Culture and History codex entry for
Antiva.
11 - Chest of Documents
Inside the chest you'll find
Grey Warden Documents.
12 - Prison / Riordan
13 - Torture Chamber
When you enter the torture chamber, you'll be attacked by several torturers, including a "yellow" one. After the battle, when you explore the chamber, you'll discover a man on a torture rack, who you'll learn is Oswyn, son of Bann Sighard of the Dragon's Peak Bannorn. When you release Oswyn, he'll thank you for your help, and he'll promise you a reward from his father. Then he'll flee the estate.
Your encounter with Oswyn will trigger the quest "Tortured Noble," which you'll be able to complete by talking to Bann Sighard in the Gnawed Noble Tavern in the
Denerim Market District. Sighard will offer you a reward for your service, and if you accept, then you'll receive 40-50 sovereigns and 250 xp. If you decline the reward, then you won't receive anything.
14 - Low Prison
When you enter the prison, you'll be attacked by a "yellow" jailor and several guards. The jailor will drop a key when he dies, which will allow you to free two prisoners:
- Rexel. He's involved in the quest
Missing in Action.
- Soris. He isn't really involved in anything. If you free him, then he'll flee to the Alienage, and you'll be able to talk to him more there. Note: If you're playing a City Elf, then you should recognize Soris from your origins sequence.
15 - Arl Howe
16 - High Prison
From this prison you'll be able to rescue two prisoners:
- Vaughan (unless you killed him during the City Elf origins sequence). Vaughan will try to convince you to let him out of the prison. If you're receptive, then he'll either offer to support you in the Landsmeet, or he'll give you the key to the lockbox in his bedroom (#8), where you'll find 40 sovereigns. You can also kill Vaughan or simply leave him in his cell.
- Irminric. Irminric is a templar going through lyrium withdrawal. He'll give you the quest "Lost Templar," and he'll ask you to do two things: deliver
Irminric's Signet Ring to Alfstanna in the Gnawed Noble Tavern in the
Denerim Market District, and ask her to pray for him. When you do this, you'll receive the amulet
Spirit Ward, 2 sovereigns, and 250 xp.
Exits:
- Main entrance.
- Side entrance.
- Stairs between the interior and the dungeon.
- World exit.


