|
|
 Did we miss anything in this section? Is there something we didn't discover?
Let us know!
Walkthrough
Did we miss anything in this section? Is there something we didn't discover?
Let us know!
Walkthrough
When you enter the tower (at Exit A), you'll automatically meet up with Knight-Commander Greagoir. He'll tell you that the Chantry has lost control of the tower, and that "abominations and demons stalk the tower's halls." Greagoir will assume that the Circle has been lost, but he'll allow you to go deeper into the tower to search for First Enchanter Irving (#37), because if Irving is still alive then perhaps some part of the Circle can be saved. However, Greagoir will warn you that when you venture past the foyer of the tower (that is, past the door at #2), you won't be allowed to return until the situation has been resolved. This might take you several hours, so be prepared before going in.
Inside the main part of the tower, you'll encounter demons, abominations, blood mages -- and even some survivors (#5), including a potential companion named Wynne, who you might remember from Ostagar. If you decide that the Circle has been corrupted and that all of its mages should die, then you'll have to kill the survivors. If you decide that the survivors might be useful to you, then you'll be forced to take Wynne into your party for the remainder of your trip through the tower. Wynne is a spirit healer, and she's good at keeping characters alive, so it's better to keep her around.
As you ascend the tower, you'll learn that it was a mage named Uldred (#37) who riled up the mages and caused all of the problems in the tower. But before you can get to him, you'll encounter a sloth demon (#29) who will send you to a dream world called the
Fade.
The
Fade will act like a long intermission to your trip through the tower. You won't find any equipment while you're there, but you can gain up to 21 attribute points for your main character, and so the trip is more than worthwhile. The
Fade regions are covered on their own pages. Use the links in the navigation bar to the right to learn more about them.
When you complete the
Fade, you'll return to the room where you first met the sloth demon (#29). The sloth demon and Niall will be dead in the room, and when you loot Niall's body you'll pick up the
Litany of Adralla, a special item that you'll be able to use to protect yourself against Uldred's blood magic (#37). Looting Niall will also give you the Items codex entry for the
Litany of Adralla.
You'll finally encounter Uldred in the Harrowing Chamber (#37). After sparring with you for a bit, Uldred will decide that you'd make an excellent abomination, and the fight will be on. Uldred will then change into a big, winged demon.
Uldred will start with three abominations on his side. You should take them out as quickly as possible. Also, four times during the battle, Uldred will try to convert one of the surviving Circle mages in the room (including First Enchanter Irving) into another abomination for his side. If you use the
Litany of Adralla at this time, then you'll prevent the conversion. If Wynne is still with you, then she'll call out when you should use the litany. Otherwise, you'll have to keep an eye on the mages, and use the litany when you see glowing white rings emanating from one of them.
Note: If all of the Circle mages are converted (and thus die), then you won't be able to save the Circle.
Another note: The litany should automatically have been put into your hotkey bar for easy use. If for some reason it's not there, then you'll need to find it in your inventory, right click on it, and select "use." The litany doesn't need to be targeted.
When it's just your party against Uldred, there are a few ways you can proceed. If Wynne is with you, then you can just fight Uldred with Wynne healing (and quaffing lyrium potions) as needed. If you don't have a healer, then you can quaff a bunch of health poultices as you take damage, and eventually wear Uldred down. If you have lots of trouble with the fight, then you can also use one character as bait, and have it run around while your other characters pelt Uldred with ranged attacks and spells. Uldred will drop
Cinderfel Gauntlets when he dies.
Note: If you had to kill Wynne just before entering the Harrowing Chamber (#37), or if you tried killing Uldred and found that your party just wasn't right for the job, then you can return to the survivors on the first floor (#5), and adjust your party there.
After the battle with Uldred, you'll end up in conversation with Knight-Commander Greagoir (at Exit A). If First Enchanter Irving is still alive, then you'll be able to influence Greagoir into dismantling the Circle and investigating the surviving mages, or allowing the mages to go free. For the former, or if you killed all of the mages, then the templars will join you against the Blight. For the latter, the mages will join you.
Side Quest: Summoning Sciences
After triggering the quest "Summoning Sciences" (#7a) and clicking on the summoning font (#7b), two things will happen: lots of miscellaneous objects will suddenly become interactive in the library alcoves (#7a-c), and four summoning flames will appear (#8a-d). If you're playing on the PC, then press to easily see all of these things.
To learn how to use the first three flames, you'll need to read the Quest-Related codex entry for "Summoning Sciences" (gained at #7a). The codex entry will list a series of objects that you'll need to click on to summon a creature at the summoning flames. The fourth flame is not listed in the codex entry, but its sequence is just the combination of all the other sequences (see below).
- Exercise 1: Summoning font (#7b), Tome of Spirit Personages (#7a), first summoning flame (#8a). Completing this sequence will cause a spirit hog to appear -- and then immediately die. You'll find a
Garnet on the hog's corpse.
- Exercise 2: Summoning font (#7b), Rodercoms Uncommon Calling (#7c), Magus Gorvish (#7a), second summoning flame (#8b). Completing this sequence will cause Trickster Whim to appear briefly. You won't be able to do anything with him, but later his appearance will trigger a quest from the Chantry.
- Exercise 3: Summoning font (#7b), Elvorn's Grande Bestiary (#7c), common table carving spot (#7a), Spiritorum Etherialis (#7c), Magus Gorvish (#7a), novice phylactery (#7a), third summoning flame (#8c). Completing this sequence will cause a fade rifter to appear and attack you. The demon will drop
Charged Mitts when it dies.
- Exercise 4: Summoning font (#7b), Tome of Spirit Personages (#7a), Rodercoms Uncommon Calling (#7c), Magus Gorvish (#7a), Elvorn's Grande Bestiary (#7c), common table carving spot (#7a), Spiritorum Etherialis (#7c), Magus Gorvish again (#7a), novice phylactery (#7a), fourth summoning flame (#8d). Completing this sequence will cause a mage named Arl Foreshadow to appear briefly. If you pickpocket him while he's around, then you'll receive the Notes codex entry for
Notes of Arl Foreshadow. You might also receive a random item or money.
You'll receive 50 xp for each exercise that you complete. The fourth exercise must be completed last, but the other three can be completed in any order. Only the third exercise is required for the quest "Summoning Sciences."
Side Quest: Watchguard of the Reaching
At six places in the tower (#3, #7b, #17 and #22), you'll find a note about a mysterious entity in the tower's basement. The first note you pick up will trigger the quest, and all of the notes will update the Quest-Related codex entry for
Watchguard of the Reaching. After picking up all six notes, the quest and the codex entry will update, and you'll be able to perform the ritual that will summon the watchguard.
To summon the watchguard, you'll have to click on four statues in the Great Hall in the right order: the "cup" statue, the "sword up" statue, and then the "sword down" statue in the common room (#22), and finally the "shield" statue in the central chamber (#25). When you click on the statues in the correct order, the quest will update, and the watchguard will be released.
To battle the watchguard, you'll need to travel back down to the Apprentice Quarters and try to open the door to the basement (#6). This will cause the watchguard, a demon called the shah wyrd, to appear and attack you. If you sided with the mages when you met Wynne (#5), then this battle will be pretty easy because all of the mages in the room will help you in the fight. Otherwise, you'll just have to withstand the demon's fire attacks and wear it down.
When the shah wyrd dies, it will drop a random item, plus the two-handed sword
Yusaris and some gems in a pile of rags. Picking up the sword will give you the Items codex entry for
Yusaris: The Dragonslayer. You'll also receive about 150 xp for killing the demon, and another 100 xp for completing the quest.
Note: You'll face a few dragons in the game, so be sure to keep
Yusaris around.
Side Quest: Five Pages, Four Mages
During your explorations in the Great Hall, you'll find five torn pages (#24). Each page will update the Quest-Related codex entry for
Five Pages, Four Mages, and they'll also trigger the quest "Five Pages, Four Mages."
If you read the codex entries, then you'll learn that four mages in the tower were duped into buying a forged version of the Deus vi Eternus from somebody named Beyha Joam. For the quest, you'll just need to track down Joam, who you'll speculate made a tidy profit from the transactions.
You'll run into Joam in a random encounter on the world map. He'll have a few thugs and a mage with him, and when he learns that you know of his shenanigans in the tower, he and his men will attack. You should immediately make a beeline for the mage and take him out quickly (otherwise he'll plaster you with fireballs), and then mop up the rest. Joam will drop a
Cameo Cowl, a sovereign, and more when he dies.
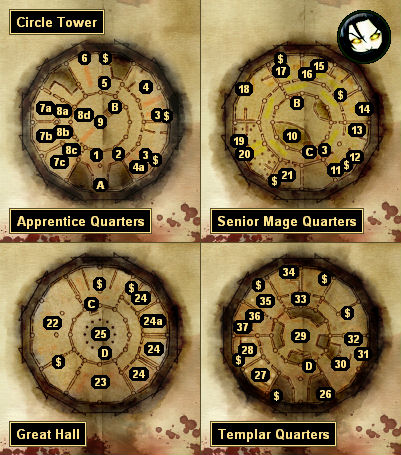
1 - Quartermaster
The quartermaster will sell you some nice (but expensive) items, including a
Tome of Arcane Technique, a
Staff of the Magister Lord, the belt
Andruil's Blessing, and a
Backpack.
2 - Barred Door
When you go through this door, you'll be locked inside the tower, and you won't be able to return until you've defeated the boss at the end (#37).
3 - Apprentice Notes
At each of these places (plus at #7b, #17 and #22), you'll find a note about a mysterious entity in the tower's basement. Each note will update your Quest-Related codex entry for
Watchguard of the Reaching, and the notes will also trigger and update the quest "Watchguard of the Reaching." See the text above for more information about the quest.
4 - Footlocker
Inside the footlocker (#4) you'll find a note that will give you the Quest-Related codex entry for
The Spot. You'll find "the spot" (a cache of goods under Denri's bed) in the previous room (#4a).
5 - Survivors
You'll meet some surviving mages here, including Wynne, a potential companion. If you decide that the Circle has been corrupted and that all mages must die, then you'll have to kill the survivors. If you decide that the survivors might be able to help you, then you'll be forced to take Wynne into your party for the remainder of your trip through the tower. Wynne is a spirit healer and is good at keeping characters alive, so it's better to keep her around.
Note: While you're in the room with the survivors, you'll be able to add and remove companions from your party.
6 - Basement Door
You won't be allowed to go through this door, but later it will play a part in the quest "Watchguard of the Reaching" (see above).
7 - Library Alcoves
In the first library alcove (#7a) you'll find a torn book. Clicking on the book will trigger the quest "Summoning Sciences" (see above) and give you the second half of the Quest-Related codex entry for
Summoning Sciences. You'll find the other half of the codex entry in the central chamber (#9).
In the second library alcove (#7b) you'll find an apprentice note that will update your Quest-Related codex entry for
Watchguard of the Reaching (see above). If you've triggered the quest "Summoning Sciences," then this is also where you'll find the summoning font.
In the third library alcove (#7c) you'll be attacked by a lesser rage demon and four abominations. After the battle, you'll find a scrap of paper inside a pile of rags, and picking it up will give you a part of the Notes codex entry for
Promises of Pride.
8 - Summoning Flames
These four summoning flames are involved in the quest "Summoning Sciences" (see above).
9 - Central Chamber
When you enter the chamber, you'll be attacked by a greater rage demon plus four abominations. They won't drop anything when they die. You'll also find a torn book, which will give you the first half of the Quest-Related codex entry for
Summoning Sciences. The other half can be found in the library (#7a). Finally, if you're working on the quest
Places of Power, then you'll recognize the center of the chamber as a "mystical site of power," and clicking on it will update the quest.
10 - Owain
During your conversation with Owain, you'll learn about the
Litany of Adralla, a spell that can protect you against blood magic, and about a mage named Niall, who checked the litany out of the stockroom. You'll meet Niall in the
Fade.
Near Owain on a charred corpse you'll find a
Water-Stained Portrait.
11 - Ancient Texts
In the ancient texts you'll find a
Scroll of Banastor, which will update the Quest-Related codex entry for
The Scrolls of Banastor. You'll need to find five of these scrolls for the quest
The Scrolls of Banastor.
12 - Bel's Cache
This is the cache referenced in the Quest-Related codex entry for
Maleficarum Regrets (gained in
Lothering). Inside the cache you'll find some potions.
13 - Blood Mages
You'll encounter a trio of blood mages here. You'll need to defeat them to proceed deeper into the tower. After the battle, one of the mages will beg you for her life, but it won't make any difference what you decide to do with her. Your companions won't even comment. In a pile of books near the mages, you'll find
The Rose of Orlais, a good gift for Wynne.
14 - Locked Chest
Inside the chest you'll find a
Love Letter. Picking it up will update your Notes codex entry for
Correspondence Interruptus. You'll need a dozen
Love Letters for the quest
Correspondence Interruptus.
15 - Vanity
Inside the vanity you'll find a
Silver Chain, a good gift for Morrigan.
16 - Closet
You'll meet a mage named Godwin hiding in the closet. While demons and abominations are roaming around in the tower, Godwin won't have much to say to you; he'll only want to get back into the closet. Later, after clearing out the tower, if you side with the mages, then Godwin will appear here just outside the closet, and he'll play a role in the quest
Precious Metals.
17 - Battle
When you approach this spot you'll find two blood mages attacking an abomination. If you want to, you can watch the battle and then attack the winner, but you'll get more xp if you can land all of the killing blows yourself. One of the blood mages will drop a
Creationist's Cord when he dies.
You'll also find an apprentice note here. Clicking on the note will update your Quest-Related codex entry for
Watchguard of the Reaching (see above).
18 - Locked Door
You won't be able to go through this door.
19 - Soldier Corpse
On this corpse you'll find a
Chantry Amulet and more. The bracelet is a good gift for Leliana.
20 - Toppled Statue
You'll find a small, glass phylactery in the base of the statue. If you take it, then you'll release an ancient revenant, which will turn around and attack you. You won't be able to damage the revenant with cold attacks, and it'll do lots of damage to any of your characters within melee range, and so the revenant can be very difficult to kill depending on your party make-up.
For best results, you should have one character engage the revenant in melee combat, and have the rest of your characters use ranged attacks. With Wynne plus some health poultices, you should be able to keep your melee fighter alive, and eventually wear the revenant down. If that doesn't work, then you can also use the "bait" strategy, and have the revenant chase one character around while the other characters pelt it with ranged attacks.
Note: The revenant is immune to Wynne's
Enchanter's Staff, but it isn't immune to standard
Acolyte's Staves or
Magic Staves.
When the revenant dies, it will drop some random loot, plus a scrap of paper. The scrap will update the Notes codex entry for
The Black Vials.
21 - First Enchanter Irving's Office
You'll find a bunch of things in the office:
22 - Common Room
When you advance far enough into the common room, you'll get ambushed by some undead creatures, including an arcane horror (which you should immediately take down). After the battle, you'll find a few things of interest inside the room:
- Ancient Texts. Inside them you'll find another
Scroll of Banastor (see #11).
- Apprentice Note. Reading it will update your Quest-Related codex entry for
Watchguard of the Reaching (see above).
- Three Statues. They're involved in the quest "Watchguard of the Reaching" (see above).
23 - Battle
You'll face several abominations and demons in this room. After the battle, you'll find two piles of rags, each containing a scrap of paper. Each scrap will update your Notes codex entry for
Promises of Pride.
24 - Study Chambers
In these four chambers you'll find five torn pages. Each page will update the Quest-Related codex entry for
Five Pages, Four Mages. After picking up all five pages, you'll receive the quest "Five Pages, Four Mages" (see above).
In one of the rooms (#24a), you'll also encounter a desire demon and several charmed templars. The demon will drop the necklace
Shiver when it dies.
25 - Central Chamber
You'll be attacked by an abomination, some skeletons, and some lesser shades when you enter the room. The abomination will drop a
White Runestone and more when it dies. The runestone is a good gift for Alistair.
You'll also find a statue in this room. It's involved in the quest "Watchguard of the Reaching" (see above).
26 - Pile of Rubble
If you click on the pile of rubble then you'll update the Notes codex entry for
Extracurricular Studies.
27 - Bedroom
In this room you'll meet a desire demon and a bewitched templar. You'll have two options for how to deal with them: you can allow them to leave, or you can attack them. Nothing will happen for the former, but with the latter you'll have to fight the happy couple plus four corpses, and you'll receive some xp and some loot for defeating them. In particular, the templar will drop
Templar Armor and a notice of censure (which will give you the Notes codex entry for
Desire and Need) when he dies.
Also in the room you'll find a book, which will give you the Culture and History codex entry for
The Tevinter Imperium, and a vanity, where you'll find
Sun Blonde Vint-1 and more.
28 - Bedroom
In this room you'll encounter a blood mage and three possessed templars. The blood mage will drop
Archon Robes and more when he dies. Also in the room you'll find a pile of books, which will update the Notes codex entry for
Extracurricular Studies.
29 - Central Chamber
This is where you'll meet the sloth demon who will send you to the
Fade.
30 - Charred Corpse
You'll find
The Libertarian's Cowl on the corpse.
31 - Book
Reading the book will give you the Books and Songs codex entry for
The Legend of Calenhad: Chapter 2.
32 - Pile of Books
Examining the books will update the Notes codex entry for
Extracurricular Studies.
33 - Hallway
When you enter this hallway, you'll be attacked by a handful of abominations. One will drop a scrap of paper that will update your Notes codex entry for
Promises of Pride.
34 - Locked Chest
You'll find the
Beastman's Dagger and more in this chest.
35 - Battle
In this room you'll get ambushed by a greater rage demon, a greater shade, and assorted minions.
36 - Cullen
Next to the stairs you'll meet a templar trapped in a magical prison. At first the templar will mistake you for blood magic illusions, but then once he's figured out that you're real, he'll demand that you kill all of the mages in the tower. If you agree, then Wynne (if she's still alive) will turn against you, and you'll have to kill her. You can also disagree with Cullen, or tell him that you'll decide later. Since he's stuck in a cage, he won't be able to do anything about it.
37 - Harrowing Chamber
This is where you'll finally get to deal with Uldred. You'll also meet First Enchanter Irving here.
Exits:
- Exit to the
Lake Calenhad Docks.
- Stairs between the Apprentice Quarters and the Senior Mage Quarters.
- Stairs between the Senior Mage Quarters and the Great Hall.
- Stairs between the Great Hall and the Templar Quarters.
|
|
|


