 Did we miss anything in this section? Is there something we didn't discover?
Let us know!
Walkthrough
Did we miss anything in this section? Is there something we didn't discover?
Let us know!
Walkthrough
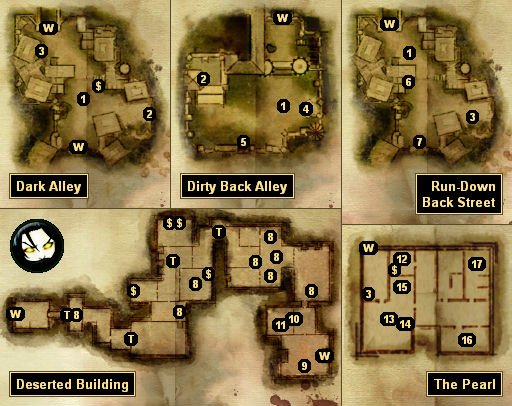
These small zones in Denerim are all optional, but you'll complete some quests in them, plus gain some loot and xp from clearing them out, and so they're worthy to visit before heading off to the
Village of Haven.
Note: The Dark Alley, the Run-Down Back Street, and the Pearl will start out unlocked. To unlock the Dirty Back Alley, you'll need to accept the quest
Back Alley Justice from the chanter's board in the
Denerim Market District. To unlock the Deserted Building, you'll need to loot Ser Friden's corpse (#6).
1 - Bandit Attacks
You'll need to defeat the bandits in these three spots for the quest
Back Alley Justice.
2 - Blood Mage Doors
You'll need to mark these doors for the quest
Blood of Warning.
3 - Hooded Couriers
The couriers are involved in the quest
Grease the Wheels.
4 - Quaint Hovel
The hovel is involved in the quest
Unbound.
5 - Tania
Tania is involved in the quest
Notices of Death.
6 - Ser Friden's Corpse
When you loot the corpse, you'll acquire
Ser Friden's Journal, which will trigger the quest "The Last Request." To complete the quest, you'll need to travel to the Deserted Building (which will now appear on the Denerim map), and defeat all of the blood mages that you'll find there.
You'll encounter blood mages in several places in the building (#8, #9). Each time you face them, you should always gang up on the blood mages first, and then worry about any mercenaries with them. If there are multiple blood mages, then you should split up your party to make sure that at least one character is attacking each mage.
You won't get a reward for completing the quest, but you will get a decent amount of xp for clearing out the building, and you'll also find some useful loot -- like a
Dalish Battery (#9) and a
Magister's Shield (#11) -- while you're inside.
7 - Dirty Hovel
Inside the hovel you'll meet Layson the Deserter, who is involved in the quest
Dereliction of Duty.
8 - Blood Mages
9 - Blood Mage Leader
The blood mage leader will drop a
Dalish Battery, a
Bedroom Key (which will open the door at #10), and close to three sovereigns when he dies.
10 - Locked Door
You can use the
Bedroom Key (#9) to open this door, or you can simply pick the lock.
11 - Chest
Inside this chest you'll find the
Magister's Shield and more. Picking up the shield will give you the Items codex entry for
The Magister's Shield.
12 - Bouncer
The bouncer won't say anything to you, but for some reason you won't be able to enter the room with him until you've defeated Paedaen (#17) in battle. On the counter near the bouncer you'll find a book that will give you the Culture and History codex entry for
The Anderfels.
13 - Sanga
Sanga is the owner of the brothel. For 30-40 silvers, she'll allow you to sleep with a man, a woman, or a "surprise." Alistair and Leliana won't approve of this (at least the first time you do it), but Oghren will. Near Sanga you'll find a book that will give you the Culture and History codex entry for
Culture of Ferelden.
Note: You can pickpocket a
Headband from Sanga.
14 - White Falcon Mercenaries
The White Falcon mercenaries are involved in the quest "Pearls before Swine," which you can pick up from Sergeant Kylon in the
Denerim Market District.
15 - Isabella
When you first enter the brothel, you'll witness Isabella driving off a trio of ruffians, and you'll learn that she's a duelist. If you then play a game of cards with her (and pass one of the numerous rogue checks involved), or if you persuade her to sleep with you, then she'll teach you the duelist specialization.
Note: Under the right circumstances, you can convince Alistair, Leliana or Zevram (or even two of the three) to join you when you sleep with Isabella. For this to work, you'll need to encourage Leliana and Alistair to be less idealistic (which you can do after completing their quests), and you'll need to have slept with them at the party camp. Zevram won't need much in the way of convincing.
On a table near Isabella you'll find a book that will give you the Books and Songs codex entry for
Dane and the Werewolf.
16 - Sal the Grinder
Sal will appear here with a body bag if you're working on the quest
Solving Problems. Also in the room you'll find a locked chest containing a
Love Letter. You'll need
Love Letters for the quest
Correspondence Interruptus.
17 - Paedan
To enter Paedan's room, you'll need to learn the password, which you can pick up from the Grey Warden Poster in the
Denerim Market District. However, once inside you'll discover that Paedan isn't leading an underground movement in support of the Grey Wardens -- he's set a trap for their supporters, and he'll be thrilled to meet you. After the battle, you'll find
Paedan's Orders on his corpse.
Note: Paedan is involved in the quest
The Trial of Crows, but it's safe to kill him before triggering the quest.
Exits:
- World (Denerim city) exit.


