 Did we miss anything in this section? Is there something we didn't discover?
Let us know!
Background
Did we miss anything in this section? Is there something we didn't discover?
Let us know!
Background
You'll automatically receive this quest at the start of Act III.
Walkthrough
Not much will happen with the quest until the end of the act, when after completing the quest
Best Served Cold, you'll receive a message entitled "The Last Straw" at your
Hightown estate. This message will either be from First Enchanter Orsino (if you've been supporting the mages) or Knight-Commander Meredith (if you've been supporting the templars), and it will ask you to visit the
Gallows Courtyard right away.
Note: This is the final quest in the game. Don't accept the message at your estate until you've completed everything else you plan to do.
Another Note: It's possible to lose Anders during the quest. So if he's your only healer, be sure to stock up on potions before you proceed.
A Third Note: Your extra companions might help you during the quest. So be sure to check their equipment and level them up first.
When you arrive at the
Gallows Courtyard, you'll learn that Orsino and Meredith have been arguing again, and that they're currently on their way to the
Chantry to consult with Grand Cleric Elthina. When you catch up to them in
Lowtown, Meredith will accuse Orsino of hiding blood mages in the Circle tower, and she'll demand that the tower be searched from top to bottom. Orsino, meanwhile, will accuse Meredith of seeing blood mages everywhere. You'll then be asked to pick a side, but this decision (if any) won't mean anything because immediately afterward Anders will step in and blow up the
Chantry, killing Elthina and eliminating any chance of compromise.
With Elthina dead, Meredith will invoke the Right of Annulment, and you'll be forced to pick a side. This decision will change the course of the campaign:
- If you choose Meredith and the templars, then Bethany (if she's a Circle mage), Isabela and Merrill will be angry, and they might leave you if you don't have enough friendship or rivalry points with them. Your decision will also cause Orsino to flee to the
Gallows Courtyard, and a group of mages to attack you.
- If you choose Orsino and the mages, then Aveline, Carver (if he's a templar) and Fenris will be angry, and they might leave you if you don't have enough friendship or rivalry points with them. Your decision will also cause Meredith to retreat to the
Gallows Courtyard, and a group of templars to attack you.
After the battle, you'll have to decide what to do with Anders. You'll have at most three options:
- You can keep Anders with you. If you supported the templars, then Anders will refuse to join you (even if you have perfect friendship or rivalry with him), and you'll have to pick a different option.
- You can let Anders go.
- You can kill Anders.
If Anders isn't killed, then Sebastian will vow revenge against Anders, and he'll leave you (even if you have perfect friendship or rivalry with him). You'll then have to form your party out of your remaining companions, which might be exciting if you had several die or desert you. This group will have to do a lot of fighting, so choose carefully.
As you follow Orsino and Meredith to the
Gallows Courtyard, you'll encounter lots of mages, templars and demons (#2-5), most of which you'll have to fight. If Bethany or Carver joined the Grey Wardens during the quest
The Deep Roads Expedition, then you'll also meet a group of Grey Wardens, and you'll be able to recruit your sibling back into your party.
When you reach the
Gallows Courtyard, you'll witness the last civil confrontation between Orsino and Meredith (#7). During this conversation, if any companions other than Sebastian left you earlier (at #1), then you'll get a chance to convince them to come back. At the end, no matter what you say, Orsino will retreat into the Gallows Prison (not shown), and Meredith will wait in the
Gallows Courtyard and give him time to prepare.
Depending on who you supported, one of two things will happen. If you supported the mages, then you and your companions will follow Orsino into the Gallows Prison. If you supported the templars, then you and your companions will wait outside with Meredith. Either way, you'll get a chance to talk to your companions and catch your breath. When you're ready to move on, simply talk to Orsino or Meredith. When you do this, you'll be prompted to choose your companions for the remainder of the quest, and then the fighting will start in earnest.
Siding with the Mages
For this case you'll start out in the Gallows Prison (not shown). After defeating a few waves of templars, Orsino will use blood magic to transform himself into a harvester (which you might remember from the Golems of Amgarrak DLC for Dragon Age: Origins), and you'll have to defeat him. This battle will involve Orsino in multiple forms, plus numerous waves of undead creatures, including arcane horrors, but you'll have all of your extra companions plus possibly Bethany (if she joined the Circle mages) helping you out.
At the end of the battle, you'll receive over 20,000 xp (which should be enough for everybody in your party to gain a level), and you'll find a
Staff of Violation and
Orsino's Signet Ring on Orsino's corpse. If Bethany helped you to defeat Orsino, then you'll be able to recruit her back into your party.
Next up, you'll need to exit the Gallows Prison (via Exit D) and fight your way through the
Templar Hall. You'll encounter lots of demons, mages and templars there. You'll also encounter Sandal (#16), and you'll be able to use him as a shopkeeper and an enchanter. When you exit the hall (via Exit C), if Fenris left your service, then you'll encounter him, too, and you'll have to kill him.
Siding with the Templars
For this case you'll start out in the
Templar Hall in a major battle against mages and demons. If you can, try to kill the mages on the sides of the room first (since they tend to mess up the pathfinding of your companions) and then clear out everything in the middle. Afterwards, three mages will surrender. Cullen will argue in favor of letting them live, while Meredith will argue that they should die. You'll have to make the final choice, but this decision won't change anything.
Next up, you'll need to fight your way through the
Templar Hall to reach the Gallows Prison (via Exit D). Along the way you'll encounter lots of mages and demons, and you'll even run into Sandal (#16), who will act as a shopkeeper and enchanter. If you want to, you can explore the entire
Templar Hall for some extra battles and loot.
In the Gallows Prison, Orsino will use blood magic to transform himself into a harvester (which you might remember from the Golems of Amgarrak DLC for Dragon Age: Origins), and you'll have to battle him plus numerous waves of demons, including some arcane horrors. Meredith and a few templars will help out, and you might also get the assistance of Bethany (if she joined the Circle mages).
At the end of the battle, you'll receive over 20,000 xp (which should be enough for everybody in your party to gain a level), and you'll find a
Staff of Violation and
Orsino's Signet Ring on Orsino's corpse. If Bethany helped you against Orsino, then Meredith will notice her, and you'll have to choose between recruiting Bethany back into your party or allowing Meredith to kill her. Either way, Meredith will return to the Gallows Courtyard and wait for you there.
Note: When you leave the Gallows Prison, you'll find Sandal next to the exit, and you'll be able to use him as a shopkeeper and enchanter again.
Finishing the Quest
When you return to the
Gallows Courtyard (#7), Meredith will decide that you need to die (even if you've been helping her), and she'll draw her sword, which you'll recognize as being crafted from the pure lyrium idol you found during
The Deep Roads Expedition. Cullen will decide to assist you, and you might also gain some other allies during the course of the battle, including your extra companions, Donnic (if you completed the quest
The Long Road), Zevran (if you completed the quest
A Murder of Crows), and Nathaniel (if you completed the quest
Finding Nathaniel).
Meredith will start out as a tough melee boss, but she'll be so outnumbered by your forces that the first part of the battle shouldn't be much of a problem. However, after removing about a quarter of her health, Meredith will start waking up the statues in the courtyard (gate guardians and slave statues), and she'll also start using her lyrium powers, which will make the battle much tougher. But you'll still have a lot of characters on your side (many of which, as far as we can tell, can't be defeated) and so as long as you use potions and healing spells as necessary, and move characters away from the battles if they're too injured, then you should eventually be able to wear Meredith down and defeat her. When Meredith dies, the campaign will come to an end.
Note: If you sided with the templars, then after the battle Cullen and the remaining templars will bow down to you, and you'll become the viscount of Kirkwall. This is the only way to receive the Crowning Glory achievement.
"May the Maker watch over you during the dark times ahead of us."
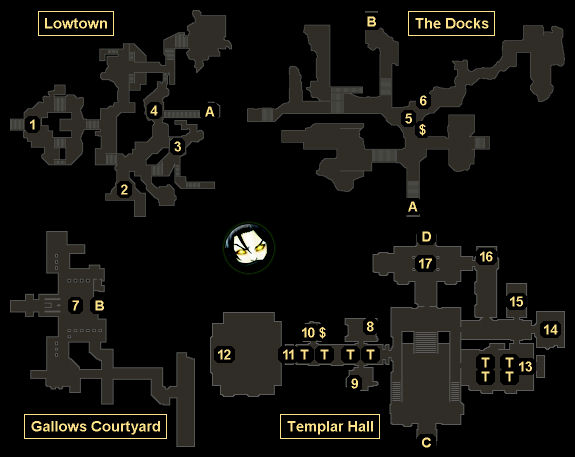
1 - Starting Point
2 - Battle / Rage Demons
At this spot you'll encounter a battle between mages and templars. If you sided with the mages, then you'll have to fight both groups (and so you might want to sit back and watch them duke it out for a while first). If you sides with the templars, then you'll only have to fight the mages.
3 - Desire Demon
4 - Another Battle
You'll encounter more mages and templars fighting each other here, but the mages won't summon any demons, and so the battle will be much easier.
5 - Pride Demon
6 - Document
On the ground here you'll find a piece of paper that will give you or update the "lore" codex entry for The Enigma of Kirkwall. You'll need several of these entries for the
Archaeologist achievement.
7 - Courtyard
8 - Locked Chest
Inside this "master" locked chest, you'll find a
Templar Ceremonial Cummerbund.
9 - Locked Chest
Inside this "standard" locked chest, you'll find the amulet
Dreamcatcher.
10 - Chest
Inside this chest, you'll find a
Dragonhide Mantle of the Predator.
11 - Arcane Horror
12 - Pride Demons
After defeating the demons, you'll find a corpse and a pile of bones here that you'll be able to loot for a
Shield of the Resolute and some potions.
13 - Mage / Templar Battle
14 - Desire Demon
15 - Trapped Room
Inside this room you'll encounter a rage demon and some traps, and you'll find a corpse with not much loot on it. There isn't any way to disarm the traps.
16 - Sandal
At this spot you'll run into Sandal, and you'll be able to use him as a shopkeeper and an enchanter. You'll also find your storage chest here.
17 - Rage Demons
Exits:
- One-way exit to the
Docks.
- One-way exit to the
Gallows Courtyard.
- Entrance to the
Templar Hall.
- Doorway between the
Gallows Prison and the
Templar Hall.
- World exit.


