 Did we miss anything in this section? Is there something we didn't discover?
Let us know!
Background
Did we miss anything in this section? Is there something we didn't discover?
Let us know!
Background
You'll automatically trigger the quest "Mirror Image" at the conclusion of the quest
Blackpowder Courtesy. You'll trigger the quest "Honoring the Fallen" when you talk to Keeper Marethari during the quest "Mirror Image."
Walkthrough
When you talk to Merrill in her home in
Lowtown for the quest "Mirror Image," she'll show you an eluvian that her clan discovered in the Brecilian Forest (which you might remember from the Dalish Elf origins sequence in Dragon Age: Origins). She'll then inform you that she's trying to fix it, but that she needs a special tool -- an arulin'holm -- that is being kept by Keeper Marethari. Since relations between her and the keeper are currently strained, she'll ask you to help her out.
During this conversation with Merrill, you'll get a few chances to earn friendship or rivalry points with her:
- In your first response, if you flirt with her then you'll gain friendship points.
- In your second response, if you ask her if she's crazy then you'll gain rivalry points.
- In your final response, if you agree to help her then you'll gain friendship points, and if you refuse then you'll gain rivalry points.
But regardless of what you say, you'll accept the quest.
When you travel to the Dalish camp on
Sundermount, Keeper Marethari will tell you that a varterral has killed three of her clan's hunters, and she'll make you a deal: if you kill the varterral and recover the possessions of the hunters, then she'll lend you the arulin'holm. This deal will trigger the quest "Honoring the Fallen," which you'll be able to complete at the same time as "Mirror Image."
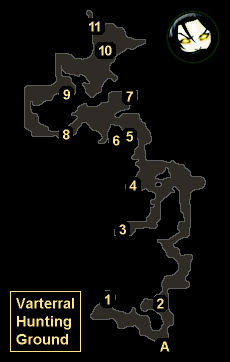
You'll find the varterral (#10) and the remains of the hunters (#2, #3 and #7) in the Varterral Hunting Ground located north of the Dalish camp. As you explore the cave system, you'll get attacked by groups of cave spiders, but then near the end you'll run into an elf named Pol (#8). Pol will be happy to see you -- until he spots Merrill, and then he'll flee in the opposite direction, straight into the varterral. There isn't any way to save Pol, whether you hurry after him or not.
The varterral is a big, nasty boss creature. It'll hit you hard with melee attacks and sometimes summon cave spiderlings to distract you, but it only has two attacks that you'll really need to worry about: it can drop boulders from the ceiling, which will do a lot of damage to anything they land on, and it'll spit some white goop onto the ground, which will cause damage over time to any characters standing in it. You can detect where boulders are about to fall because smaller rocks will drop first, and so that attack can be avoided. For the white goop, you'll just need to pay careful attention to your companions and move them out of the way as necessary. It's also a good idea to keep your ranged attackers as far away from the varterral as possible, so they avoid its area attacks.
When the varterral dies you'll earn about 2600 xp (1600 xp for defeating it, plus 1000 xp for completing a quest objective), and you'll find the longbow
Borderfall on its corpse. Then Merrill will run over to Pol's dead body, and you'll start a conversation with her. To begin the conversation, you can ask "Why did he run?" and earn rivalry points with Merrill, but after that you'll have to say one of three things:
- "Don't blame yourself." This will earn you friendship points with Merrill and rivalry points with Fenris.
- "Do you want some time?" This will earn you friendship points with Merrill.
- "Don't waste your tears." This will earn you rivalry points with Merrill..
After completing the encounter, as you make your way out of the Varterral Hunting Ground, you'll get attacked by all of the undead creatures you passed on your way in, including a Frost Horror near the entrance (Exit A) that will drop the staff
Hubris when it dies. Then when you return to Keeper Marethari, she'll hand the arulin'holm over to you, and she'll make you decide what to do with it. You'll have three options:
- You can immediately hand over the arulin'holm. This will earn you friendship points with Merill, but rivalry points with Anders, Aveline, Fenris and Sebastian.
- You can refuse to hand over the arulin'holm, but then change your mind and give it to Merrill. This will earn you friendship points with Anders and Merrill, but rivalry points with Aveline, Fenris and Sebastian.
- You can refuse to hand over the arulin'holm twice. This will earn you friendship points with Anders, Aveline, Fenris and Sebastian, but (possibly significant) rivalry points with Merrill.
Regardless of what you choose, you'll earn 1000 xp for completing the quest. If you refused to give the arulin'holm to Merrill, then you'll also receive another
Honeycut.
1 - Pile of Bones
Inside this pile of bones you'll find a
Polished Whitewood Amulet.
2 - Hunter Radha's Corpse
Cave spiders and wasp spiders will attack you when you approach this corpse. After the battle when you loot the corpse you'll find
Radha's Amulet.
3 - Hunter Harshal's Corpse
On this corpse you'll find
Harshal's Amulet.
4 - Orichalcum
A group of cave spiders will ambush you when you approach this resource.
5 - Glitterdust
6 - Locked Chest
Inside this "standard" locked chest, you'll find a
Rivaini Seer's Brand.
7 - Hunter Chandan's Corpse
On this corpse you'll find
Chandan's Amulet.
8 - Pol
9 - Deep Mushroom
10 - Varterral
11 - Pile of Treasure
Inside this pile you'll find the dagger
Honeycut.
Exits:
- Exit to
Sundermount.


