 Did we miss anything in this section? Is there something we didn't discover?
Let us know!
Overview
Did we miss anything in this section? Is there something we didn't discover?
Let us know!
Overview
When the game opens up, you'll get to choose your gender and your class. Then a cut scene will begin, and you'll witness the dwarf Varric being interrogated by Cassandra Pentaghast, a Seeker of the Chantry. Cassandra will demand information about the Champion of Kirkwall -- that is, you -- and, after a bit of encouragement, Varric will decide to tell your story. This will lead to a short introduction to the game, during which you and your brother Carver (if you're a mage) or your sister Bethany (otherwise) will take on a whole host of darkspawn, including an ogre at the end. However, this sequence is being wildly exaggerated by Varric, and so you shouldn't have any trouble with the battles. Plus, there isn't any way for you to die. So go ahead and get used to the game's controls, and try out the abilities in the quickbar at the bottom of the screen to see which ones you like best.
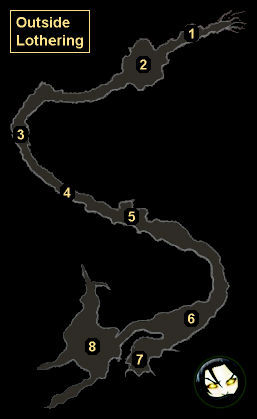
Eventually, Cassandra will grow impatient with Varric's exaggerations, and she'll force him to finally start telling the story as it actually happened. You'll then get to choose your name, your appearance, and a background setting for your character, and you'll start the game for real. When you gain control of your character, you'll trigger the quest "The Destruction of Lothering" (plus possibly several other quests, depending on which DLCs you have), and you'll begin your flight from the darkspawn attack on Lothering (#1). You'll have your mother (a non-combat NPC), your sister Bethany (a mage), your brother Carver (a warrior), and your mabari war hound (a summoned creature) with you, and you'll need to head south towards Kirkwall.
Note: When you choose abilities for you and your companions, it's a good idea for someone in your party to have the heal spell. That's because the cooldown for health potions is so long that your characters might get knocked unconscious if you don't have a second way to restore their health.
As you progress through the zone, you'll be attacked several times (#2-6), but you'll also gain some new allies in Wesley (another non-combat NPC) and Aveline (another warrior). At the end of the zone, you'll be attacked by an ogre (#8), and it will either kill Bethany (if you're playing a mage) or Carver (otherwise). The ogre can be tough, but if you watch its actions, then you'll be able to avoid its charges and its rock throws (since it will "aim" first and then attack).
At the end of the battle against the ogre, you'll meet up with Flemeth. She'll swoop in to defeat the last few remaining darkspawn, and she'll even offer to help you reach Kirkwall -- and all you'll have to do in return is perform a "simple delivery" for her. No matter what you say, you'll accept this deal, and you'll receive the main quest Long Way Home.
At the end of your conversation with Flemeth, you'll discover that Wesley has been tainted by the darkspawn, and that he must be killed. Either you or Aveline will have to complete this deed, but if you allow Aveline to make the decision (by saying "it's up to you"), then you'll gain +10 friendship with her. Otherwise, you'll earn +10 rivalry with her. Afterwards, you'll witness another cut scene with Varric, and then you'll find yourself in the
Gallows Courtyard of Kirkwall.
1 - Starting Point
2 - Darkspawn Attack
Defeating the darkspawn here should give you enough xp to gain a level. You'll also find one or two dead refugees nearby, and they'll have some weapons suitable for your character (although the weapons probably won't be any better than the ones you have already).
3 - Wesley and Aveline
At this spot you'll meet up with Wesley (a wounded templar) and Aveline (a warrior), and they'll join you for your trek south. Depending on what you say to them and what your class is, you'll gain +10 or +15 friendship with Bethany and +5 rivalry with Carver.
4 - Darkspawn Attack
From this point on, most battles will feature enemies attacking you in waves, with new waves just suddenly appearing on the battlefield. That means you shouldn't stray too far from your ranged characters (like Bethany in this fight) or else they might get surrounded and knocked unconscious when you're not looking.
Also at this spot you'll find a dead refugee with some potions.
5 - Darkspawn Attack
You'll find another dead refugee with some potions here, plus some rubble with a random item inside.
6 - Emissary Battle
At this spot you'll encounter a hurlock emissary, plus a complement of hurlock bolters. Deal with the emissary first, and then mop up the rest. This battle should gain you another level.
7 - Supplies
In this cul-de-sac you'll find two more dead refugees with even more potions on them, a simple chest that you'll only be able to unlock if you're playing a rogue, and the "places" codex entry for
The Korcari Wilds. Each codex entry you find will grant you a small amount of xp, and some are even linked to achievements.
8 - Ogre Battle


