 Did we miss anything in this section? Is there something we didn't discover?
Let us know!
Background
Did we miss anything in this section? Is there something we didn't discover?
Let us know!
Background
You'll trigger this quest when you talk to Sa'Sani after fending off Es'San's attack in the Viper Temple.
Walkthrough
Sa'Sani will tell you that the high-ranking members of House Se'Sehen -- including its leader N'Safa -- have gathered in the Temple of the World Serpent in the jungles to the west, and she'll recommend that you go there and eliminate them. Sa'Sani will then leave the temple to rally her house, but at the same time Volo will show up with some goods (mostly potions and ammunition), and you'll be able to use him to stock up. Volo will also give you
Volo's Custom Chicanery and
Volo's Rejuvenating Ring when you talk to him.
Note: When Volo appears in the temple, you'll no longer be able to complete his quests or report any locations to him.
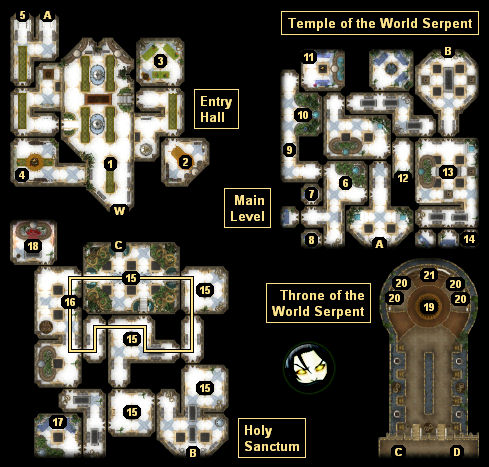
When you enter the Temple of the World Serpent, you'll run into Preacher Madeem (#1), who will mistake you for "the one Sister Ryelle sent from Mezro." This will give you two ways to proceed through the temple:
- If you have enough ranks in the social skills (such as bluff or diplomacy), then you'll be able to convince Preacher Madeem that you're an agent of Zehir, and you'll be able to move through the temple peaceably. This will trigger the quest "Infiltrating the Temple of the World Serpent," which will award you xp as you make your way through the temple without setting off any alarms.
If you attempt to sneak through the temple, then there are two things that you'll have to watch out for: traps and special creatures. Setting off some traps (such as the ones at #15) will also set off the alarms, which will cause everybody in the temple to turn hostile. So you'll need to move slowly and carefully and have the search skill on at all times. Also, while most creatures in the temple won't care about you, certain ones, including Serpentlord Hal'seh (#3), the iron golem (#10), the holy guardians (#16), will realize that you're up to no good and they'll set off the alarms. So you'll either need to avoid them or sneak past them. The easiest way to deal with all of the above is to order your party to stand its ground, and then have your rogue move through the temple alone.
If you successfully sneak through the temple, then you'll gain 5000 xp, but you'll lose out on some loot (since you won't be killing anything).
- If you're not feeling sneaky or diplomatic, then you can also just kill everybody in the temple. None of the battles should be particularly difficult, and you'll get more loot this way, but you'll only earn about 1000 xp.
- You can also do both. After sneaking through the temple and completing the "Infiltrating" quest, you can immediately turn around and kill everybody, and get the rewards for both methods.
Regardless of how you make your way to the throne room (#19), when you get there you'll encounter Hierophant N'Safa, the Herald of Zehir, two yuan-ti purebloods, and four Snaketongue zealots (#20). They won't want to talk to you. After a few words of encouragement from Zehir, they'll attack.
This battle can be easy or difficult depending on how you've built your party, and what level you are. If your party is powerful, then you can probably just let the AI handle the fight, and give out a few orders where needed. If your party isn't as powerful, then you might need to use some of these tips:
- When you enter the throne room, you'll be safe, and so you should take the time to buff up your party. Spells like bless, (persistent) haste, and mass death ward -- and whatever else you can toss out -- are a good idea. If you need to, you can always leave the temple (by returning all the way to Exit W) and rest.
- The zealots will be stationed next to special crystals (#20) that will allow them to heal their allies, and so you should kill them right away. The zealots won't move, and they're not very powerful, so a couple of area-effect spells at each pair should do the trick. You might also want to assign your weakest melee character to mop them up.
- Depending on your difficulty level, the herald (#19) can have substantial resistances and be immune to certain spells (like missile storms). For best results, you should use cold iron weapons against him.
- High level summoned creatures are useful for distracting enemies while you bomb them with spells.
- If you have to, you can always travel back to a crafting station somewhere and do some crafting and enchanting. Adamantine or mithral armor, elemental resistances, and cold iron weapons are all useful, and you should have found the recipes for these things during your travels.
- At worst, you can just wander around the overland map for a while and gain some levels. The bosses in the last fight are only about level 16, so if you advance to level 20, then you should have a much easier time.
At the end of the battle, you'll gain the Serpent's Bane feat, and you'll find the
Fang of Zehir, a
Tower Shield +3, and a
Periapt of Wisdom +6 on the remains. You'll also be able to click on the altar in the back of the room (#21) and talk to Zehir for a bit, but nothing will come of the conversation. Zehir will just ominously promise to see you again.
To complete the quest, you'll need to return to Sa'Sani in the Viper Temple. You'll be able to teleport there directly when you leave the Temple of the World Serpent (Exit D). You'll gain 3000 xp when you talk to Sa'Sani, and you'll be able to turn the conversation down a variety of paths, including starting a fight or making Sa'Sani promise never to harm anyone ever again. If you kill Sa'Sani, then you'll find
Bracers of Armor +8, a
Ring of Protection +3, a
Ring of Freedom of Movement, and yet another
Periapt of Wisdom +6 on her corpse.
To end the campaign, just click on the player menu button in the lower left-hand corner of the screen and select "retire." You should also get a "retire" option when you leave most locations. You can also continue to play if you want, but you won't face anything more challenging than the battle against N'Safa and the Herald.
1 - Preacher Madeem
2 - Snaketongue Merchant
The merchant will have a small selection of items for sale, but you won't get good prices from him.
3 - Serpentlord Hal'Seh
If you talk to the serpentlord, then he'll raise the alarm. If you kill him, then you'll find the scimitar
Tsaa Olo's Disaster on his corpse.
4 - Scrying Orb
With enough skill in spellcraft, you'll be able to use the orb to scry N'Safa's location and gain 1000 xp.
5 - Armory
Inside the armory you'll find some useful items, including a
Longsword +3,
Full Plate +3, a
Heavy Shield +3, a
Chain Shirt +3,
Boots of Reflexes +3, a
Cloak of Resistance +3, an
Amulet of Natural Armor +3, a
Composite Longbow (3), and 99
Arrows +3.
6 - Nessa
If you're diplomatic or intimidating with Nessa, then she'll give you a hint about how to open the door to the Holy Sanctum (Exit B).
7 - Chest
Inside this small room you'll find a chest containing 10
Healer's Kits +10 and a
Kukri +3.
8 - Chest
Inside this small room you'll find a chest containing a
Ring of Protection +3, a
Coin of Life, and 2000 gp.
9 - Trapped Corridor
You'll encounter over a dozen magical dart traps in this corridor. If you disarm them all, then you'll receive about 3000 xp.
10 - Iron Golem
If the iron golem spots you, then it will raise the alarm.
11 - Se'Sehen Almanac
If you're sneaking through the temple, then you'll need the information from the almanac here to open the door leading to the Holy Sanctum (Exit B). The door will ask you two (random) questions. The first question will come from this pairing:
- Deepwinter :: Greengrass
- The Melting :: Midsummer
- Highsun :: Highharvestide
- Leaffall :: Midwinter
The second question will come from this pairing:
- Marpenoth :: Mirtul
- Alturiak :: Hammer
- Eleasias :: Tarsakh
- Kythorn :: Ches
12 - Library
Inside the library you'll meet a Snaketongue Archivist. If you talk to him, then he'll recognize you from Samargol. With enough ranks in any of the social skills, you'll be able to convince him that he's mistaken. Otherwise, you'll need to kill him before he reaches the exit, or else he'll raise the alarm.
Also in the library, in a bookshelf in the back, you'll find spell scrolls for
Gate,
Meteor Swarm,
Mordenkainen's Disjunction, and
Wail of the Banshee.
13 - Serpentlord Ar'Sulis
If you kill the serpentlord, then he'll drop the scimitar
Venomdrinker.
14 - Chest
Inside this small room you'll find a chest containing a
Wand of Cure Critical Wounds, an
Amulet of Will +3, and a
Ring of Major Cold Resistance.
15 - Traps
You'll find a handful of traps in each of these rooms.
16 - Holy Guardians
A pair of holy guardians will patrol along the route shown (although, at least for us, they frequently got stuck). If the holy guardians spot you, then they'll raise the alarm, so you'll either need to sneak past them or avoid them.
17 - Chest
Inside this chest you'll find a
Bastard Sword +3, a
Tower Shield +3, a
Wand of Restoration, and 10,000 gp.
18 - Serpentlord Ul'Shan's Chamber
If you kill the serpentlord, then he'll drop a
Ring of Greater Cold Resistance plus some spell scrolls. Also in the chamber you'll find a lever. If you fight your way through the temple, then you might need to use the lever to unlock the door to the throne room (Exit C).
19 - Throne Room
20 - Crystals
21 - Altar
Exits:
- Doorway between the Entry Hall and the Main Level.
- Doorway between the Main Level and the Holy Sanctum. If you fight your way through the temple, then this door will be unlocked. If you sneak your way through the temple, then the door will be locked, and you'll have to answer two questions (see #11) to get through it. You'll gain 2000 xp for passing the test.
- Doorway between the Holy Sanctum and the Throne of the World Serpent. If you fight your way through the temple, then you'll either need to pull a lever (#18) or pick the lock to get the door open. If you sneak your way through the temple, then the door will be open.
- World exit. You won't be able to use this exit until you've defeated N'Safa and the Herald of Zehir (#19).
- World exit.


